
Building a SaaS with AI: deploying in days NOT months and scaling to many!
You don't need to spend one year building an app. You can build a SaaS that is an MVP and deploy within a week to get user feedback and start generating income.

In this blog I will take you from creating a new GitLab and NextJS project all the way through to deploying to Sevalla cloud hosting provider for the end user and all the steps in between.
What are we building and why?
We are going to build a multi-tenancy fullstack monitoring platform that pings web page URLs on a scheduler (cron) every X minutes and records the results. This will include the status code, the size of the response and how long it took to make the request, allowing us to show to the user the status of the web page at any given time, as well as their uptime for a select period. For example; 7 days or 1 month. In addition we will store the time it took to make the request, so that the user can see how fast or slow their platform is performing over time.
Why is a platform like this important? When we build a website or web app, we trust that it is always up, but we cannot be sure. There are many moving parts, from the database to the domain. Having an independent regular check that stores the results if we need to refer back to them and notifies us if something goes wrong, means you can take immediate action to solve any issues that arise.
Tools needed for this project
To follow along with this blog, here is the list of tools which I used.
GitLab
Cursor AI
NextJS + Tailwind (TailwindCSS) + Shadcn
Prisma + Postgres (PostgreSQL)
Clerk
Sevalla cloud hosting
Why these tools?
The tools I list in this post are my personal favourites, but feel free to swap out any for your preferred ones.
GitLab
GitLab will give you not only a git repository (“repo”), but also has all the project management tools to make your life easier; such as Issues, Issue Boards, as well as CI/CD and a Service Desk where a user’s message will end up straight to your GitLab project - very cool!
CursorAI
There are many AI development tools out there. Cursor has a great dedicated IDE which makes the whole process much more streamlined. For example, you can use AI in the terminal to explain or even fix an error.
NextJS (Typescript) + Tailwind (TailwindCSS) + Shadcn
These frameworks and libraries are a great combination to build a fullstack app. There are a lot of content and examples out there using them, which means AI loves these tools also. Just be careful with the version you are using and the code AI generates, as it can often get the version wrong - Typescript and the Linter can help with this which comes out of the box with NextJS.
NextJS has a Linter setup, this will run when you deploy using the NextJS build command, but I recommend you run this before you push to save you time. You can use the tool Husky as a git hook so you don’t have to remember.
Prisma + Postgres (PostgreSQL)
Prisma and Postgres have great DX (Developer Experience) as well as being mature products, making them super reliable.
Clerk
There are many authentication options out there - I know I have tried out many over the years - and they all have their pros/cons. Clerk works out of the box within minutes and has many useful features. Plus it also has a generous free tier.
Sevalla Cloud Hosting
This has all the cloud features you need to launch your app fast from your GitLab/GitHub/Bitbucket projects and scale to millions. However it is still super affordable with straightforward and clear pricing. Sevalla is a great choice to host your fullstack app and database. I especially love the architecture diagram they generate of your setup, as it gives a clear picture of your setup and allows you make any changes you need.
As you add more services like a scheduler / cron or database the diagram updates and includes those services and how they all connect together.
Chapter 1: Setting up the GitLab project
Many people skip this step thinking it will slow them down and it is not as important as the code. However I feel it is super important to create good foundations so that we can keep track of the code changes and plan the tasks we need to do. Plus having CI (Continuous Integration) and CD (Continuous Deployment) brings many efficiencies and improves quality. It doesn’t take long to set up and will help you think throughout the duration of the project and beyond.
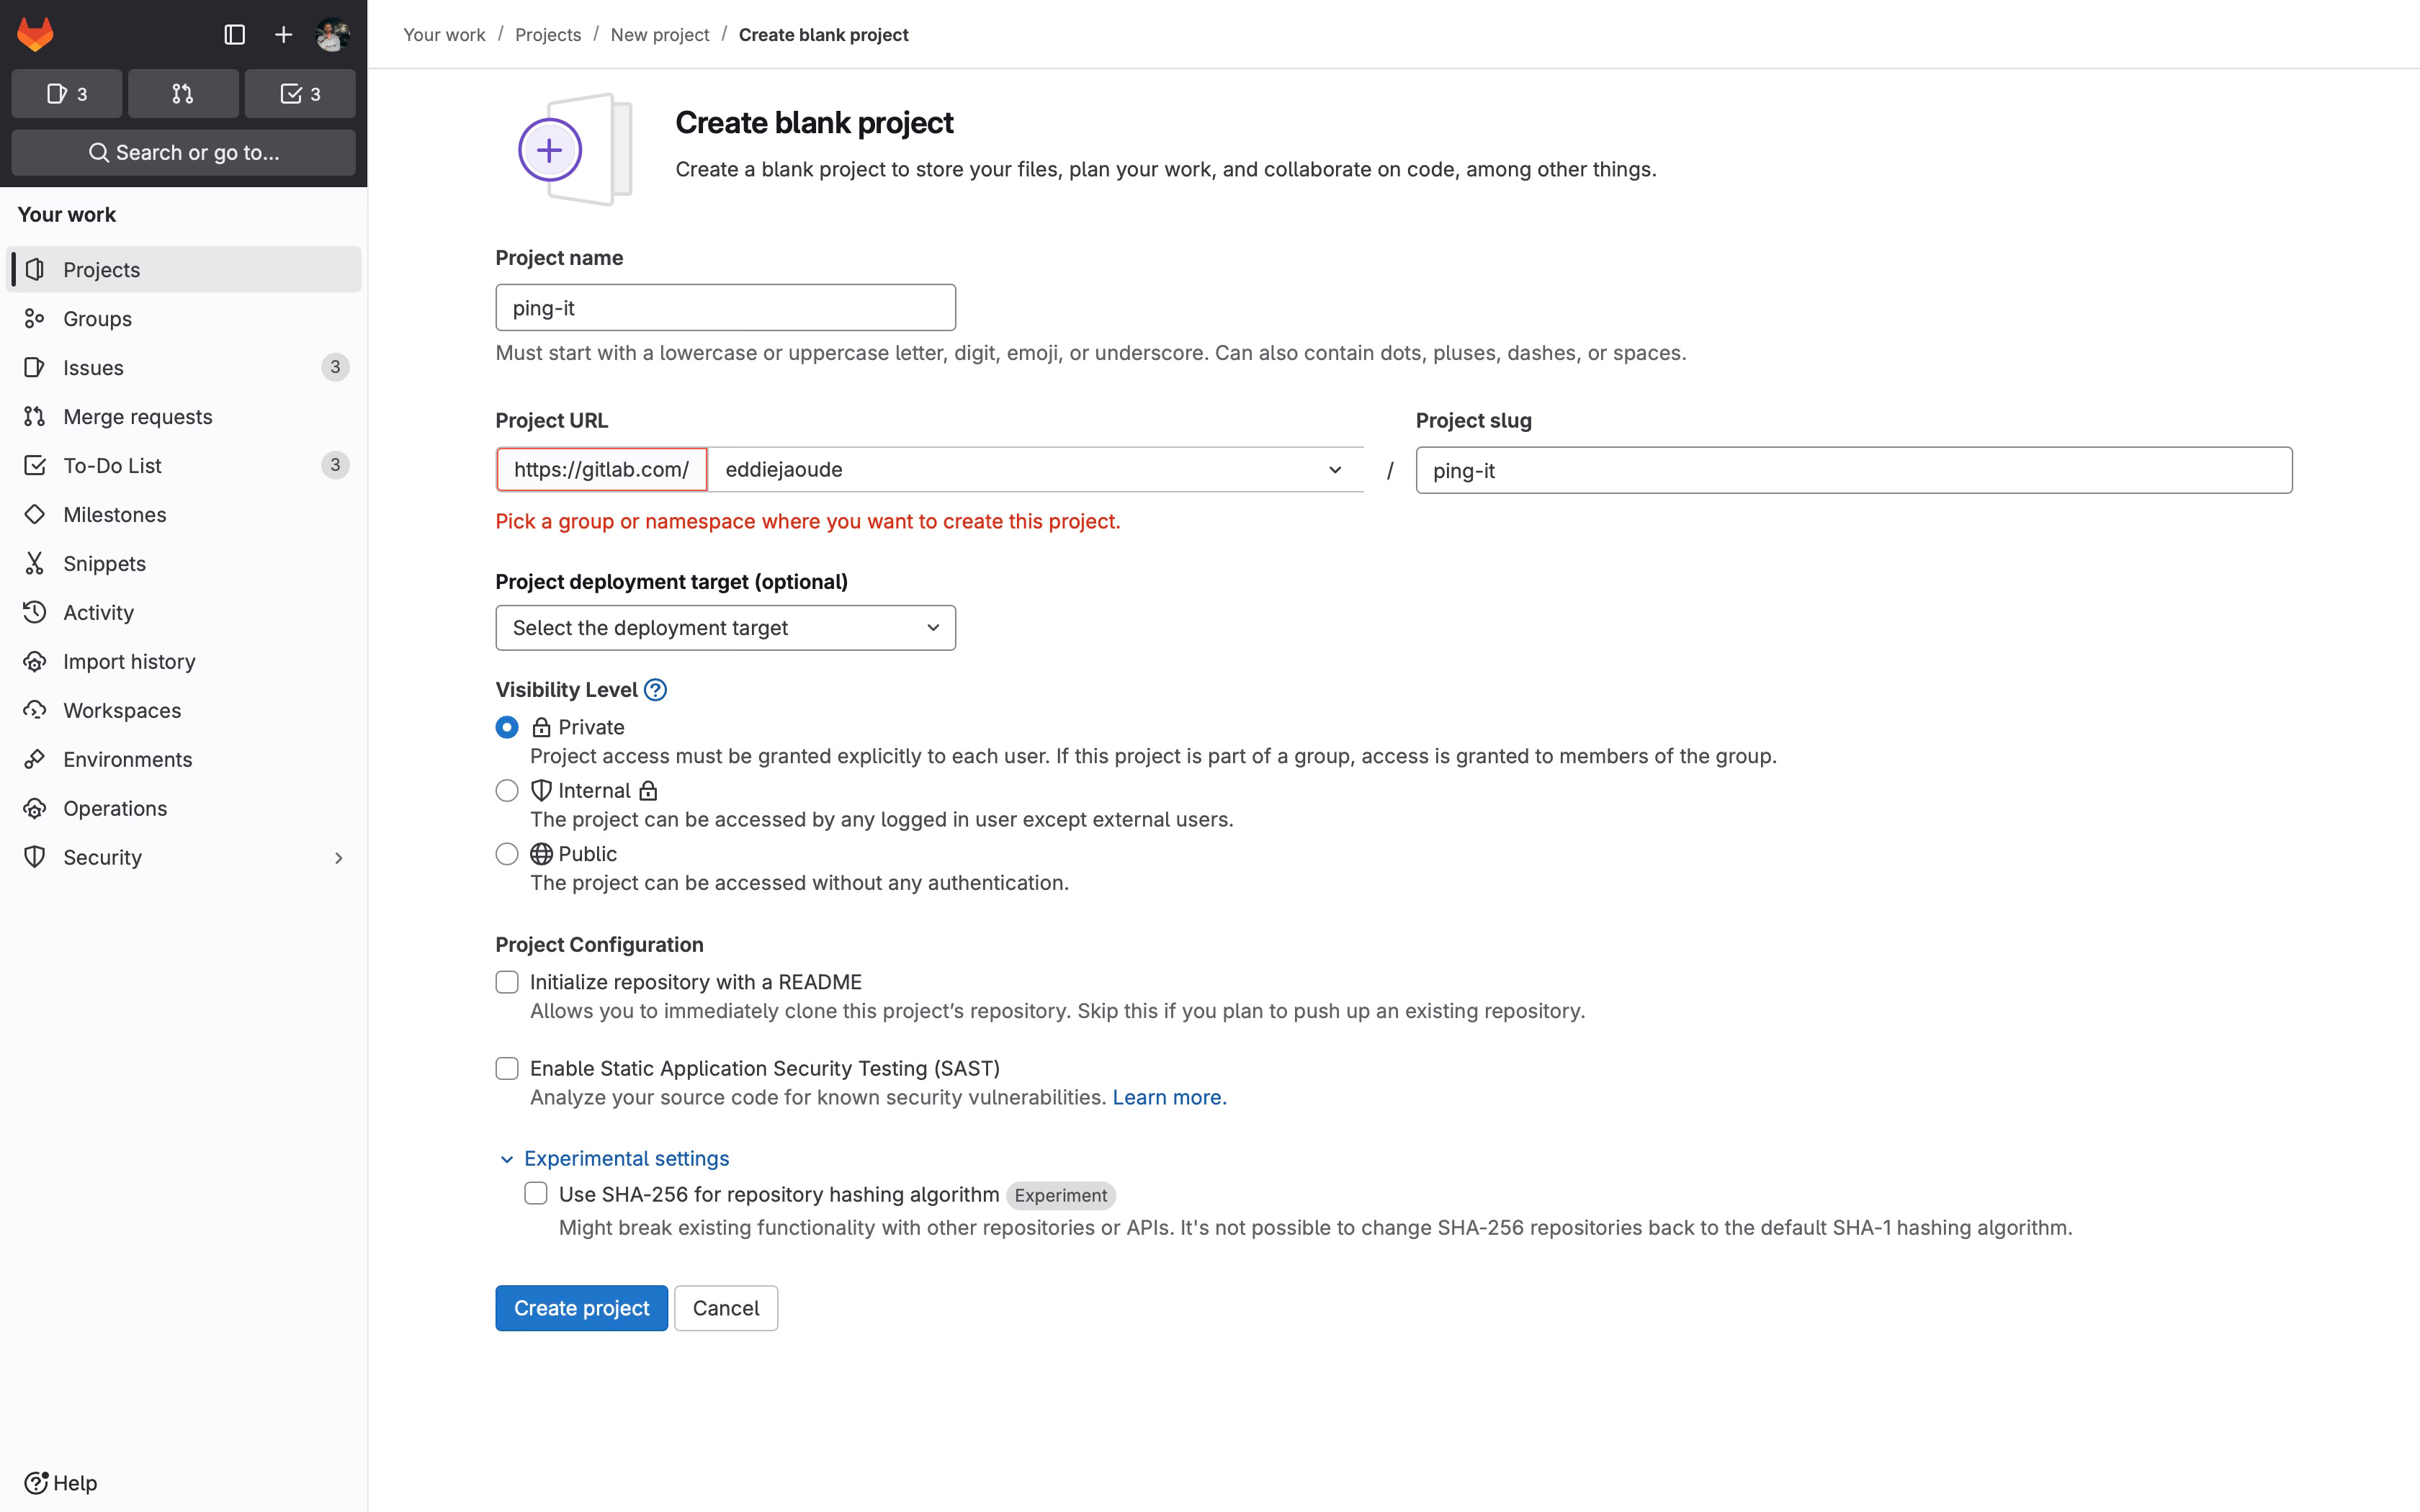
Create the GitLab Project
You need to create a unique name within your GitLab group. I am creating the PingIt project under my username.
Once the GitLab project is successfully created you will see the following page:

Create Issues for the project's features
This first pass at creating Issues does not need to be perfect. I suggest you see this as a good way to make a note of the initial tasks that come to mind. You can always split larger tasks later on when you get to them and create more as you discover that you need them.
At this stage I create only the tasks that I need for the MVP (“Minimal Viable Product”), so I can keep a clear focus. Any ideas that would fall under a version 5 stage could be a distraction at this point and also clutter the Issue Board. You could opt to add these could go under a single issue called “future ideas” to ensure you don’t forget about them.
I prefer to create Issues directly on the Issue Board so I can visually see the progress, plus I love dragging them over to the “done” column! Before we can do that on GitLab we need to create some Labels as these will become the board’s columns.
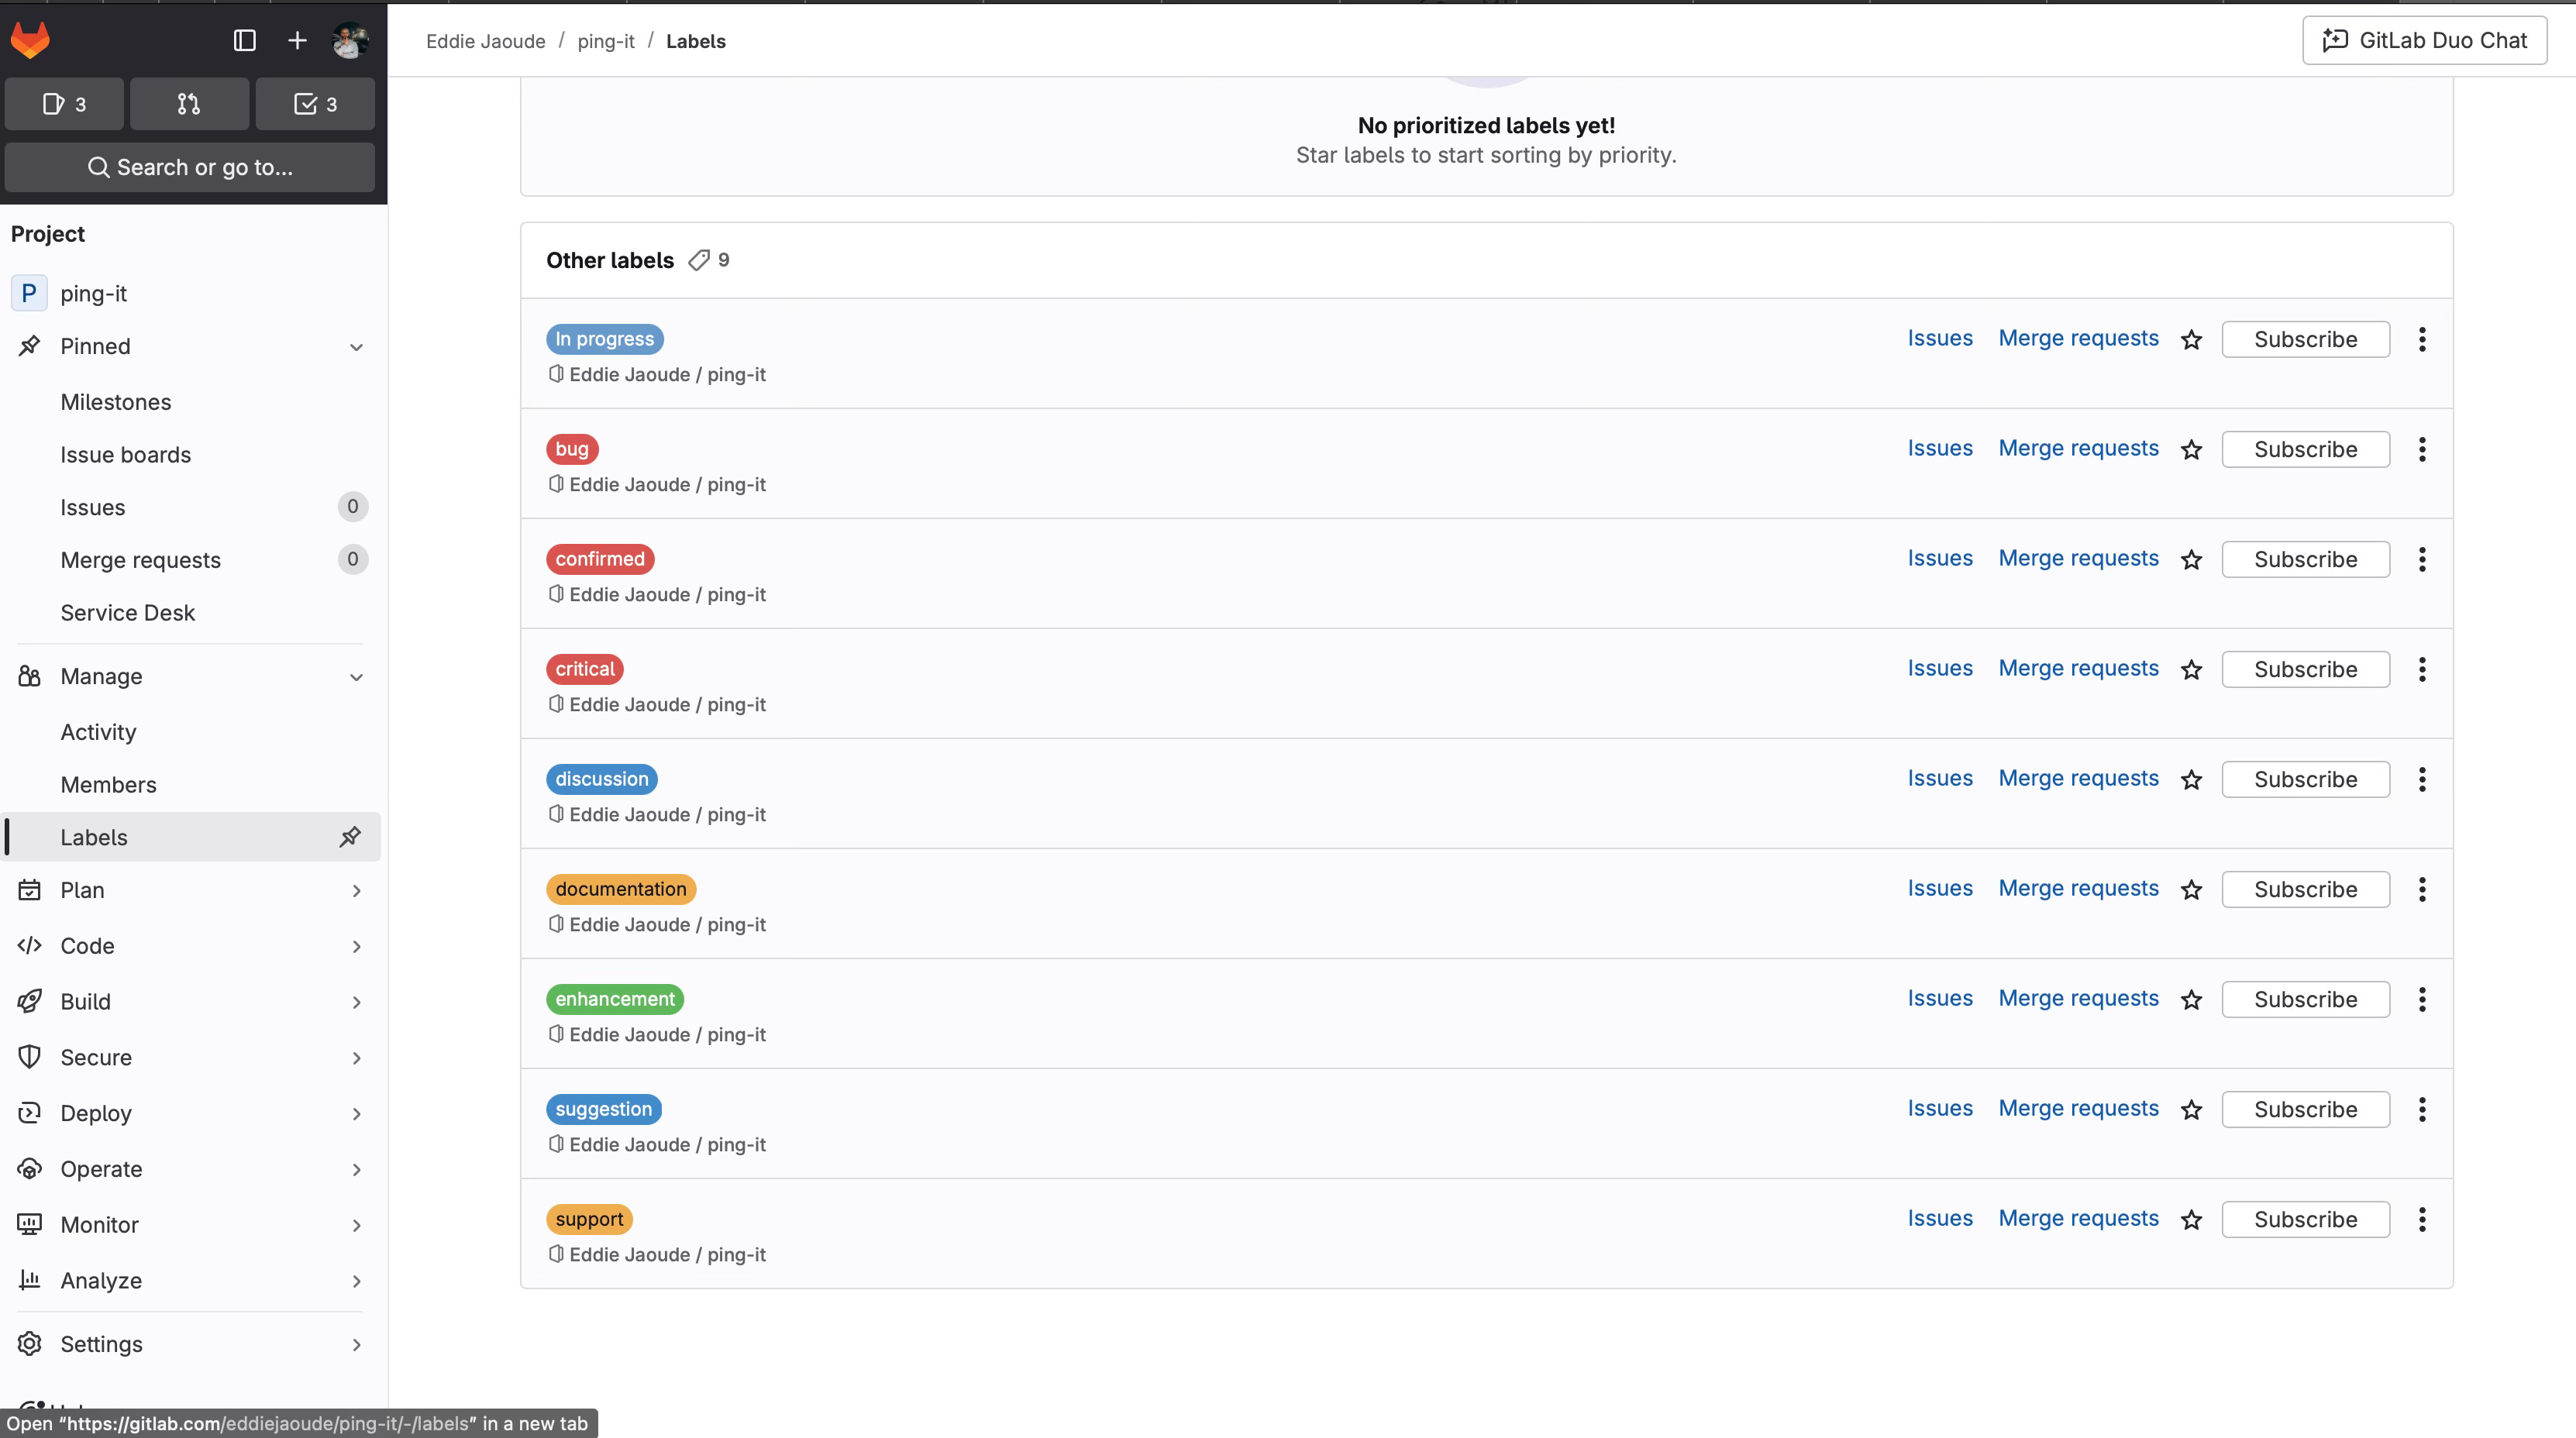
Create Labels
Under “Manage” click “Labels”. You will be presented with “generate” labels: I did this as well as adding one new label “In progress”. These are useful for filtering Issues as well as creating buckets (columns) in the next step.
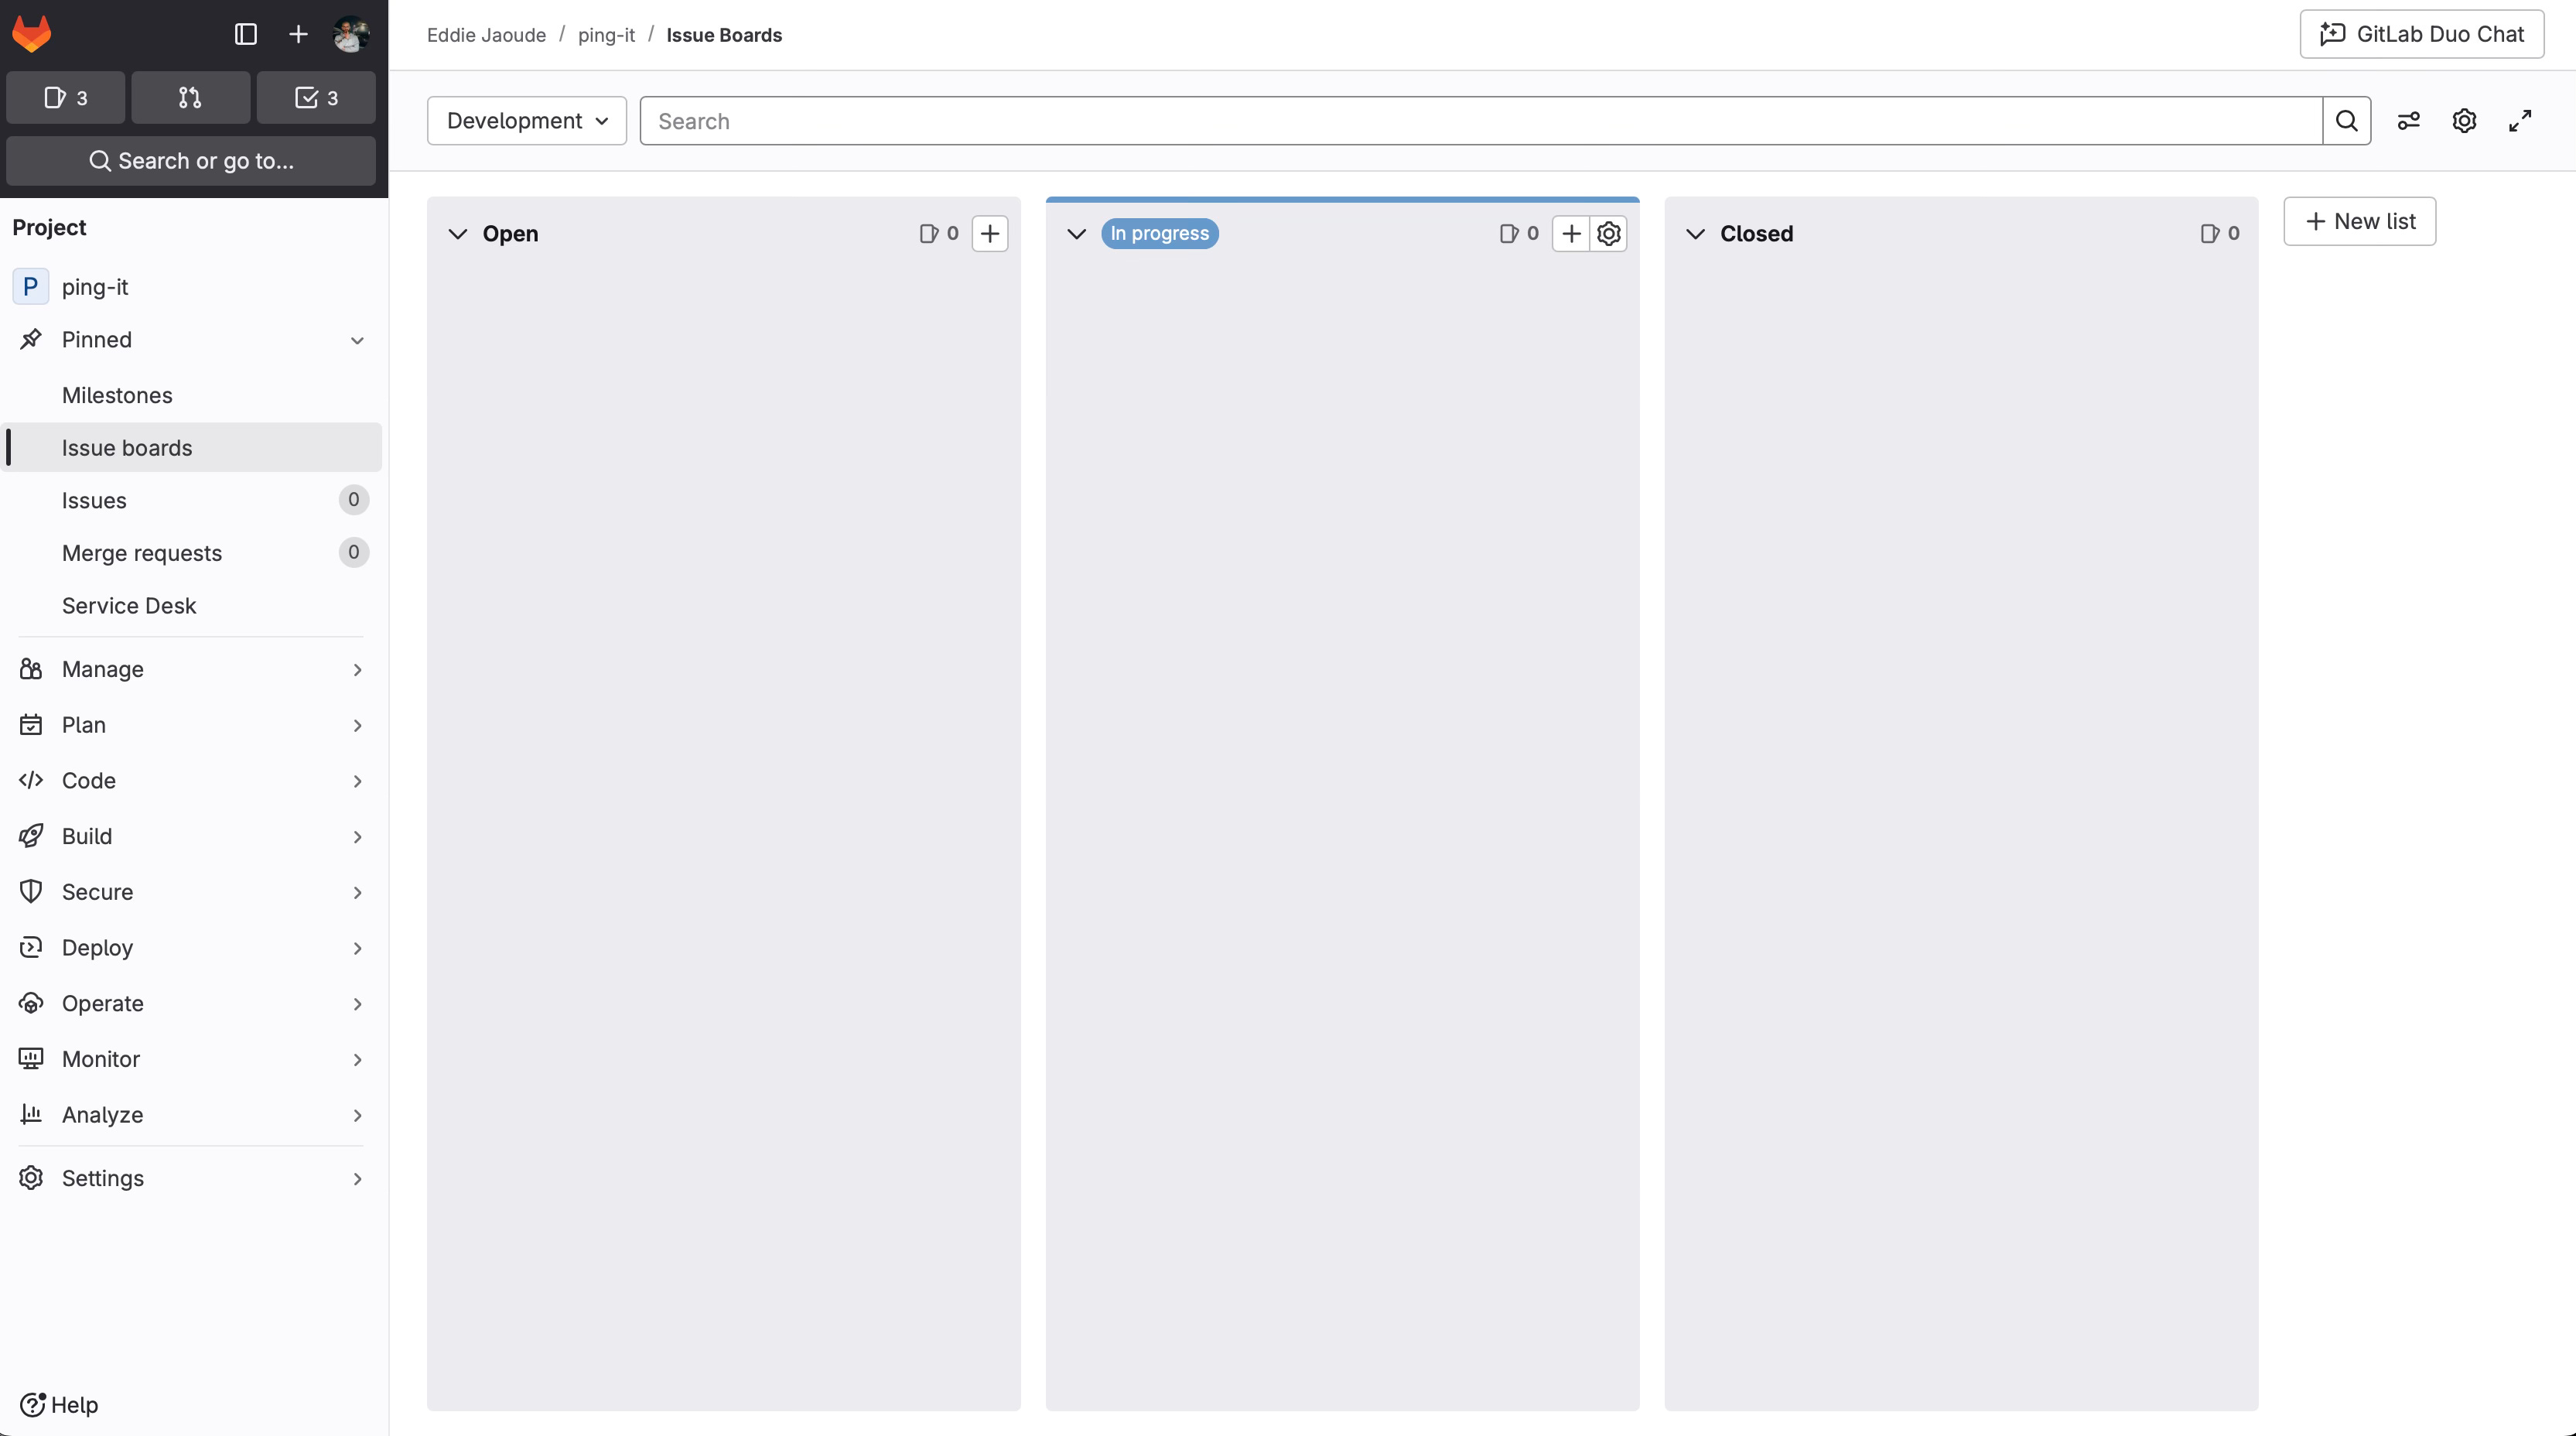
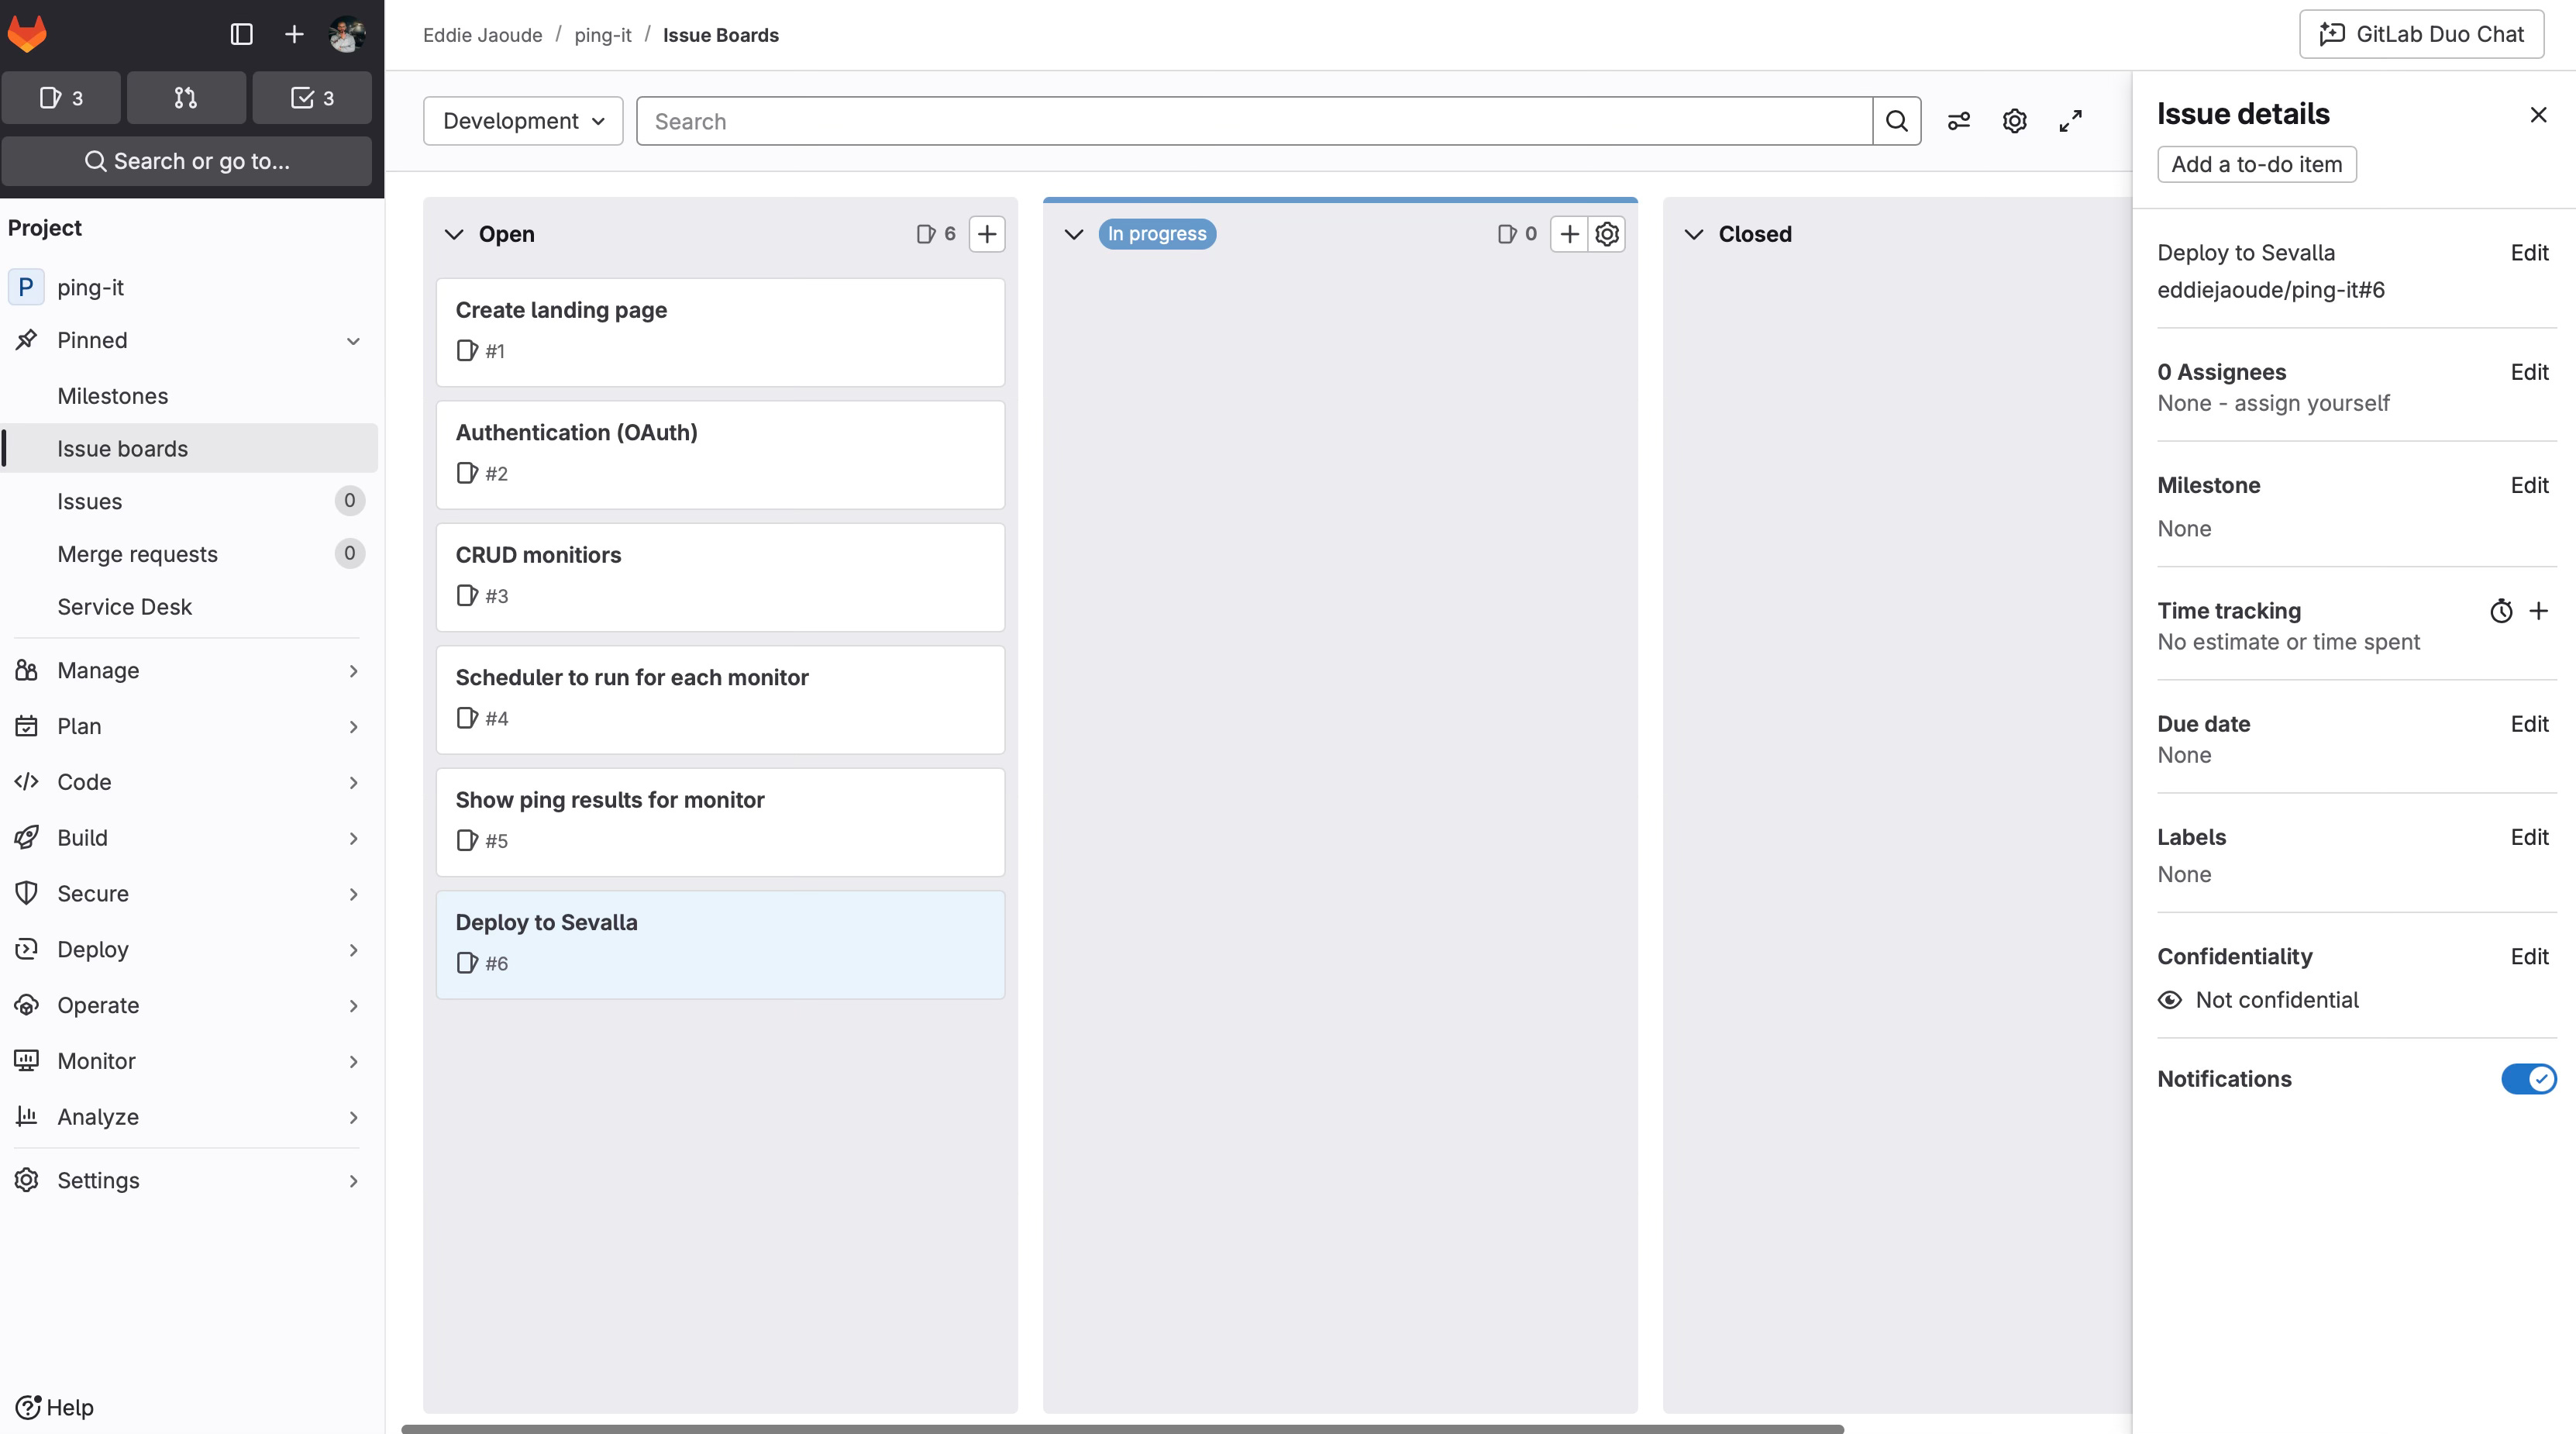
Issue Board
Now under the “Plan” section:
Click on “Issue boards“ (I have it pinned on my side navigation).
Click “New list”.
Select the “In progress” Label we created earlier.
Then you will see the following board. We will probably add more columns later but for now, let’s keep things simple and focus on the MVP.
Create specific Issues
I have created the high level Issues and the board looks like this:
For each Issue I will have a task list of things I need to do. If a task is too big, it will have it’s own specific Issue, which I can then break down further into sub-tasks.
Here is an example of what a sub-task with checkboxes looks like in the Issue:
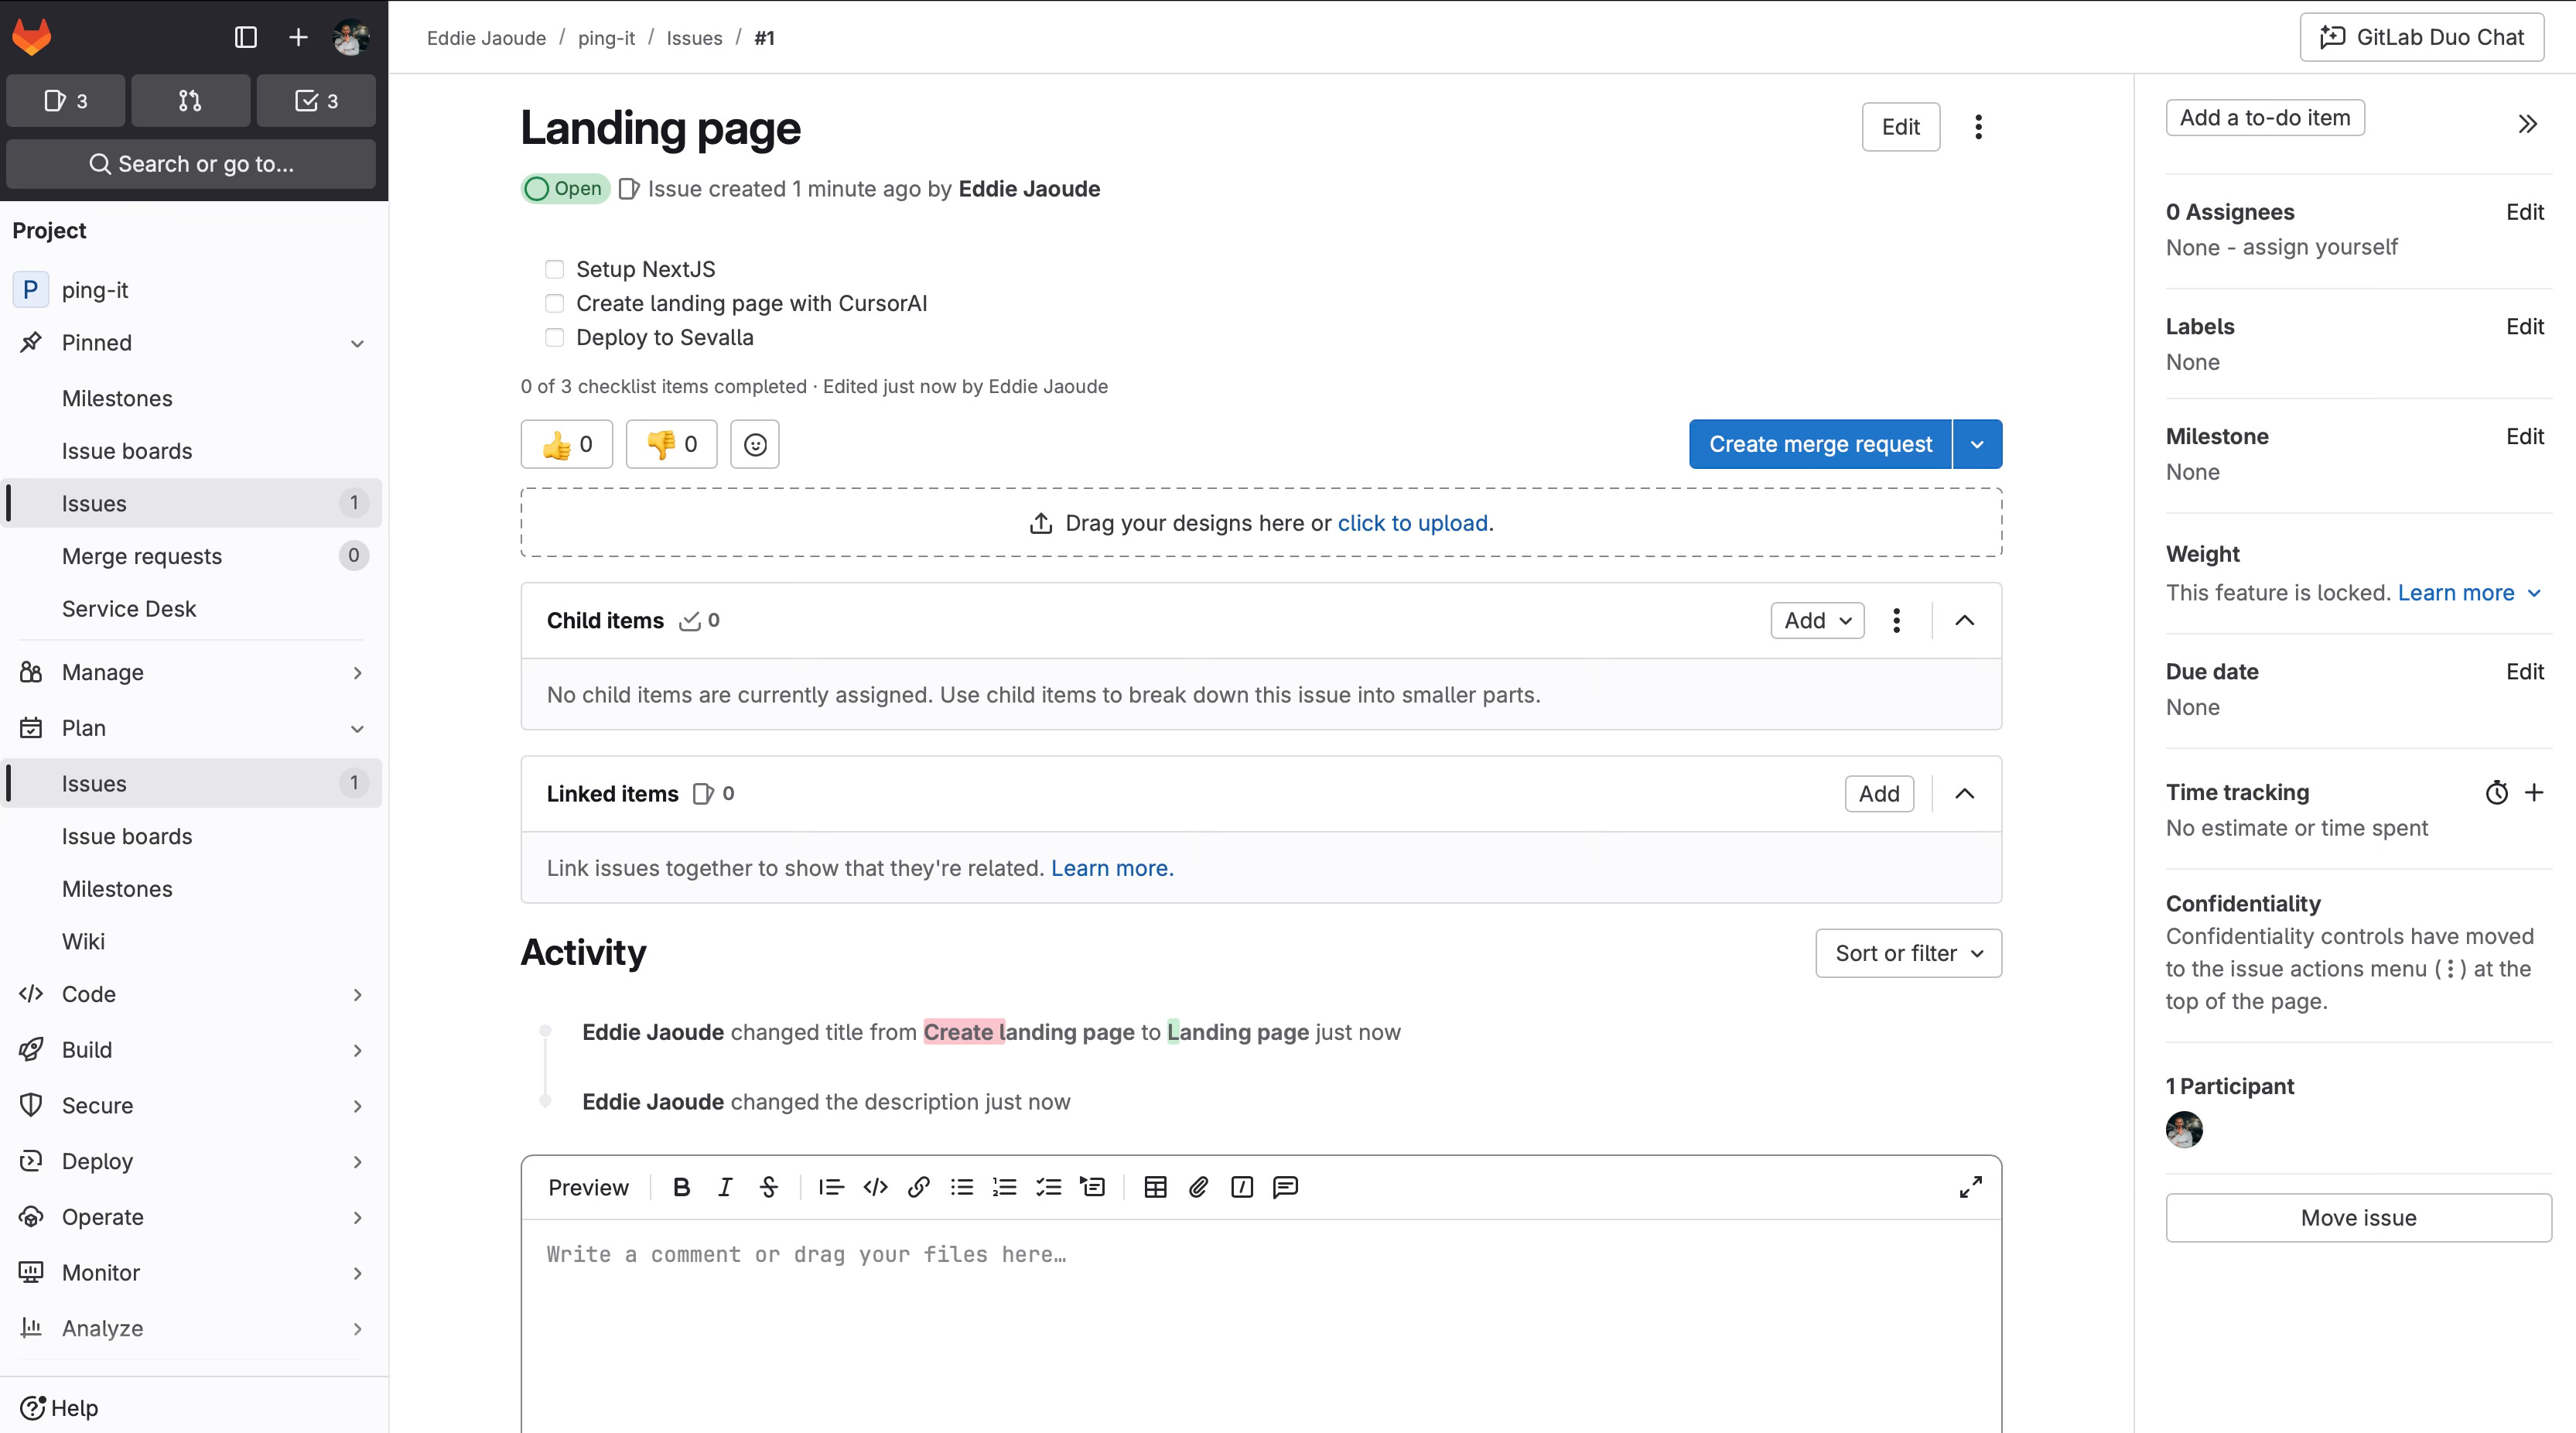
I check each task off as I go. The feeling is almost as good as moving the card over to the “done” column!
In Markdown you can create a checklist using the following (the blank spacing around the square brackets is important):
- [x] Item 1 completed and checked
- [ ] Item 2 not complete and not checked
Chapter 2: Creating the NextJS project
Using the NextJS CLI command to create a new project:
npx create-next-app@latest ping-it
Need to install the following packages:
create-next-app@15.1.7
Ok to proceed? (y)

✔ Would you like to use TypeScript? … No / Yes
✔ Would you like to use ESLint? … No / Yes
✔ Would you like to use Tailwind CSS? … No / Yes
✔ Would you like your code inside a `src/` directory? … No / Yes
✔ Would you like to use App Router? (recommended) … No / Yes
✔ Would you like to use Turbopack for `next dev`? … No / Yes
✔ Would you like to customize the import alias (`@/*` by default)? … No / Yes
Creating a new Next.js app ping-it.

Using npm.

Initializing project with template: app-tw


Installing dependencies:
- react
- react-dom
- next

Installing devDependencies:
- typescript
- @types/node
- @types/react
- @types/react-dom
- postcss
- tailwindcss
- eslint
- eslint-config-next
- @eslint/eslintrc


added 376 packages, and audited 377 packages in 28s

143 packages are looking for funding
  run `npm fund` for details

found 0 vulnerabilities
Initialized a git repository.

Success! Created ping-it
Navigate into the new directory:
cd ping-itConnect GitLab Repo with our local git repo, using the git remote command:
git remote add origin git@gitlab.com:eddiejaoude/ping-it.gitNow push the local changes to the git Repo on GitLab:
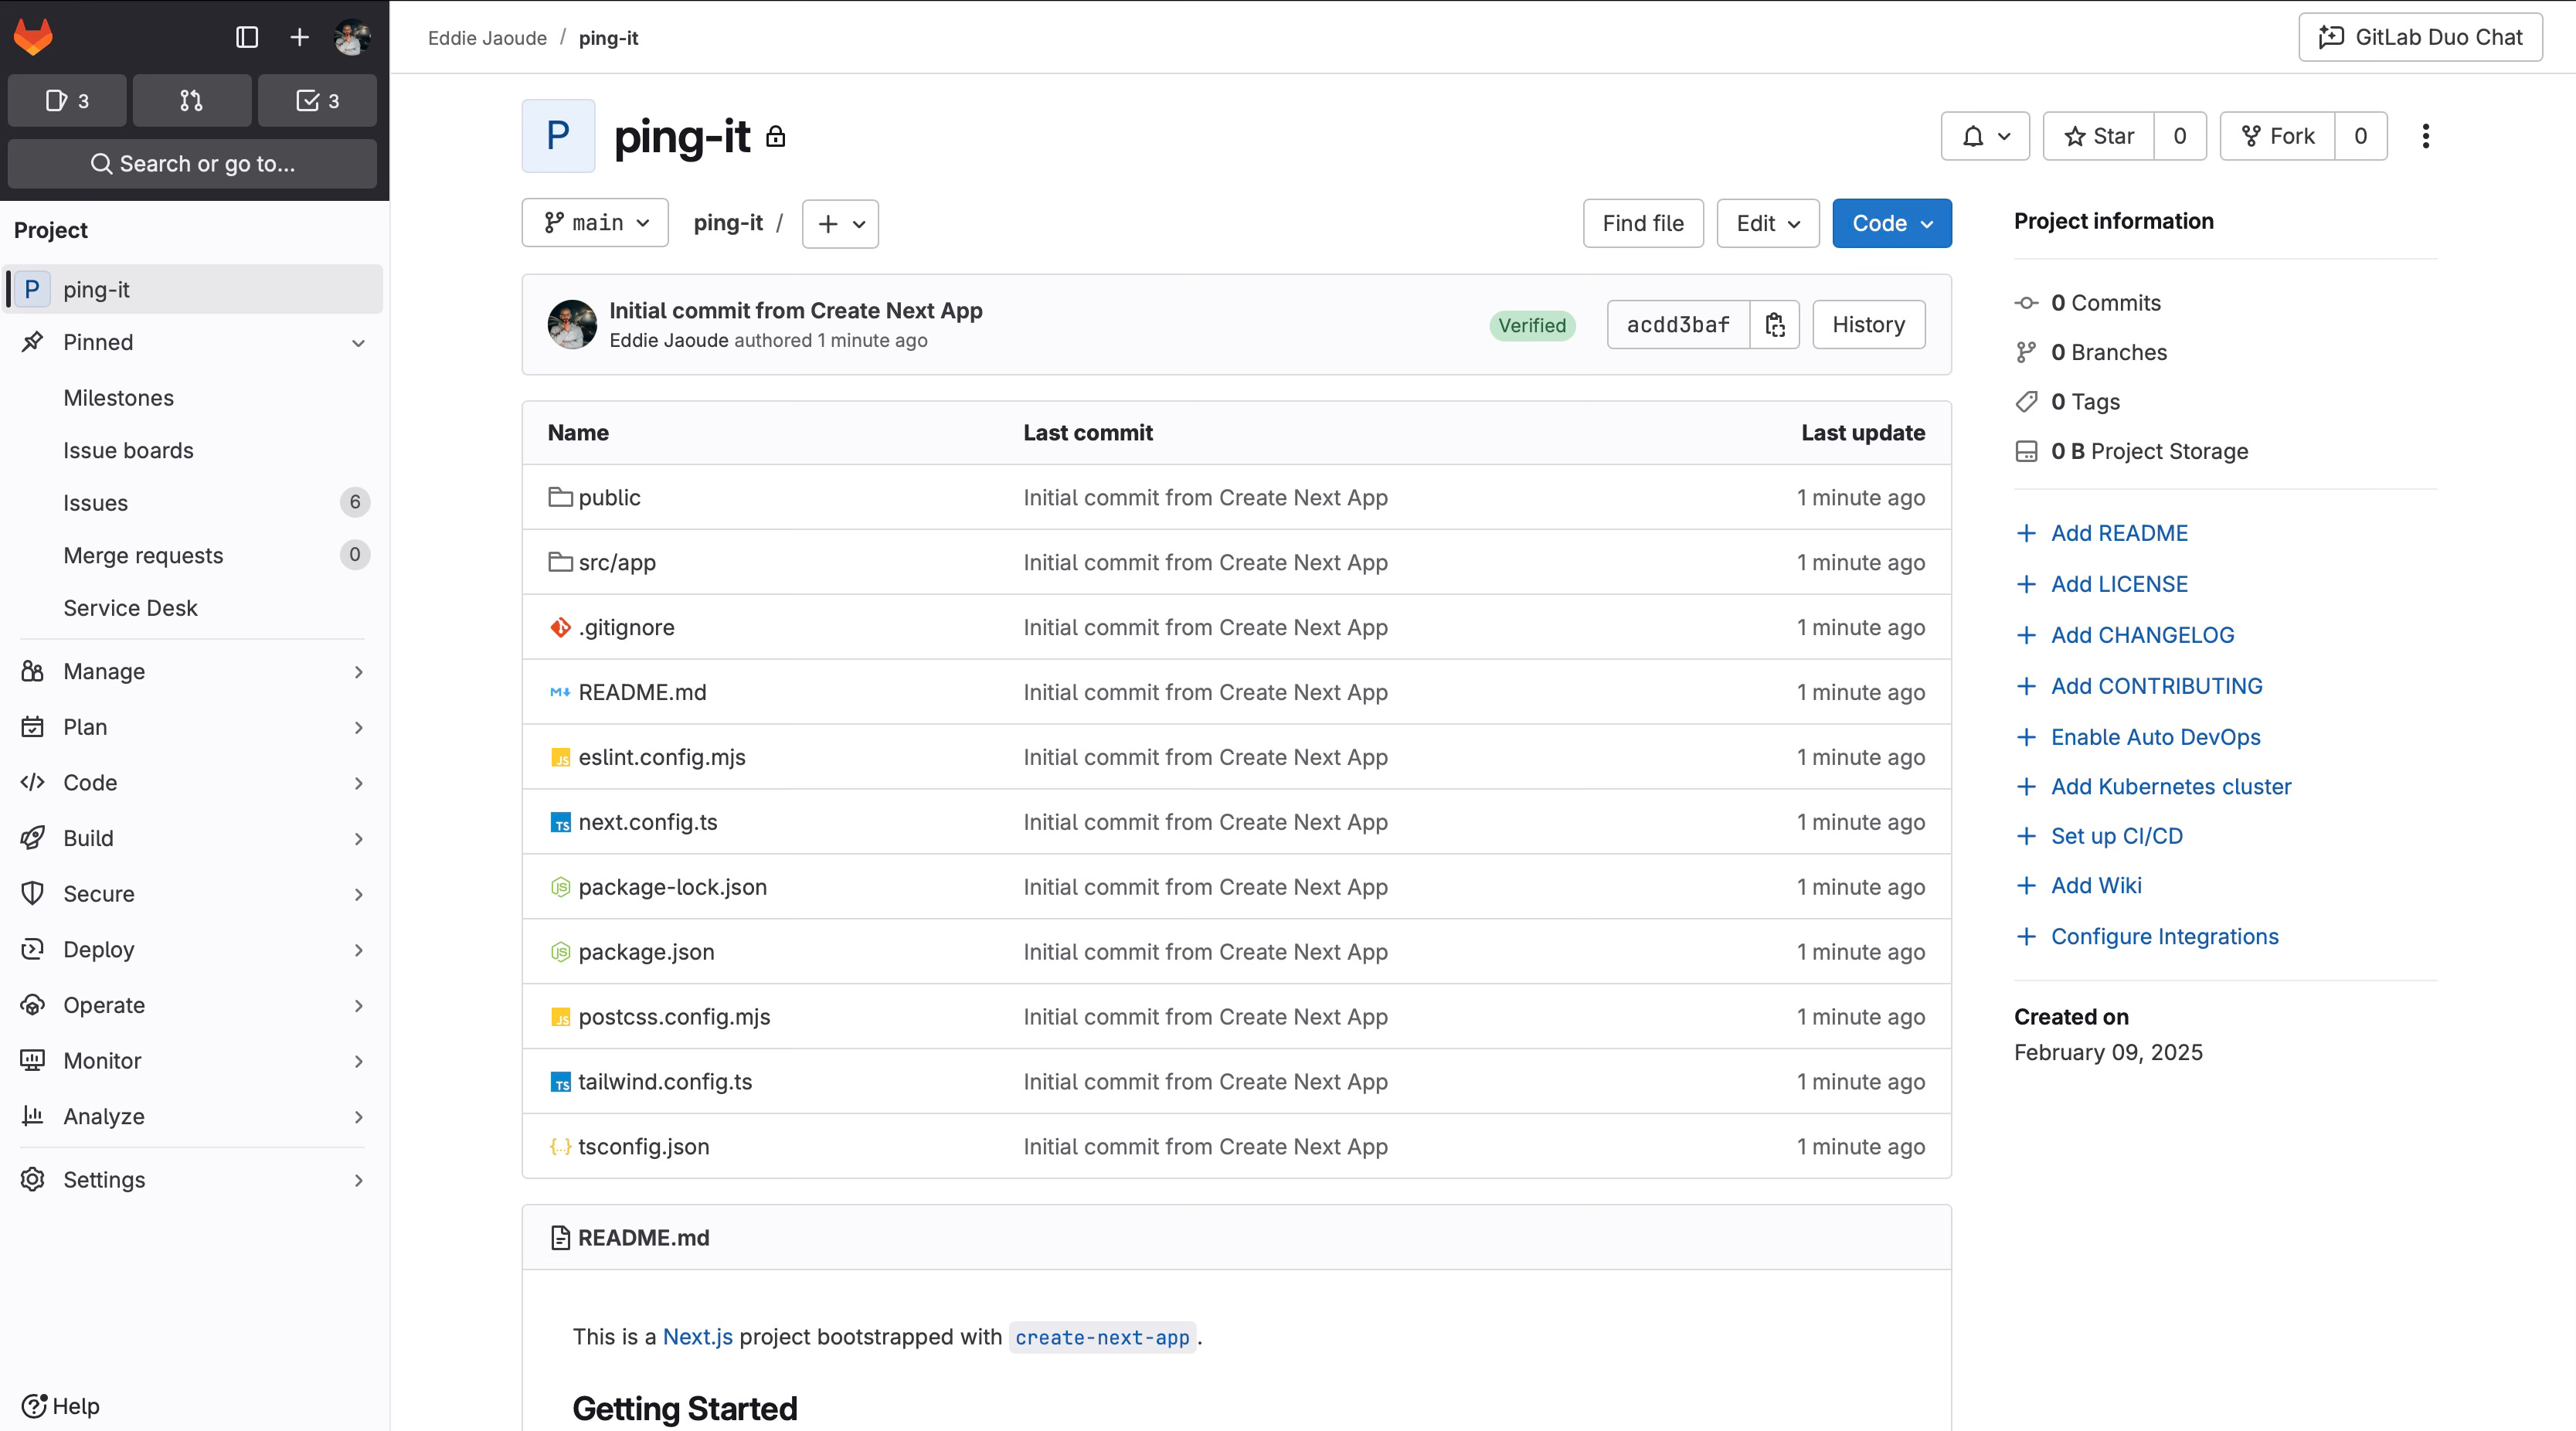
git push origin mainIf you refresh the GitLab project page, you will see the code files:
Chapter 3: Generating a static landing page
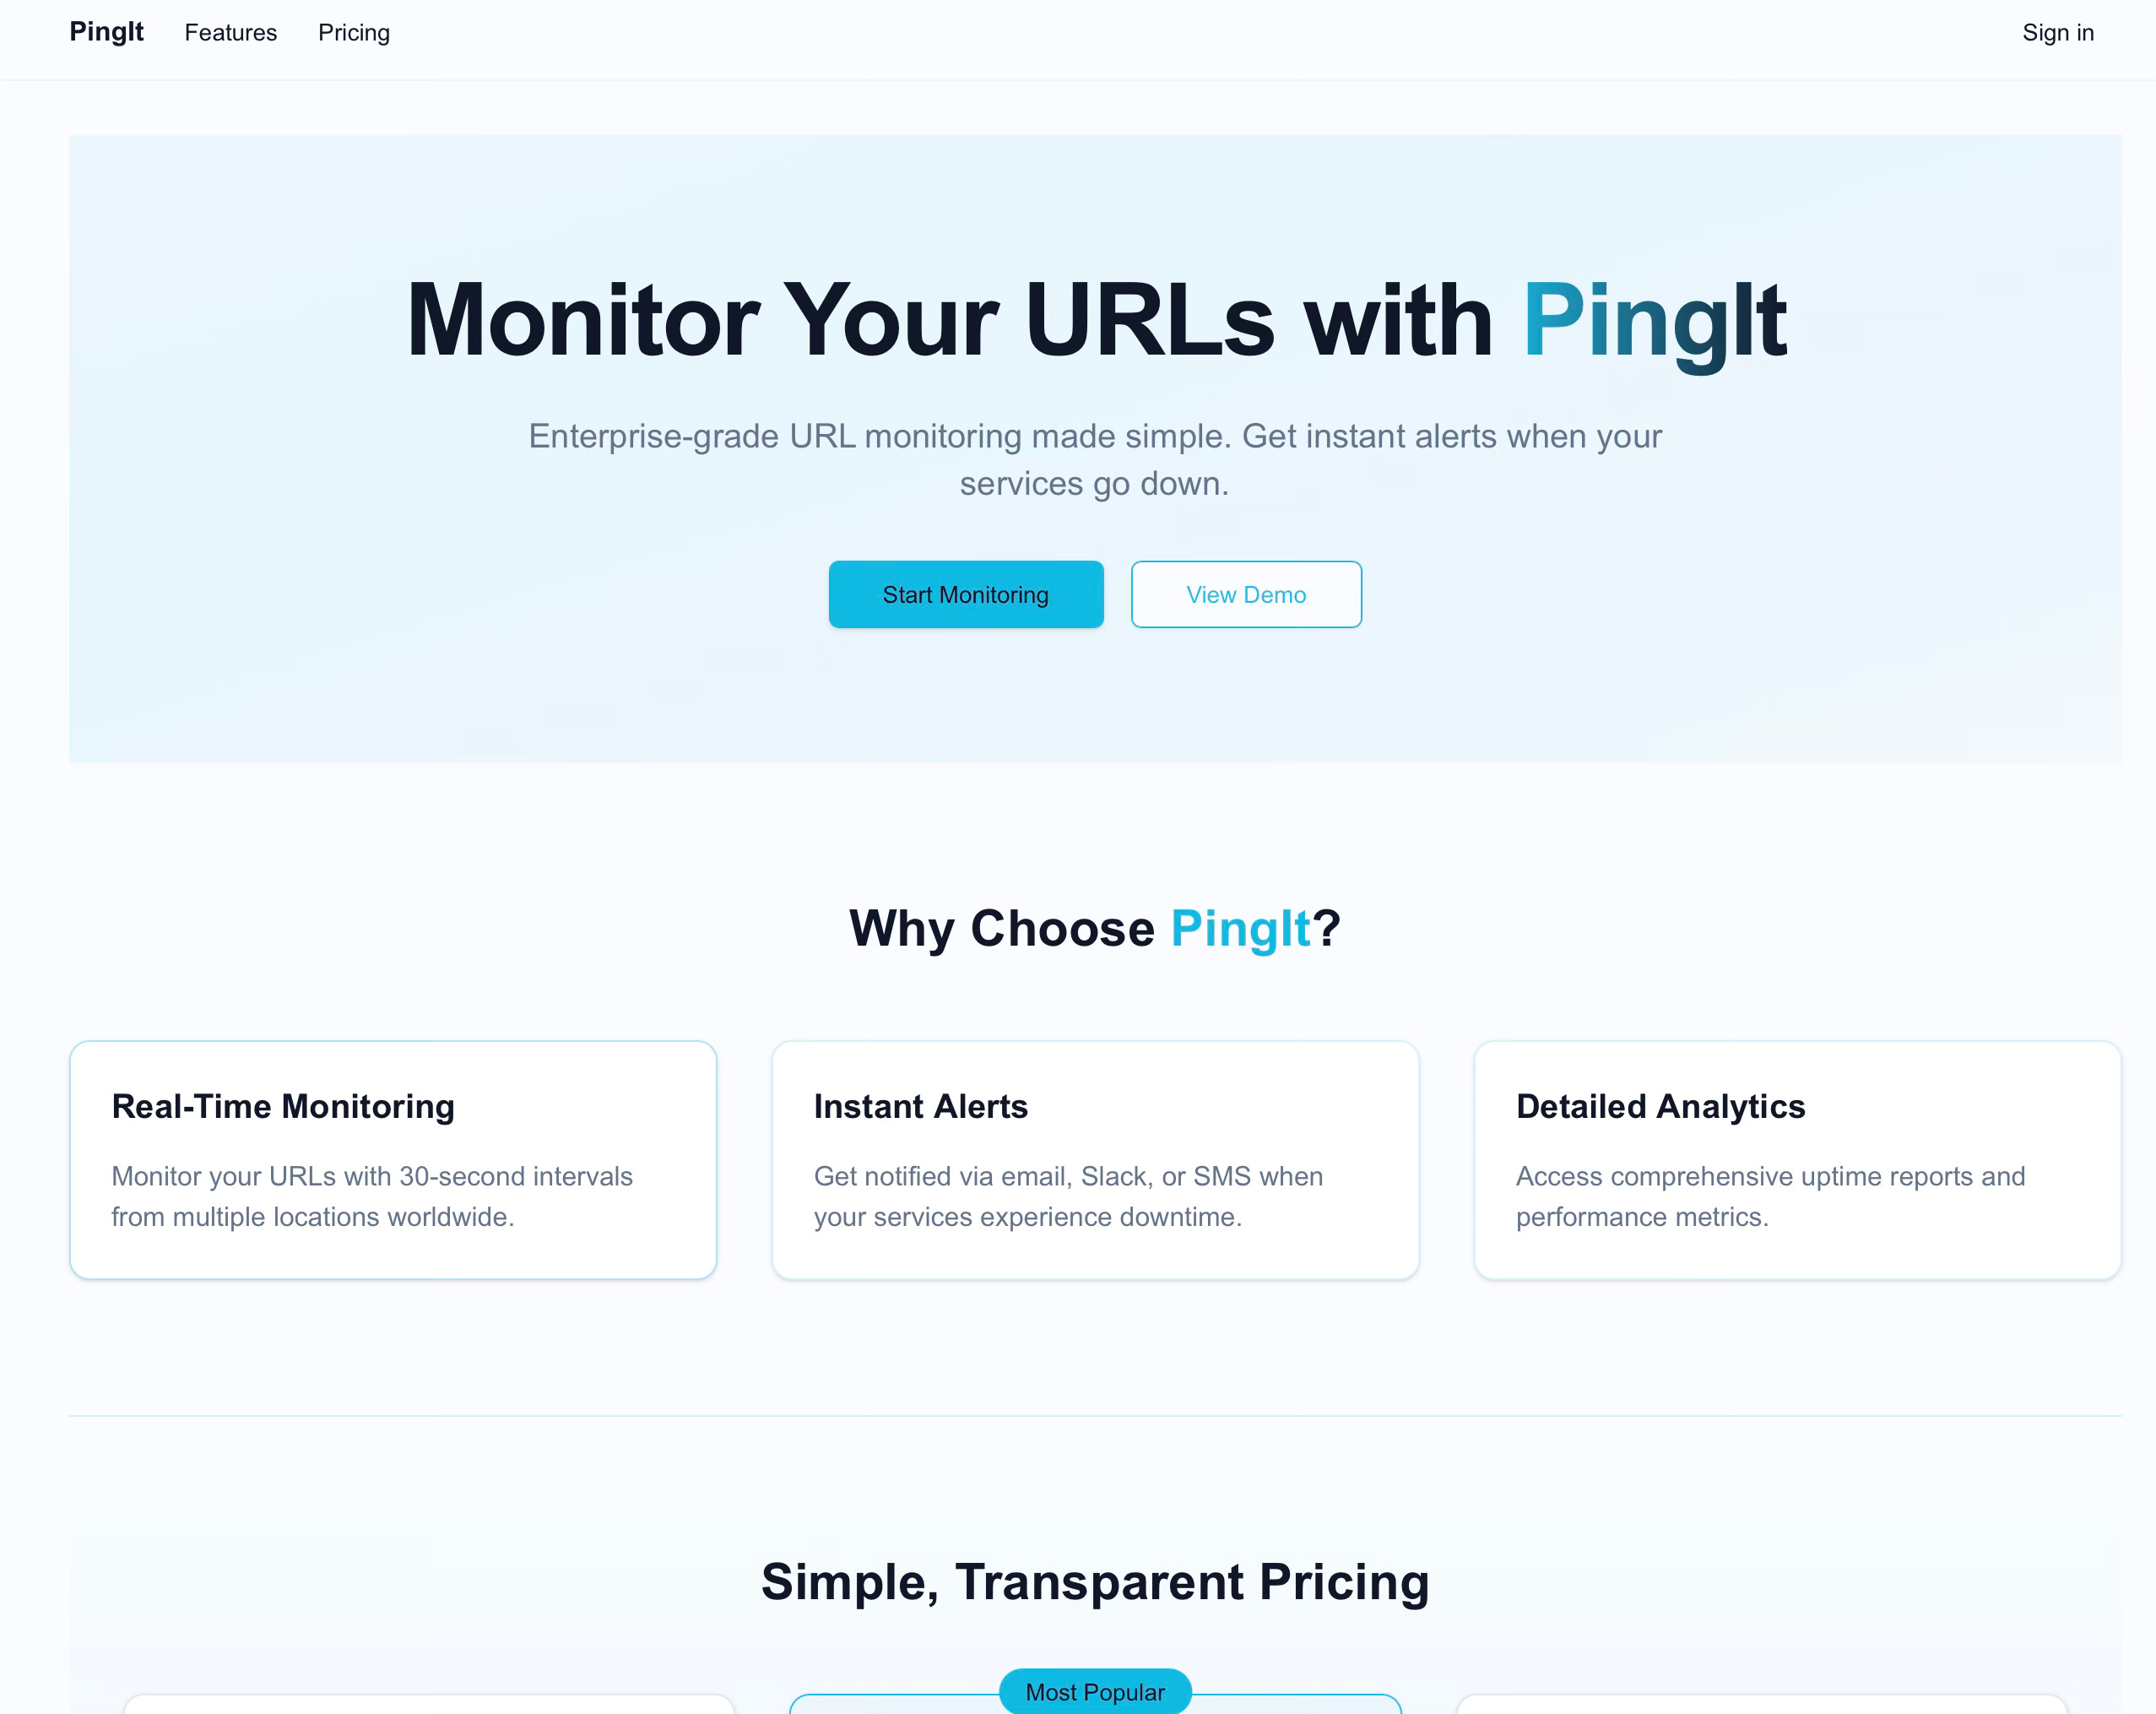
SEO discovery takes time and is out of our control so we want to make sure that we start this process immediately and without delay. It is recommended to create a landing page with high level important information about the project and get this out on the internet as soon as possible. With NextJS and Sevalla I can do this quickly, easily and for free. Plus it gives me content for social media as I enjoy posting about “building in public”.
To start building a static landing page for our project, I get CursorAI to help:
Open the project in Cursor AI:
cursor .Use the right panel Composer with “agent” mode to describe what we want CursorAI to do: which is create a static landing page for our app.
Here is my discussion with Cursor AI:
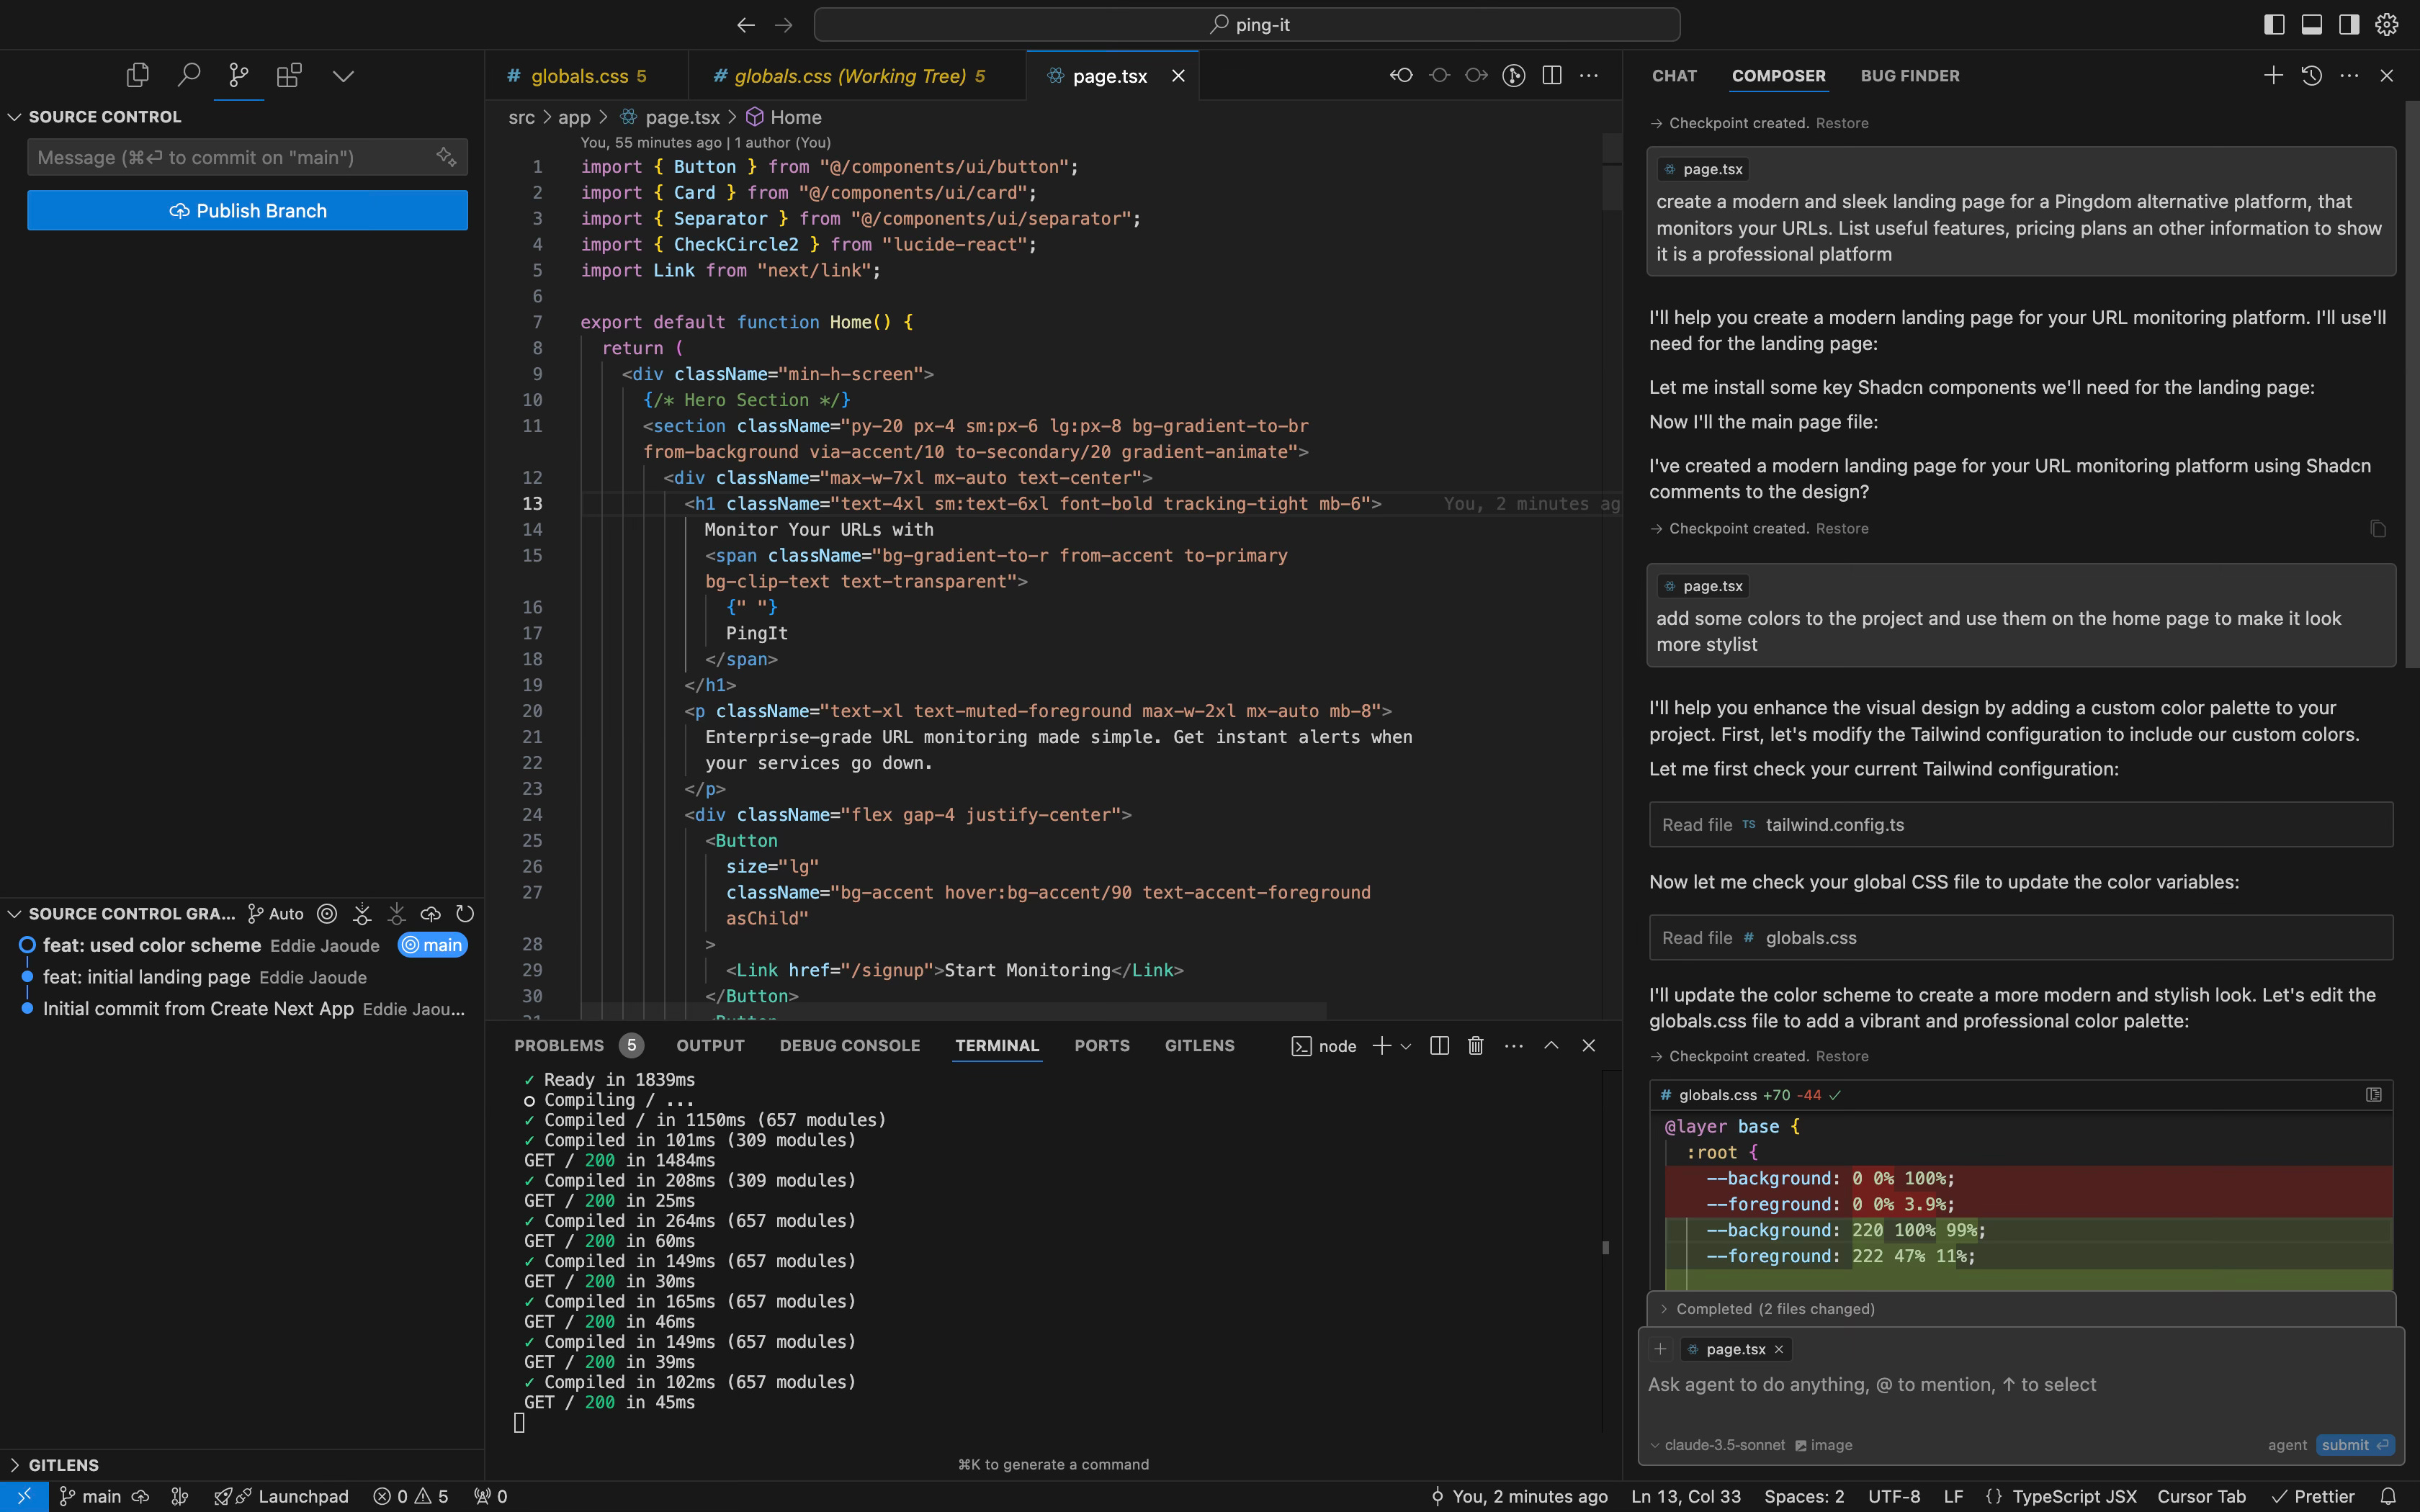
Which generated the following result:


Go ahead and change any text to make sure that the landing page accurately describes the project.
I suggest removing the payment buttons for now. I won’t be covering how to integrate payment into the project as part of this blog - but please do let me know in the comments if this is something you would like to learn more about. The objective of having a static landing page is to be able to deploy as quickly as possible so that SEO can start (plus there is nothing to pay for at this stage!). Remember, it takes time for the project to be indexed by Google and other places so ideally you do not want to leave this until the last minute.
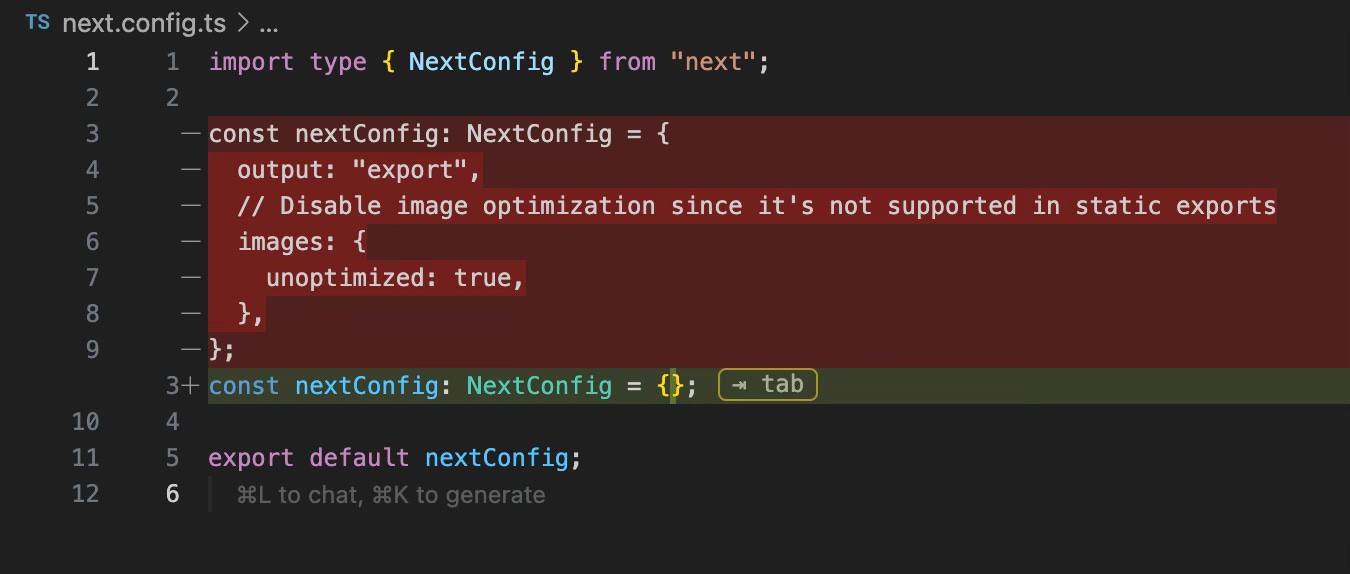
It is necessary to change the output of the NextJS project to be static files and disable image optimisation. This can be achieved by adding 2 lines to the NextJS config, but as this is a new project we can make the following changes to the `next.config.ts` file:
const nextConfig: NextConfig = {
  output: "export",
  // Disable image optimization, it's not supported in static exports
  images: {
    unoptimized: true,
  },
};
Now run `npm run build` and it will create the directory `out` where the static files will be generated.
To test it out locally you can install the dev dependency `server`. These are the steps:
`npm install serve —save-dev`
`npm run build`
`npx serve@latest out` which will output useful information
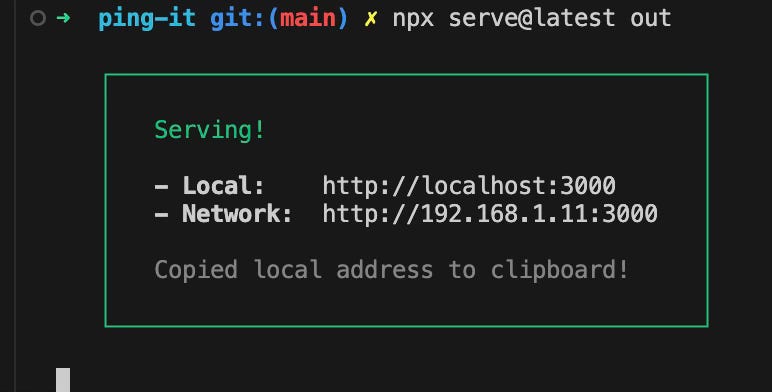
Visit http://localhost:3000 to see your static web page.
Don’t forget to push your latest changes to your GitLab git Repo
Chapter 4: Deploying the static landing page to Sevalla Cloud Hosting
I decided to use Sevalla for this project because it is very straightforward to set up. It is fast and affordable to get started and as I need to scale up. You will see the UX/DX is great with some extra visual architectural features of your set up, which I really love. I will show it to you later, but here is a teaser:

Let me know what you think by leaving a comment.
Hosting on Sevalla cloud provider
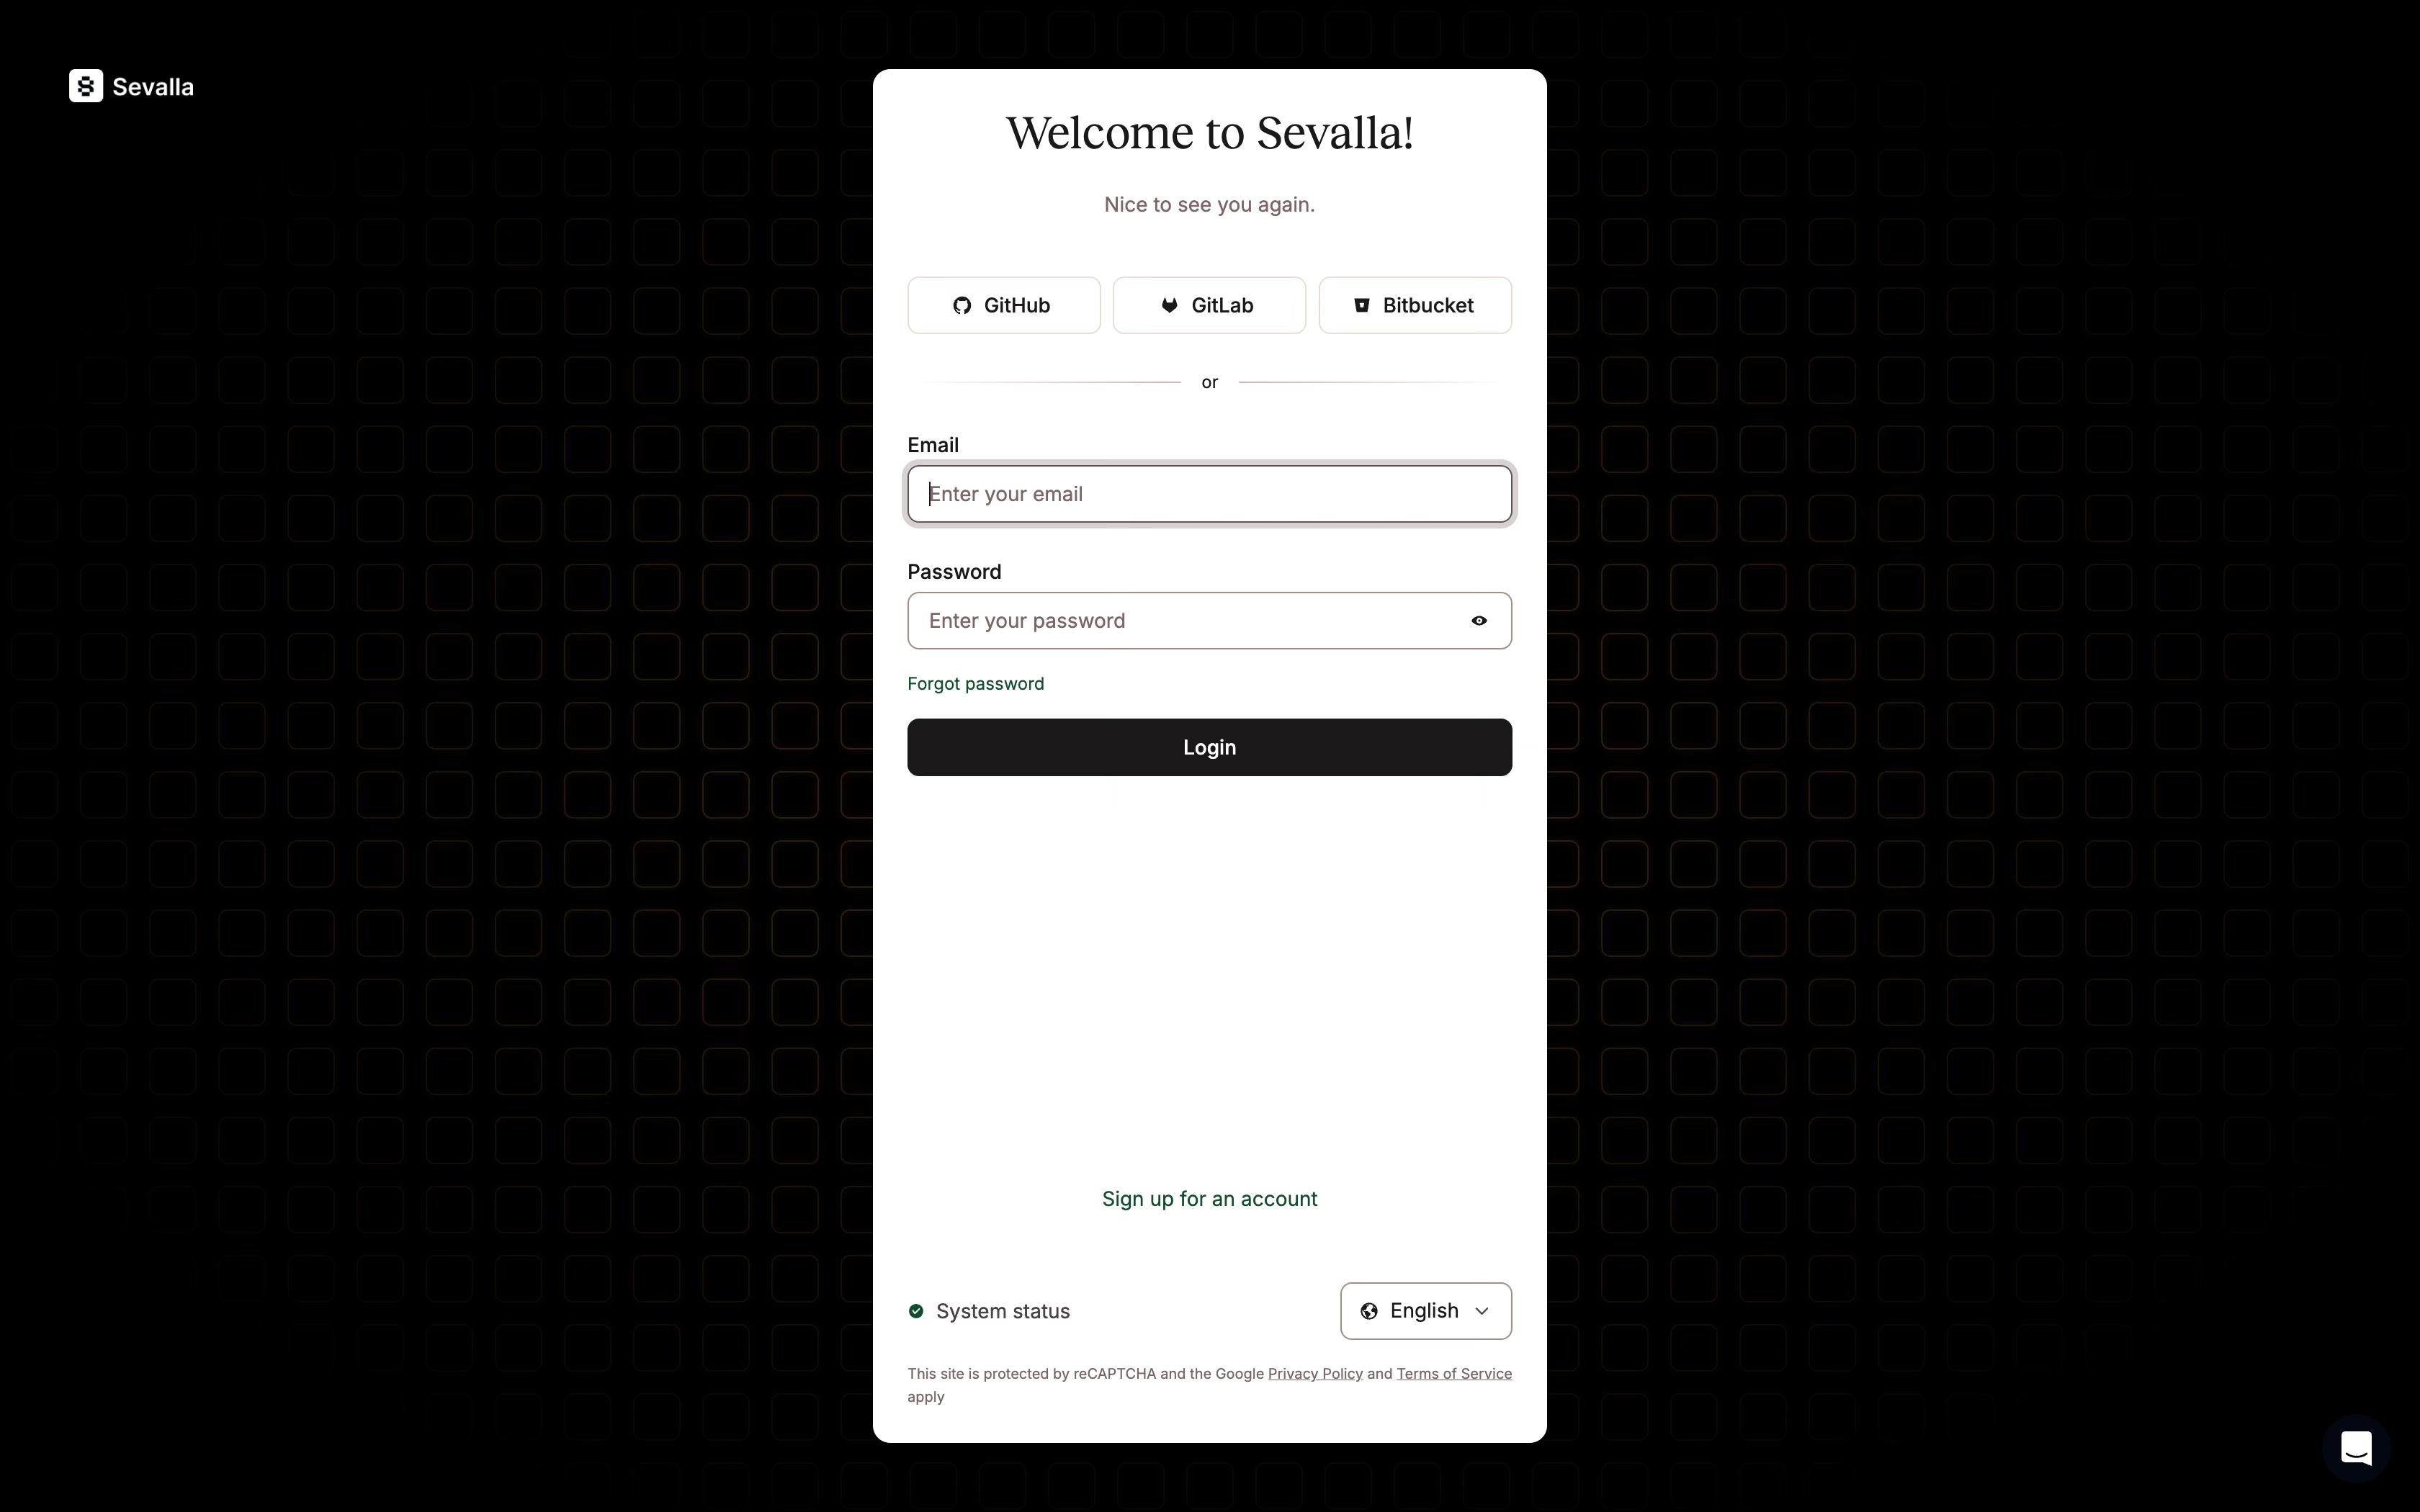
Sign up to Sevalla. I use my GitHub with Oauth, but you can select the login method you prefer.
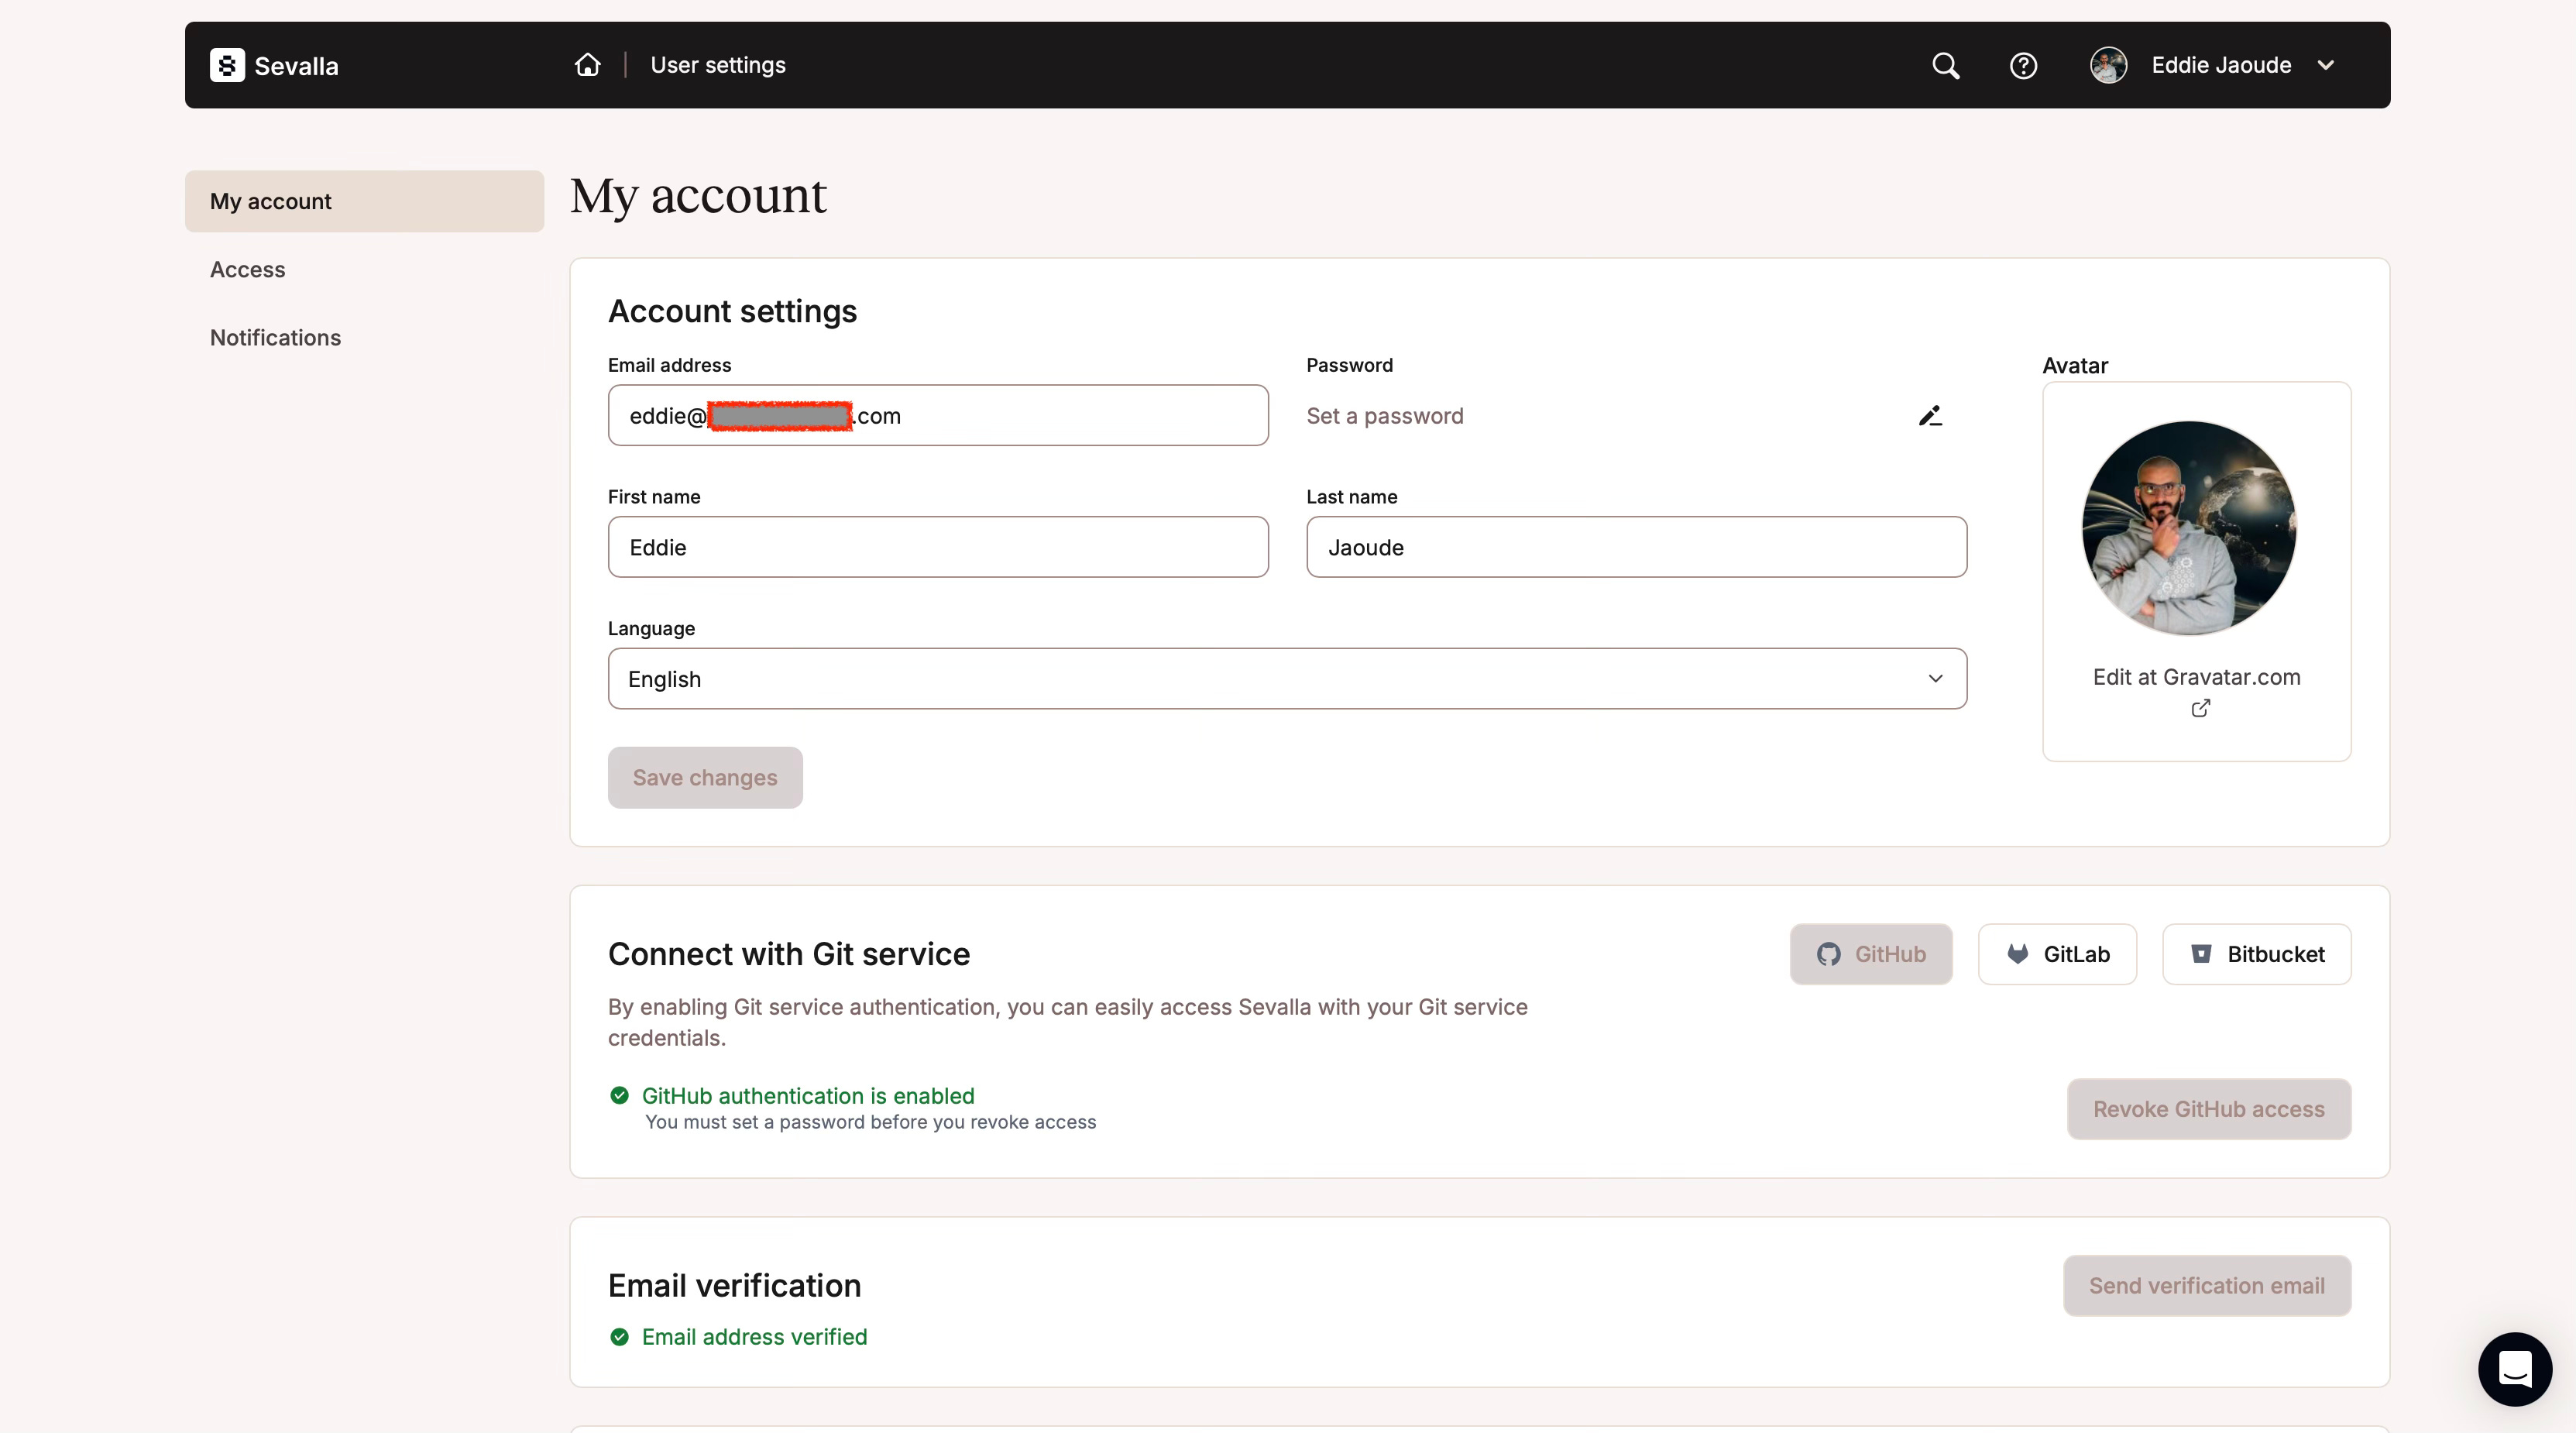
Under the My Account section, connect your GitLab.
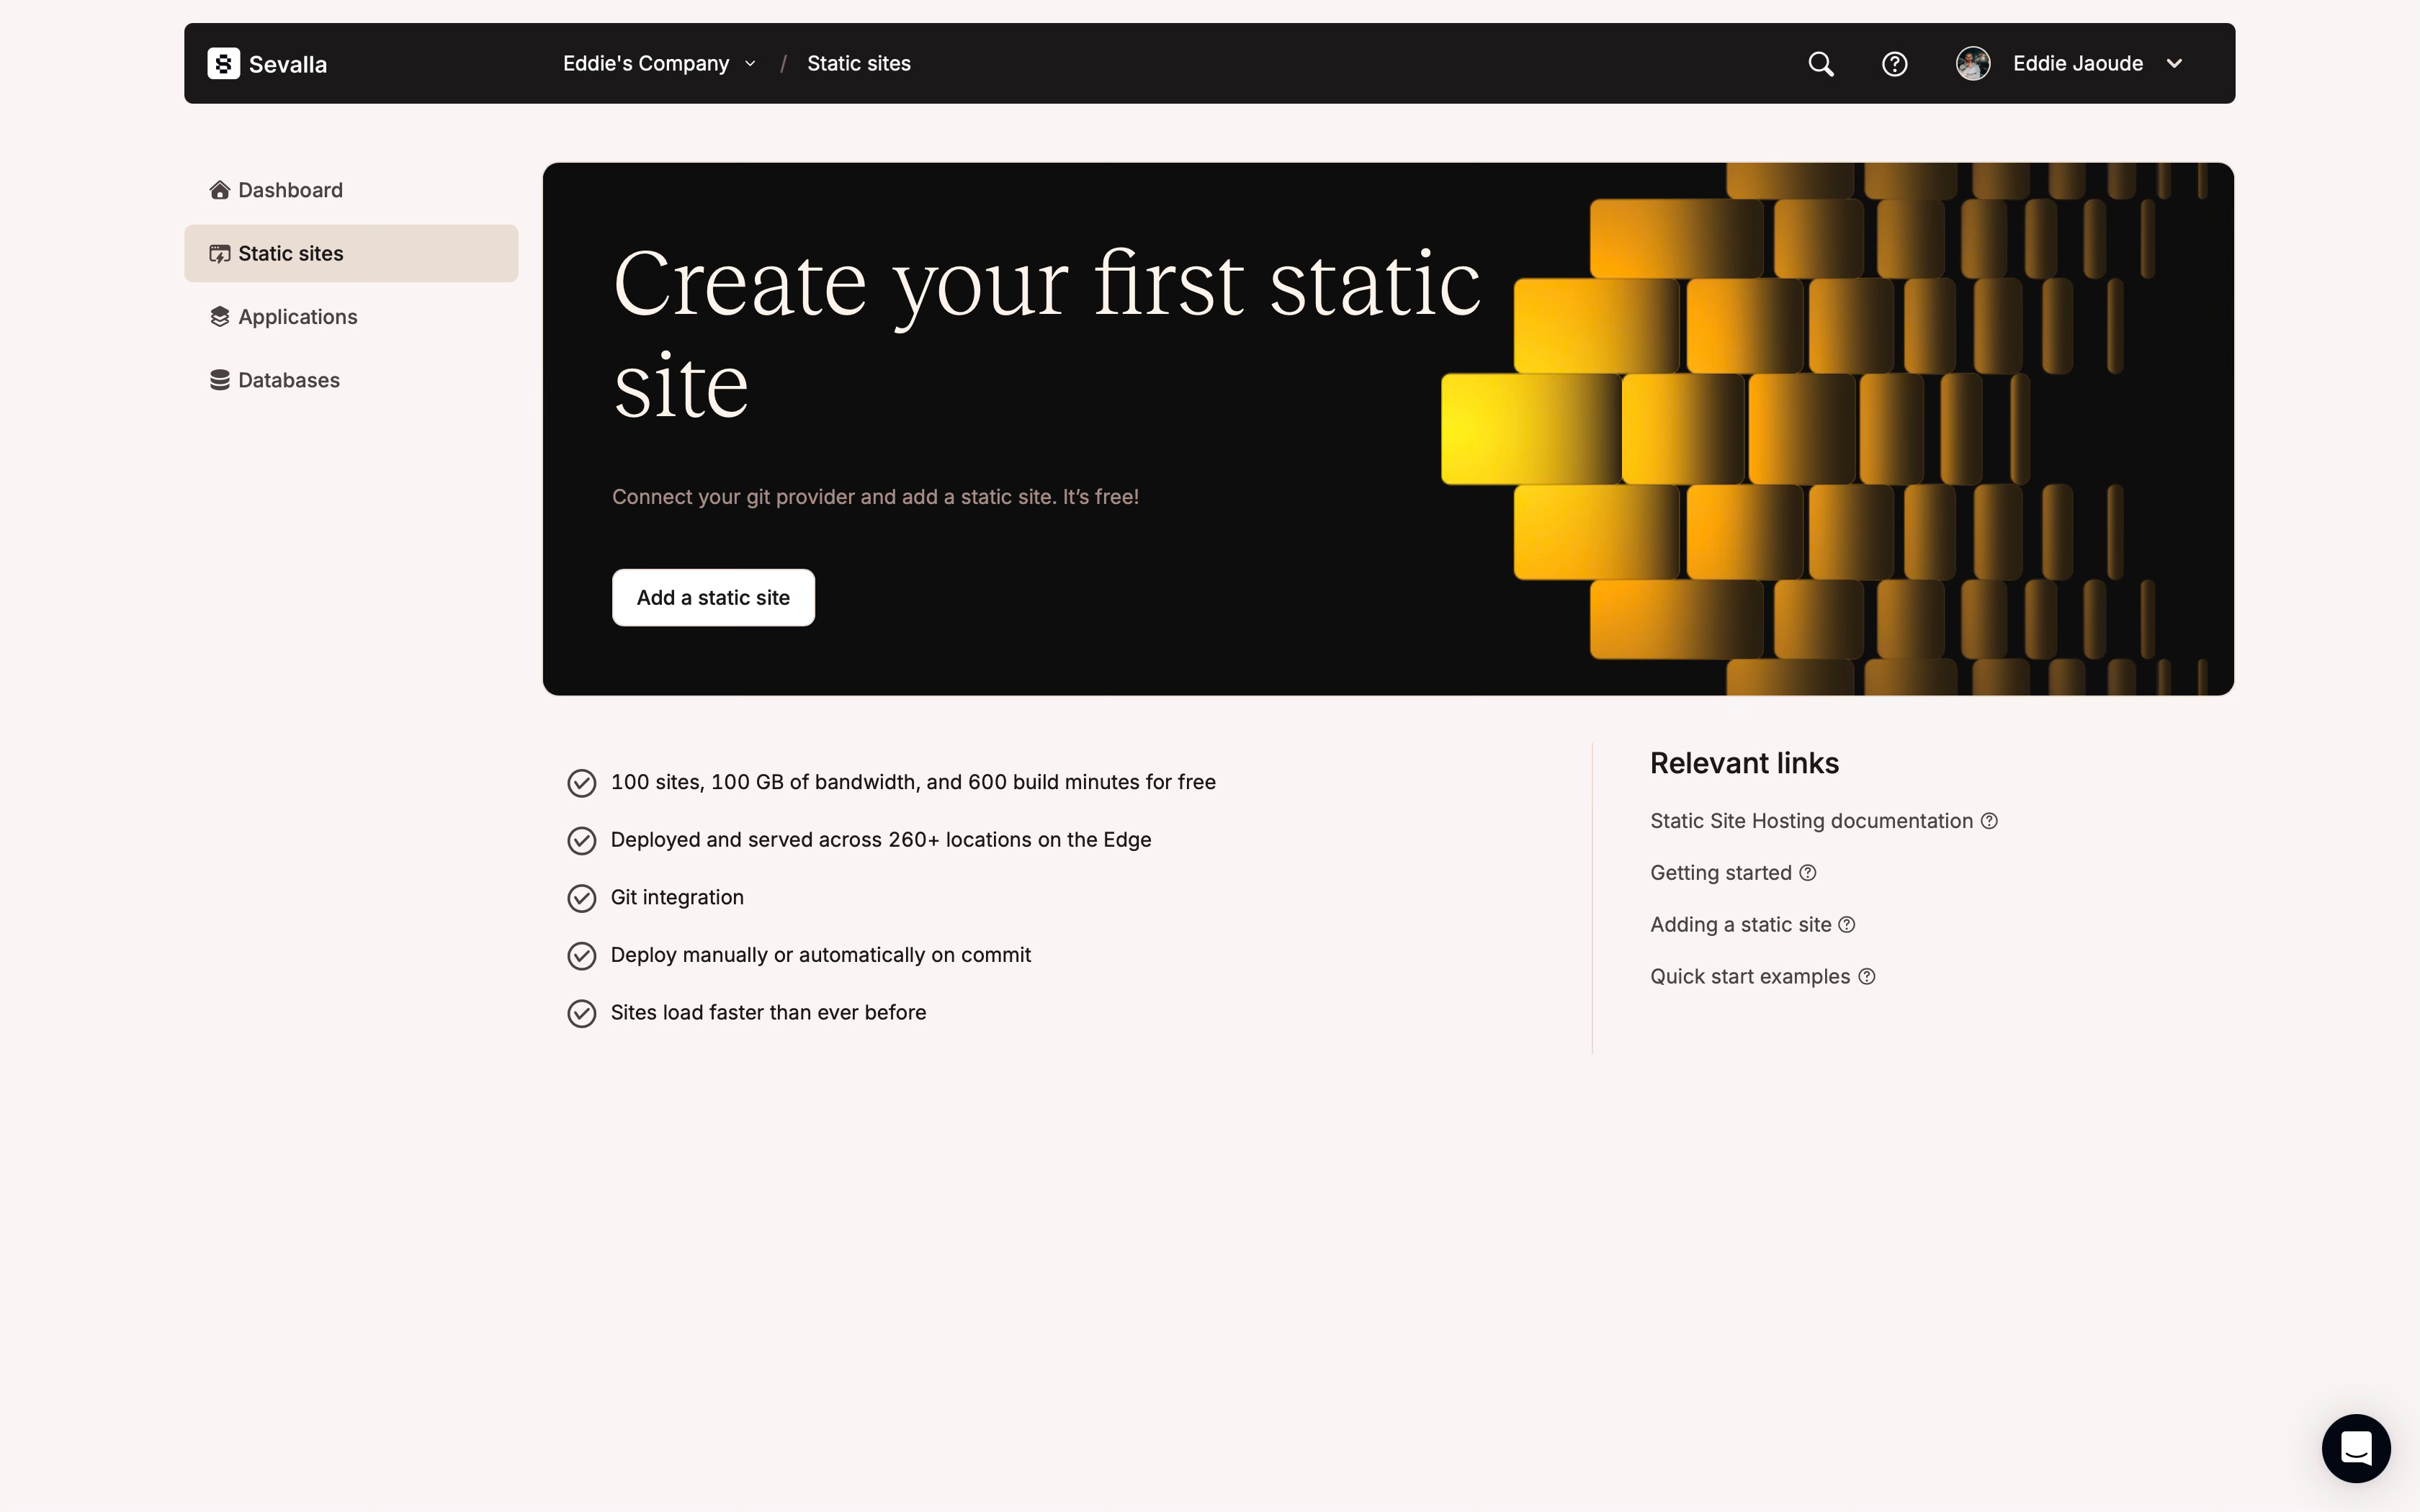
Go to the `Static sites` section on Sevalla and click `Add a static site`.
Select your repo and branch. I checked `Automatic deployment on commit` as each time I push to GitLab I want to deploy the latest changes.
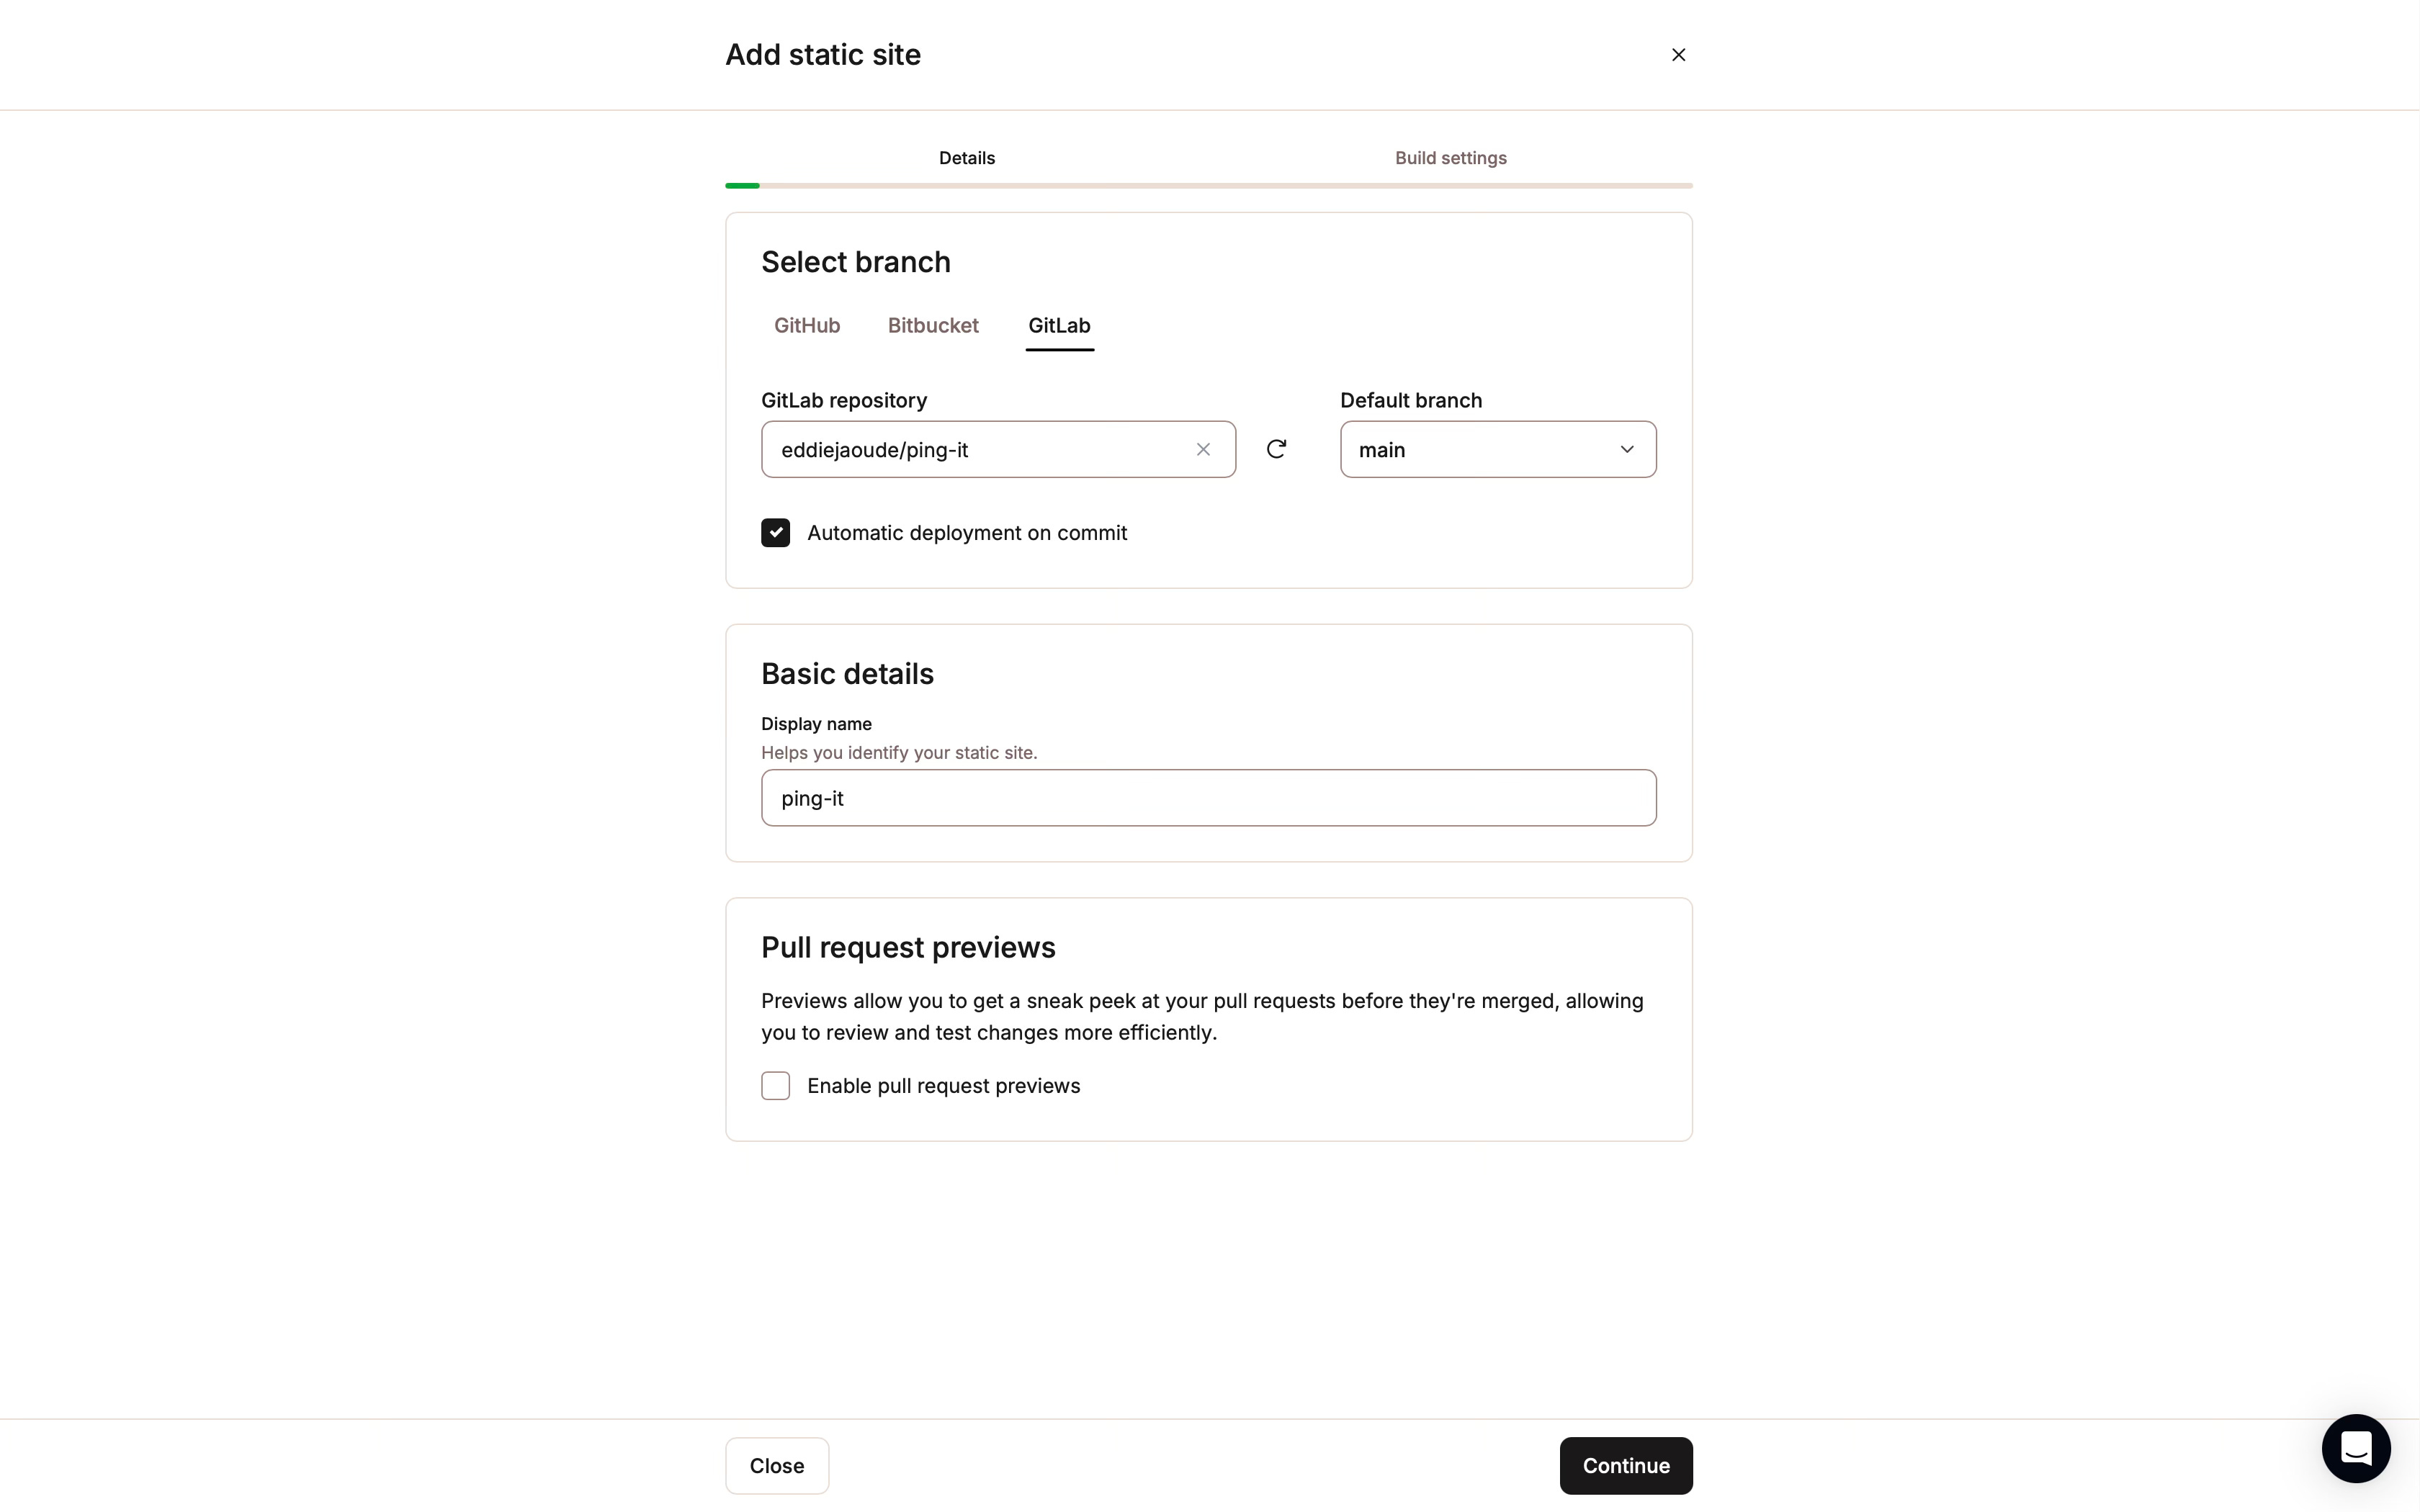
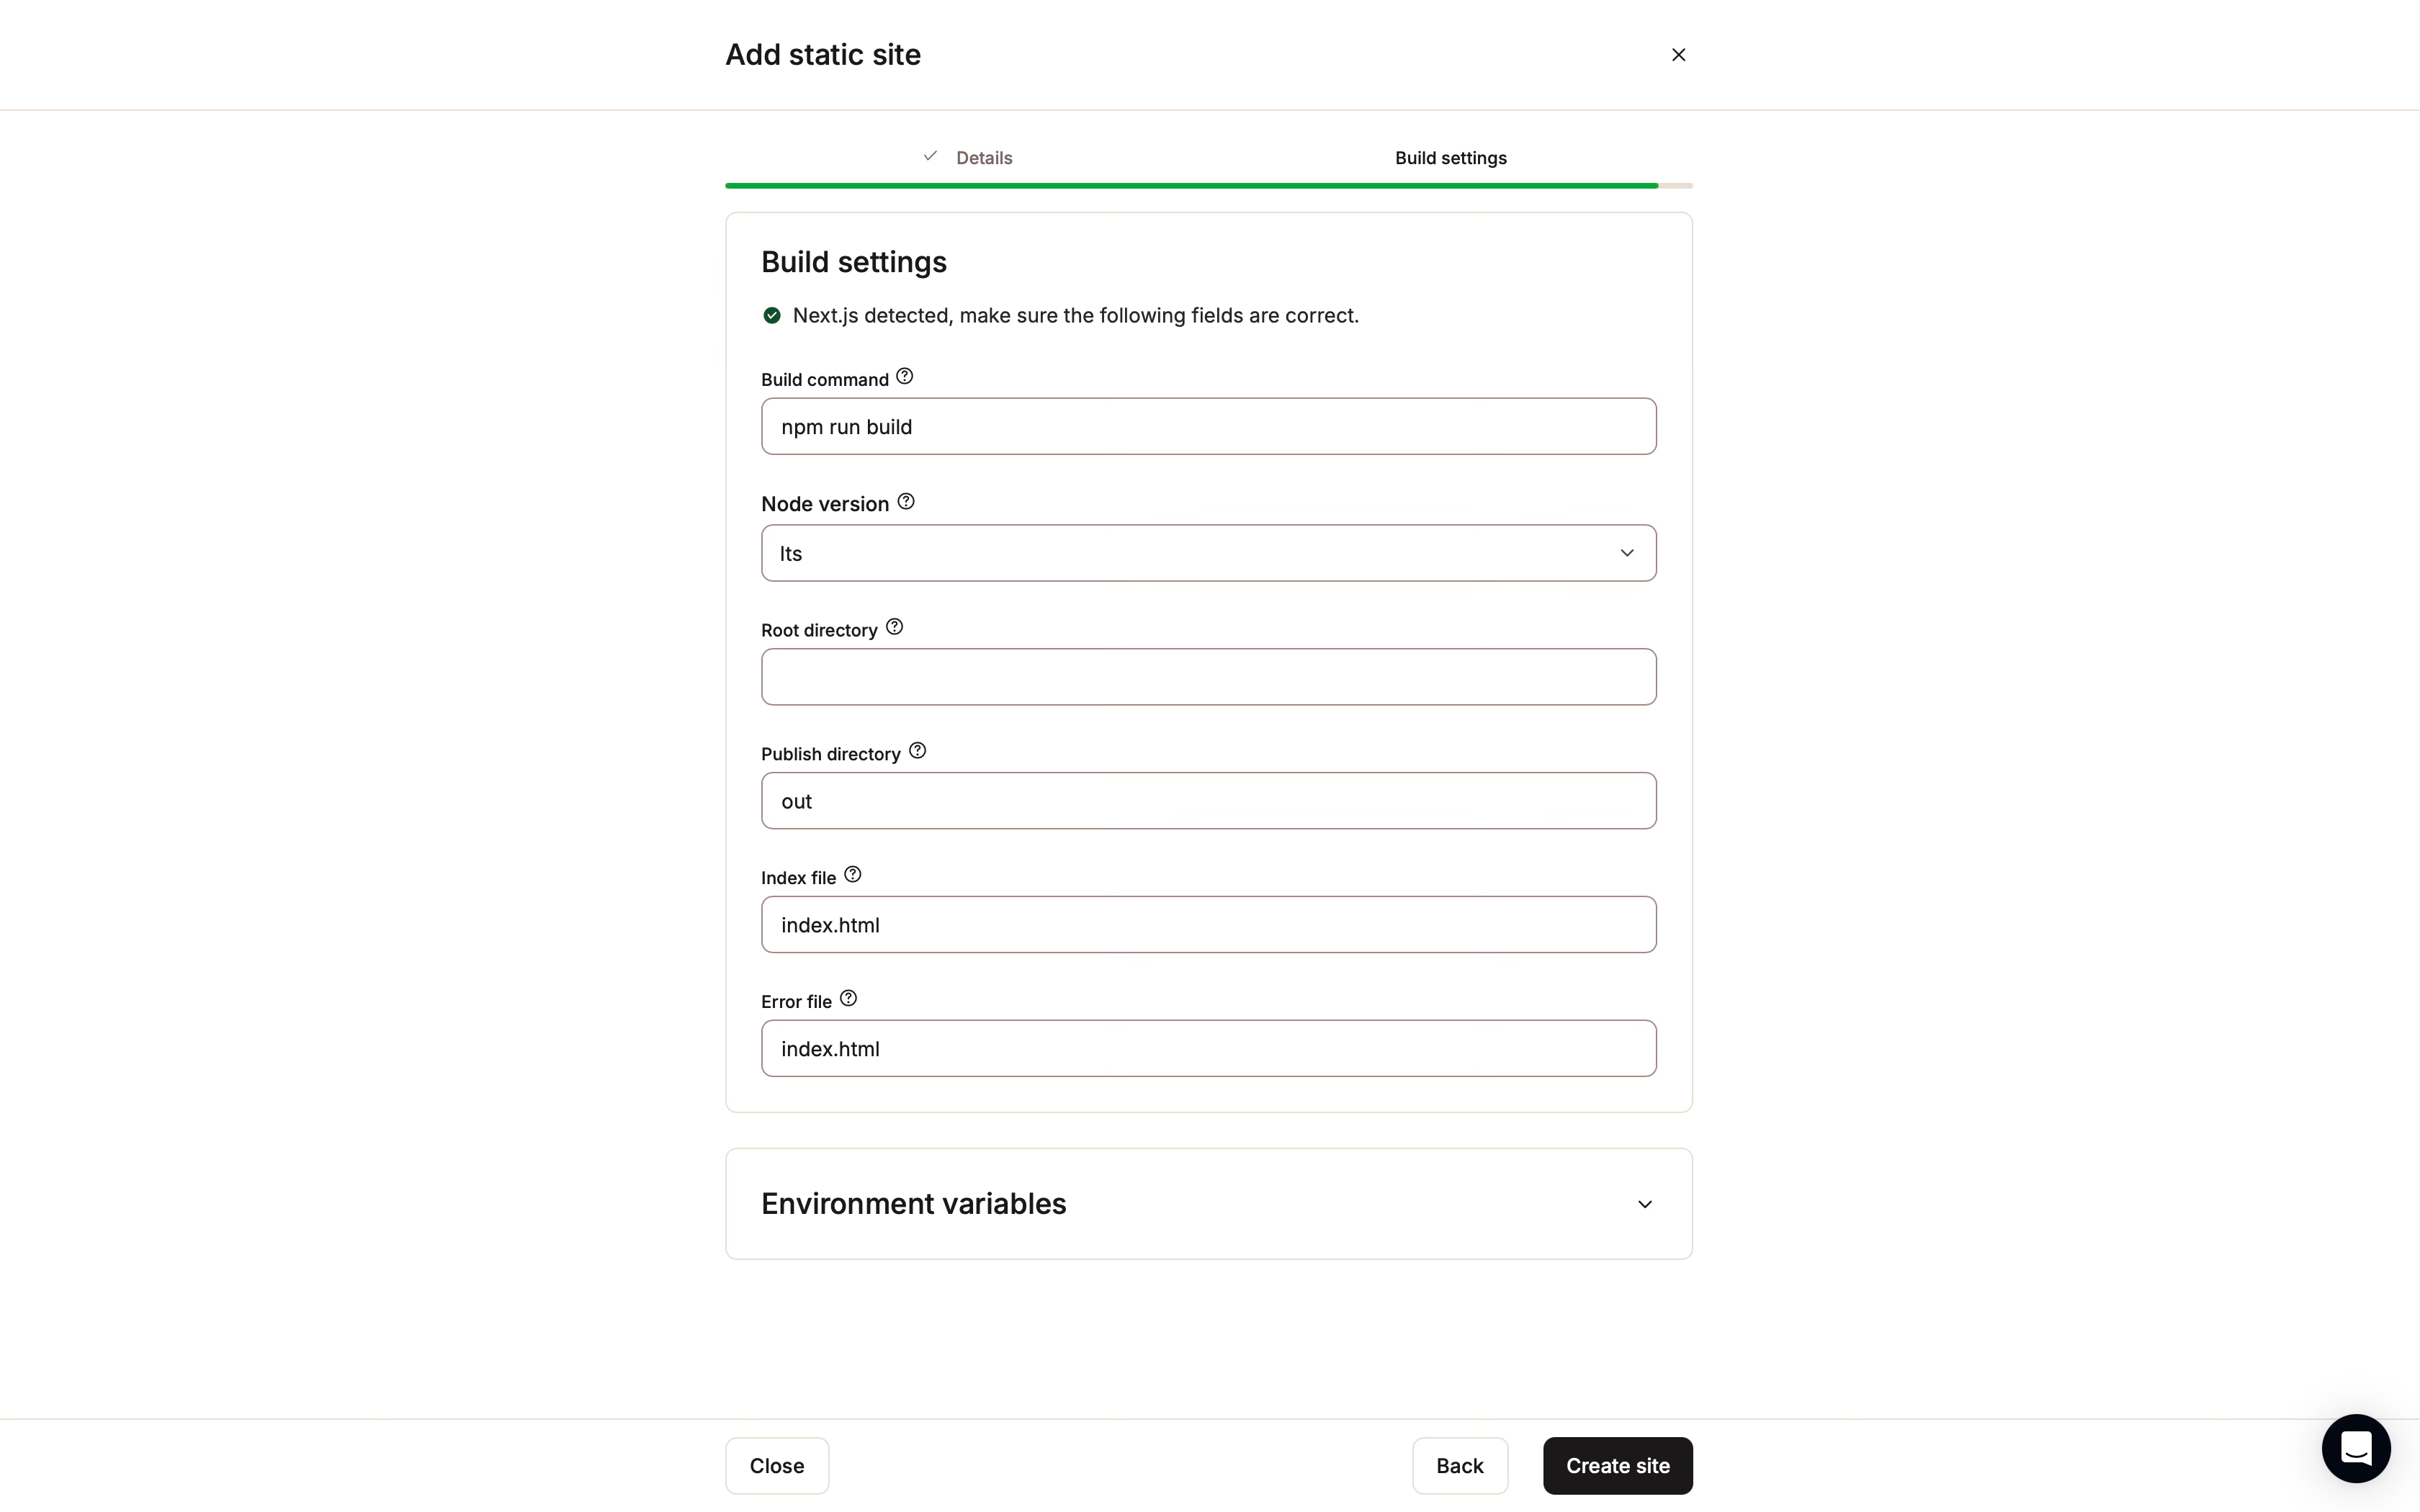
Sevalla detected my project is NextJS and has preselected the recommended settings, so I will keep those.
The first deployment will automatically happen, and future deployments will happen after a new commit is pushed to GitLab.
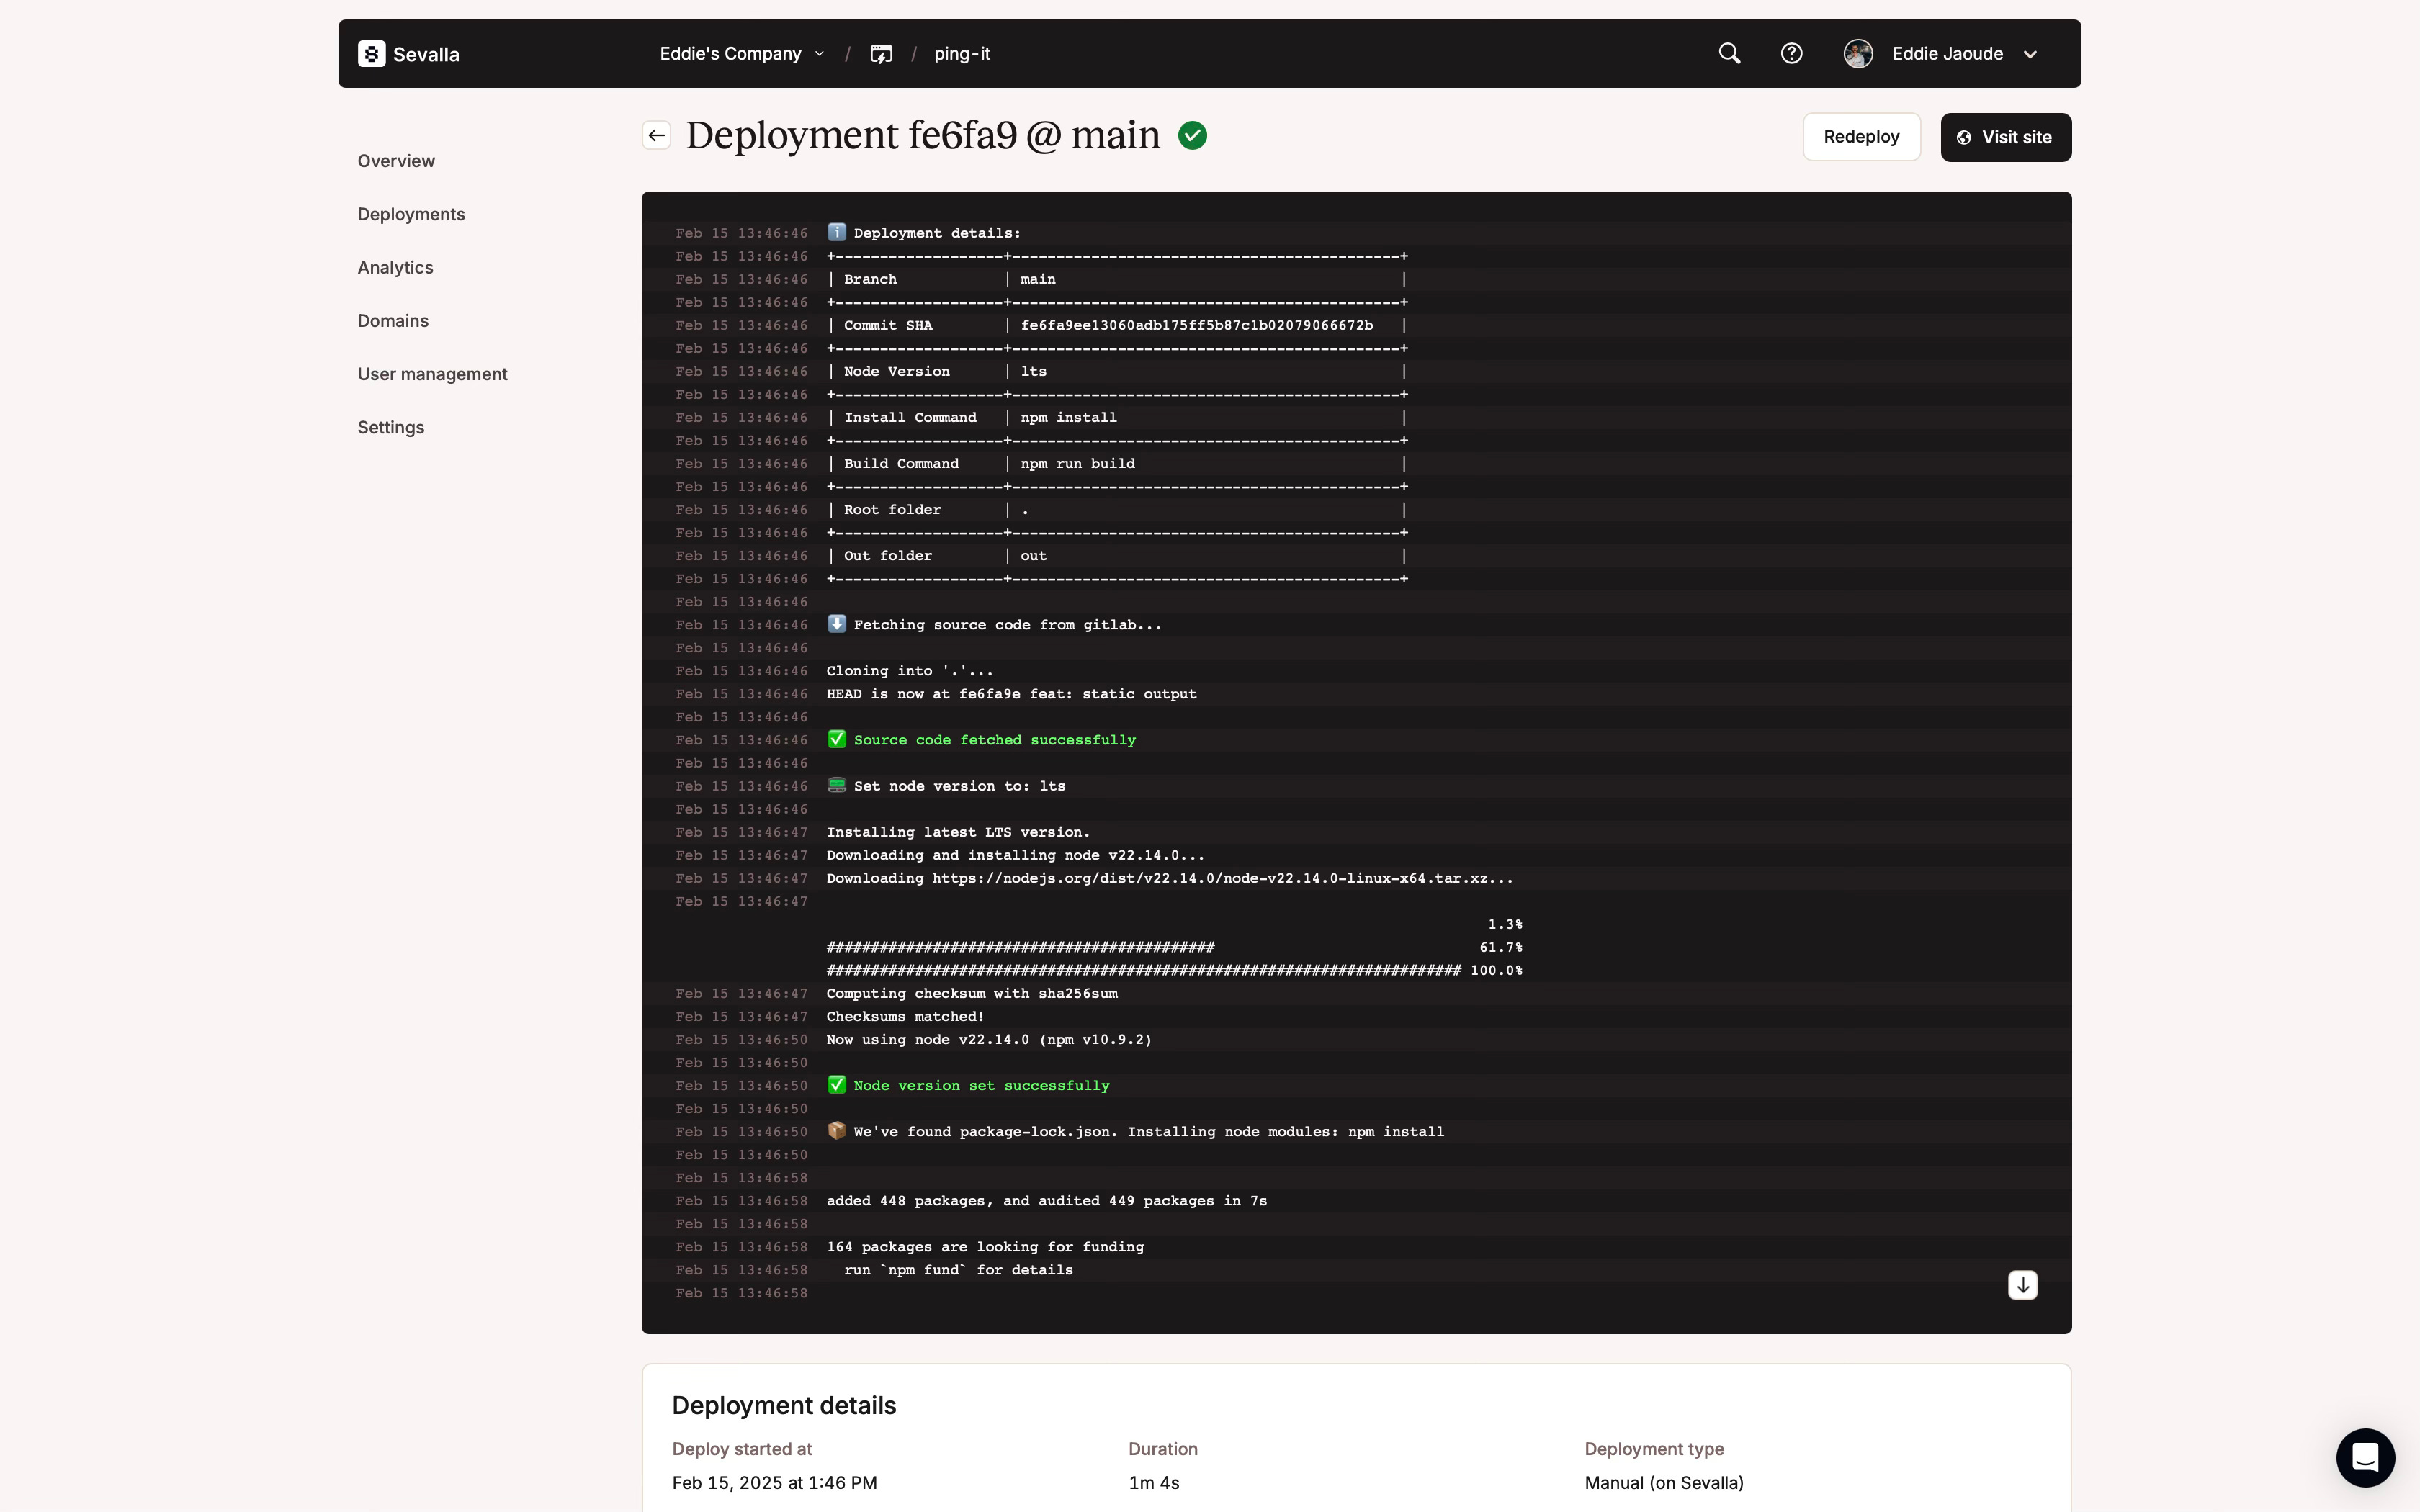
Sevalla will create a temporary sub-domain for you, which you can see by clicking the button `Visit site`. This saves me so much time because I want to focus on finalising the end-to-end workflow/pipeline, which we will build on later.
The format will be your project name then some random characters appended with `.kinsta.page`. Mine at the time of writing is https://ping-it-zv7bk.kinsta.page
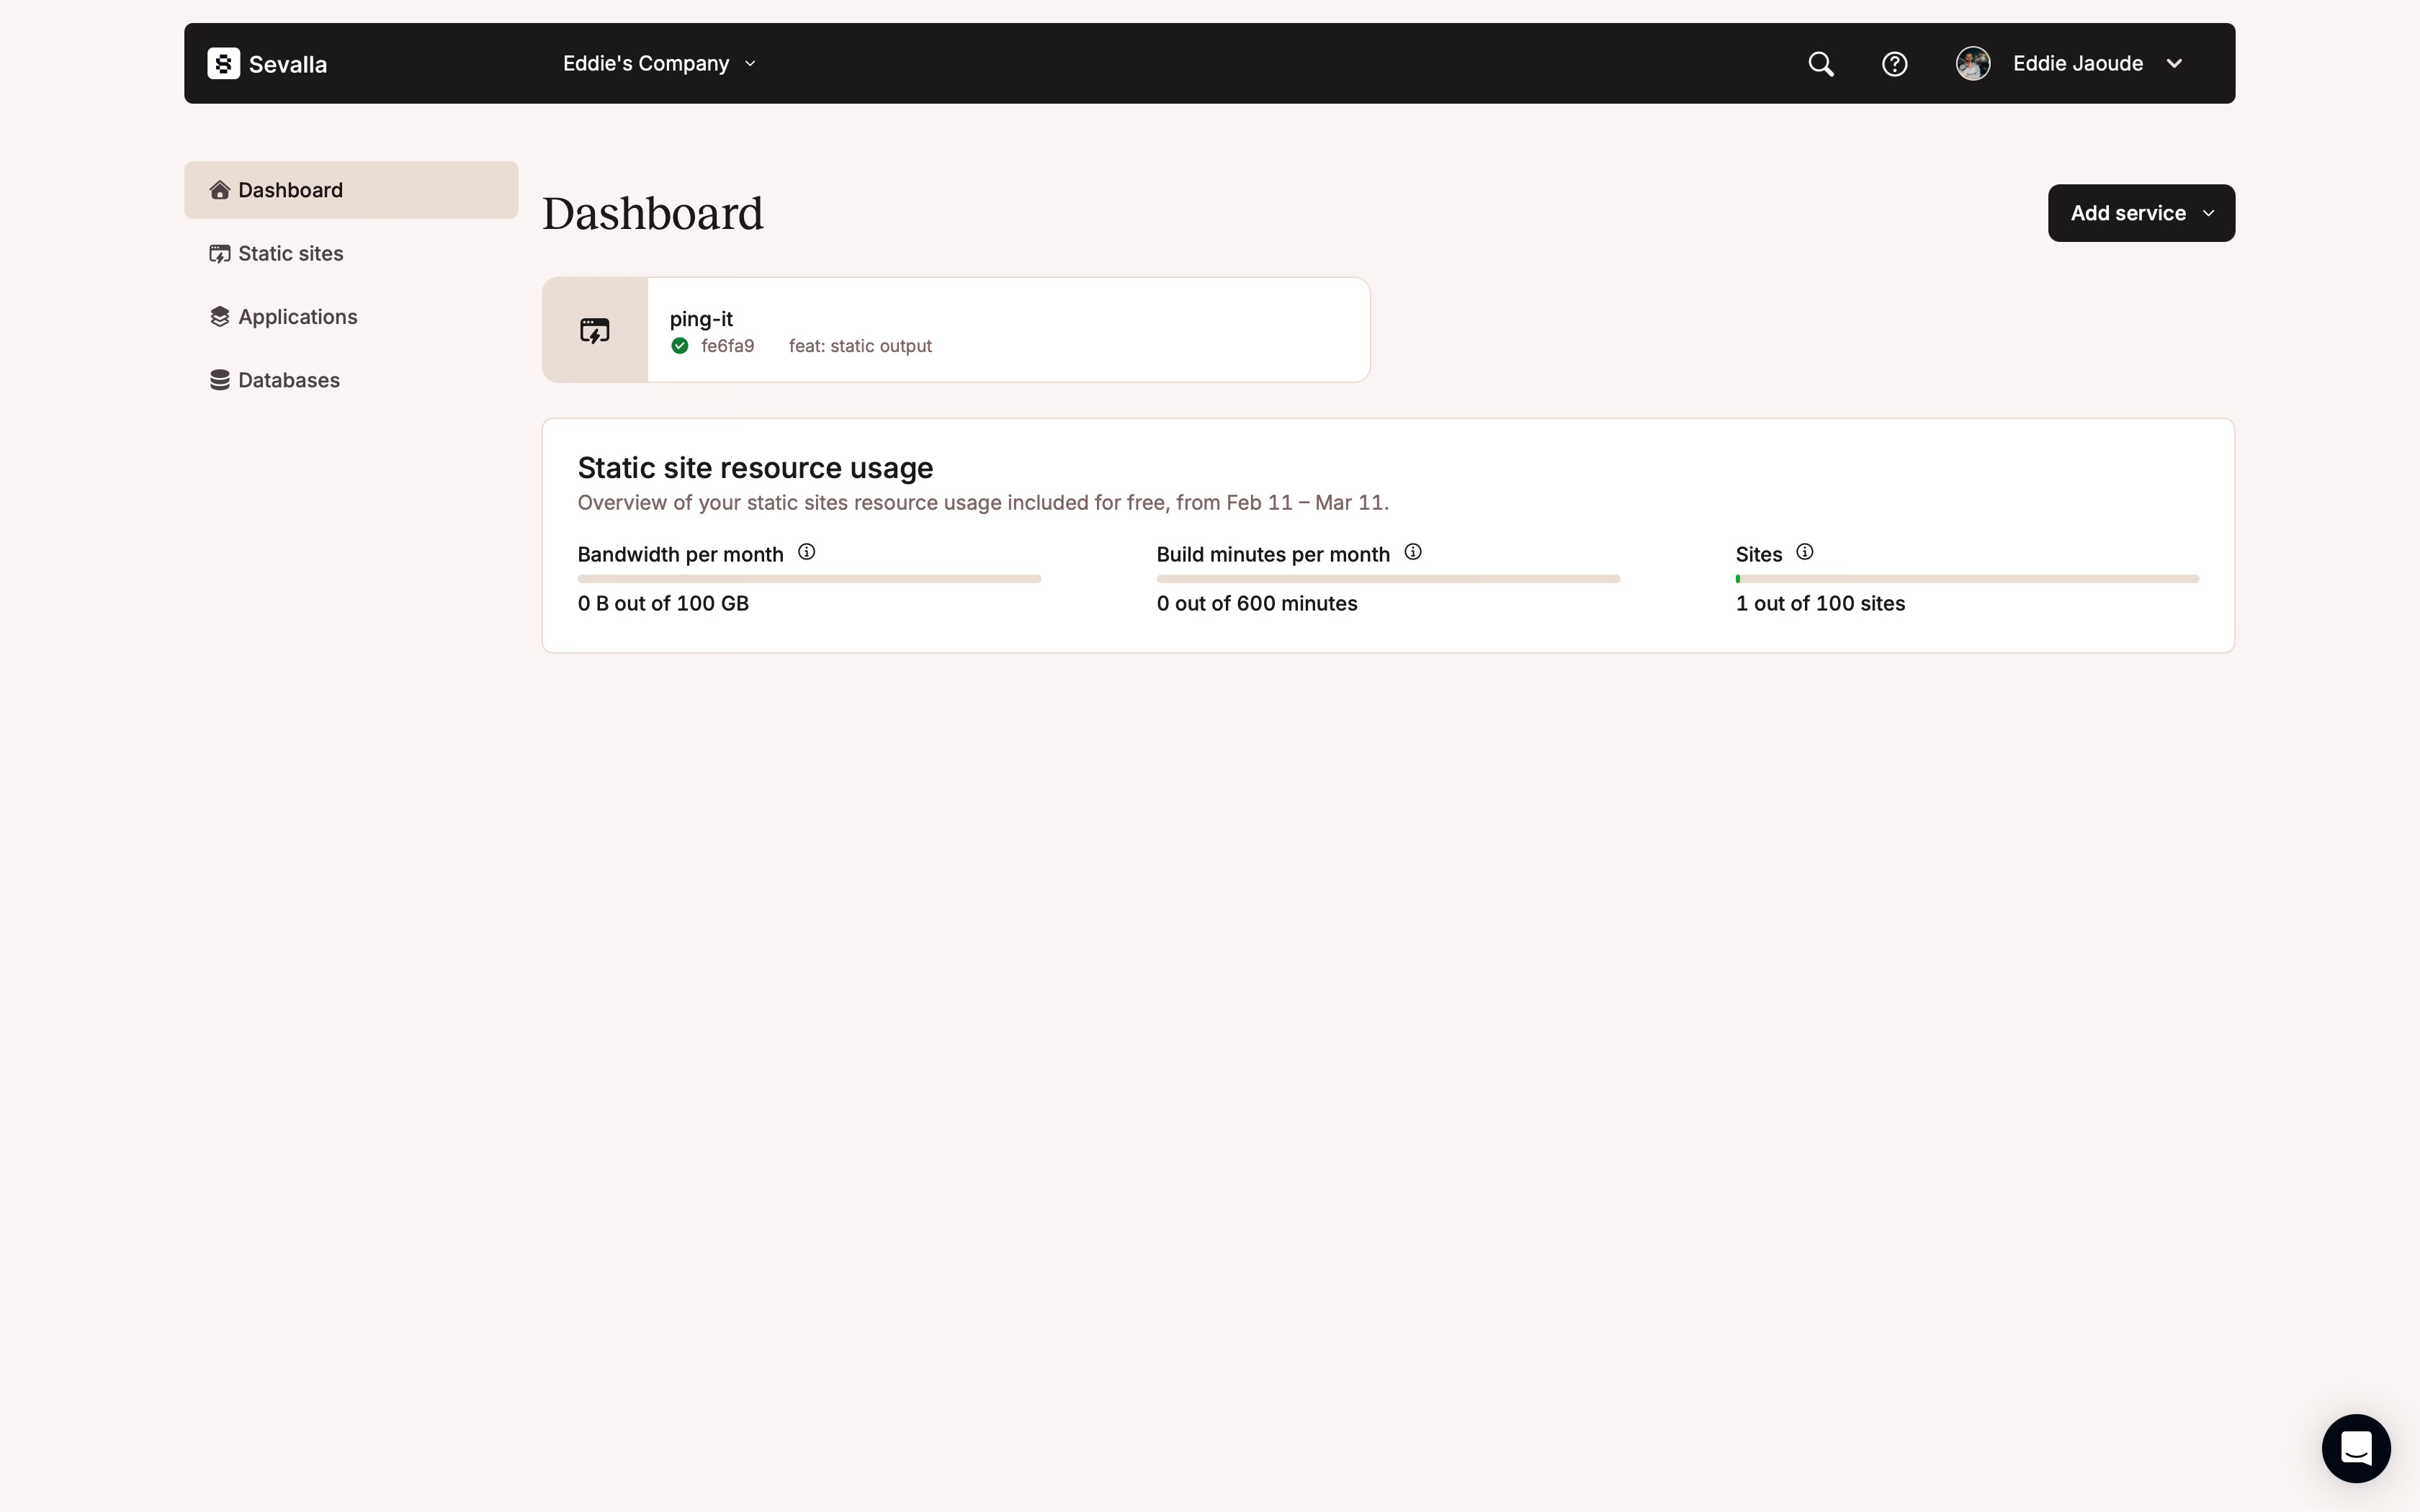
Your Dashboard will now look more interesting and something like this:
Domain setup on Sevalla
Now we have our project running on Sevalla with a temporary domain that Sevalla created, we can check everything works fine, but we want to build SEO domain authority on our custom domain.
Firstly you need to buy the available domain you want from your favourite registrar. I don’t have a favourite - quite the opposite - the ones I have tried are not great. I do hear people recommending CloudFlare but I haven’t tried it yet myself, I will soon though. Let me know in the comments which domain registrars you have tried and if you would recommend them.
In your app, go to “Domains” on your side navigation, then click “Add domain”:
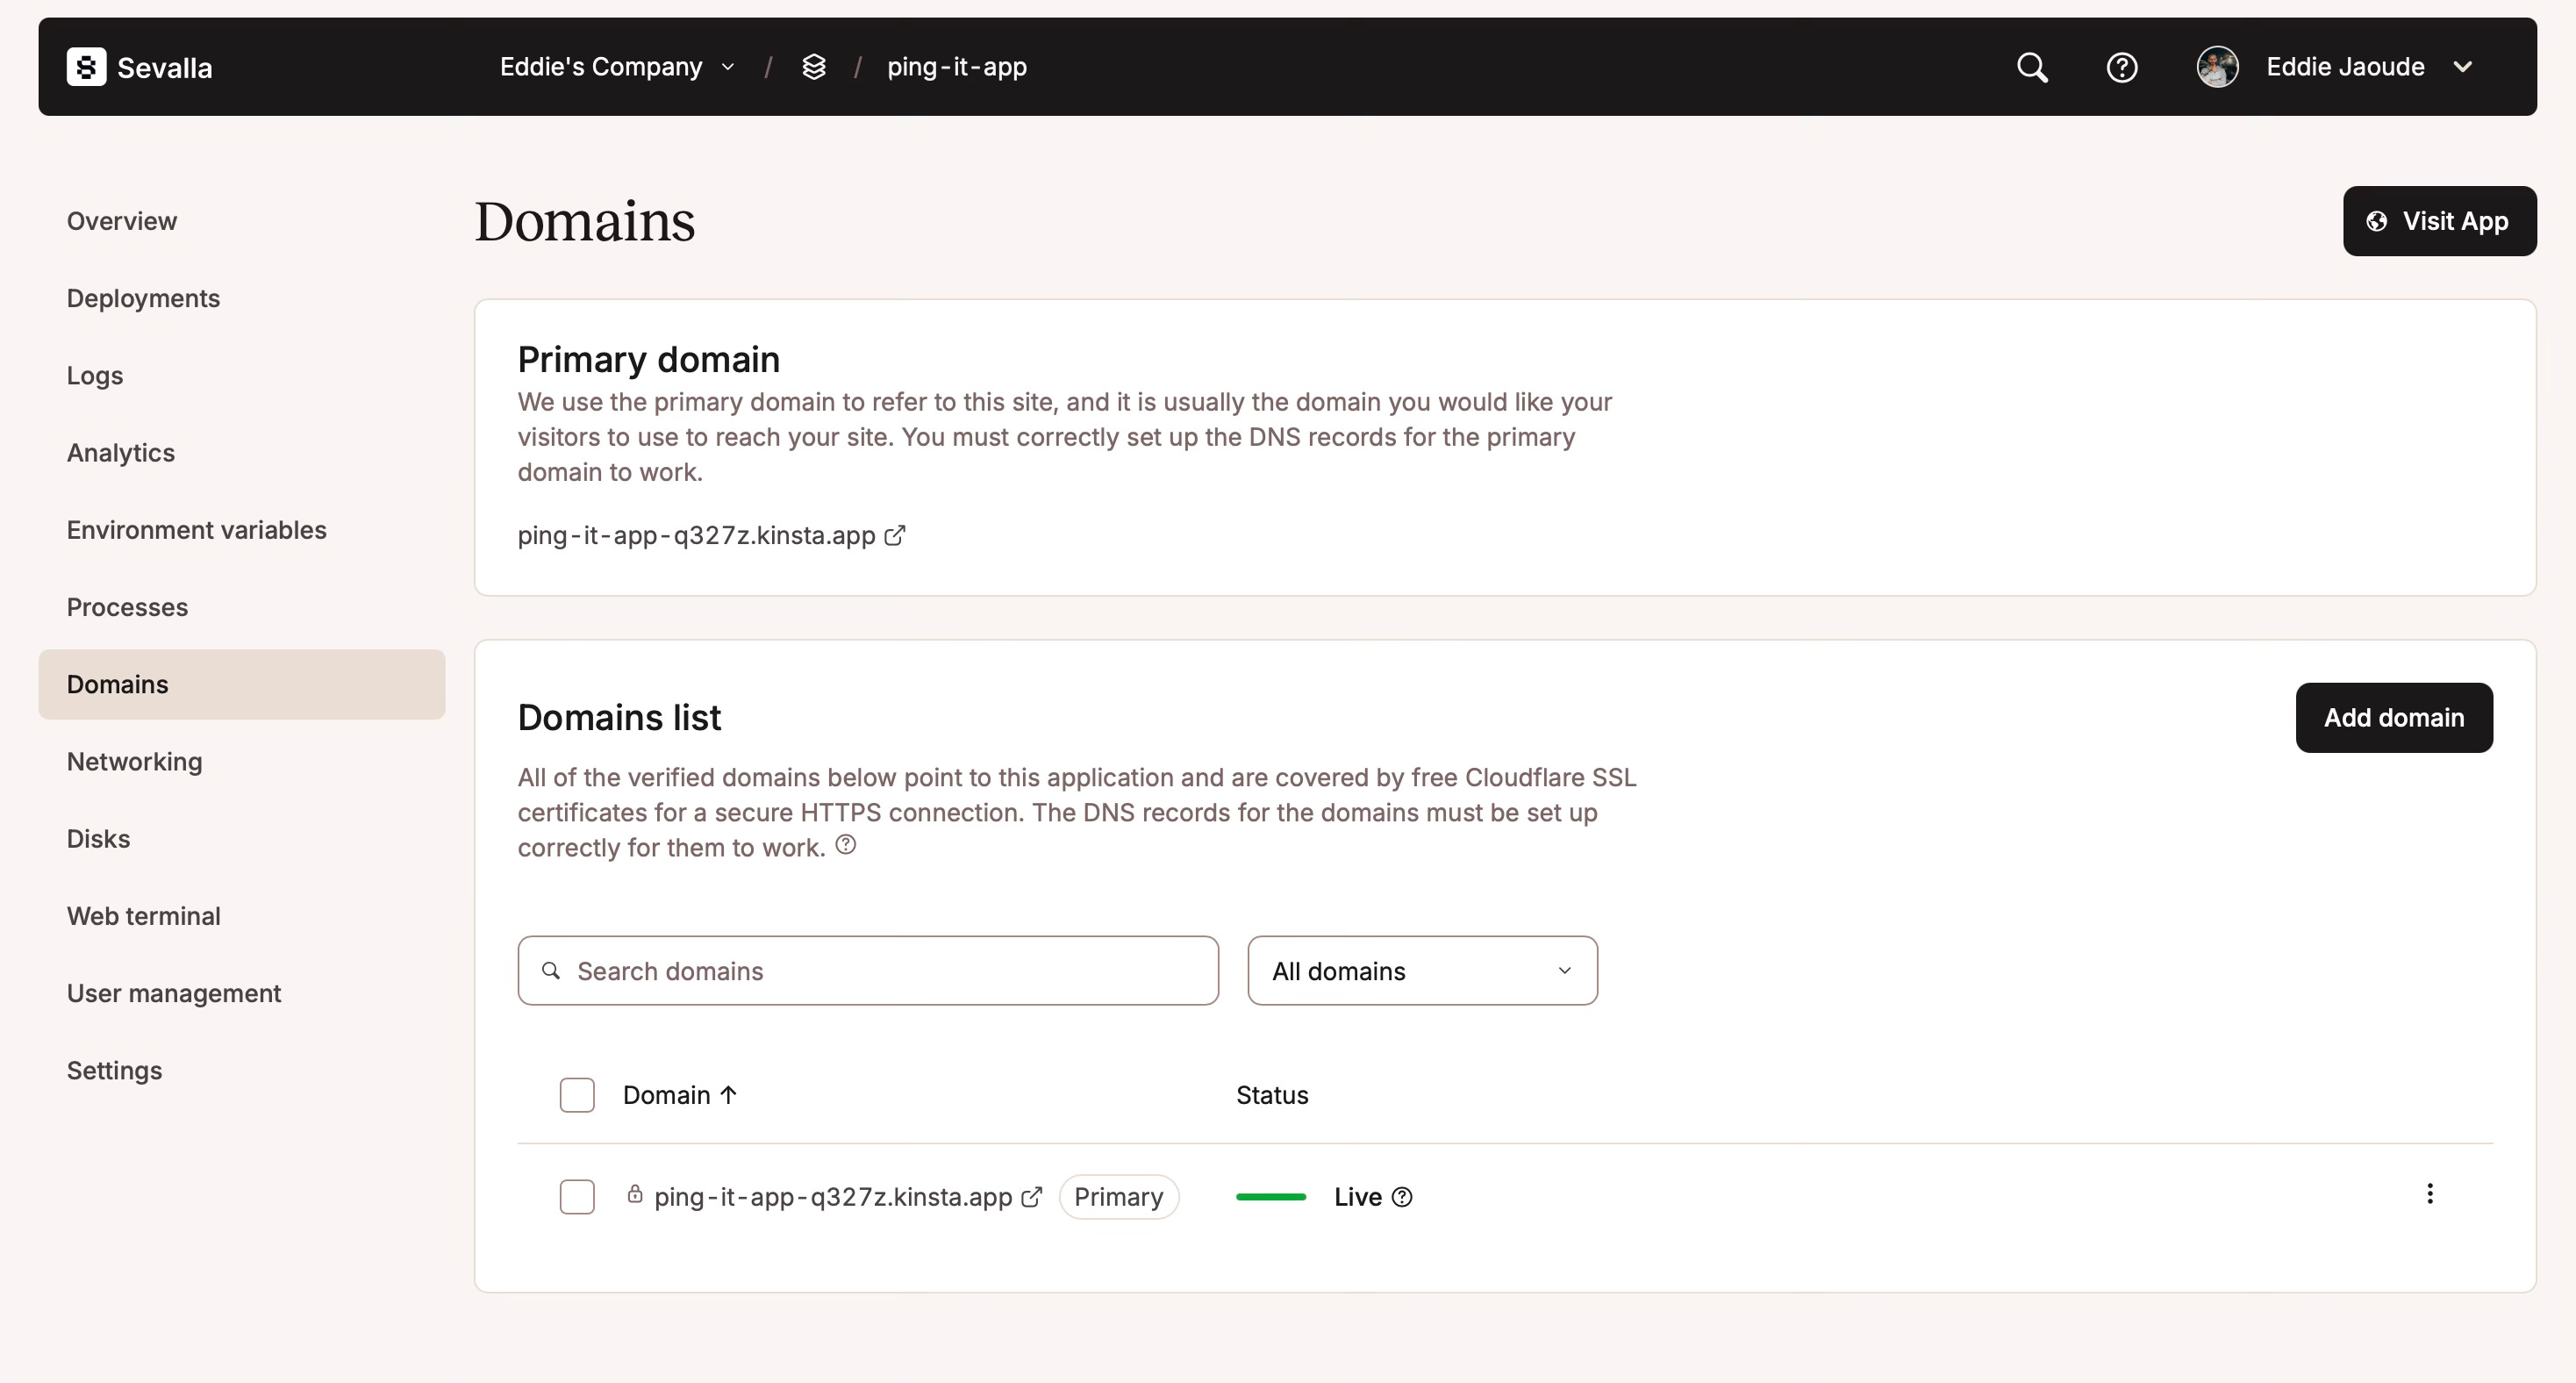
Enter the full domain you purchased, mine is pings.sh, what do you think?
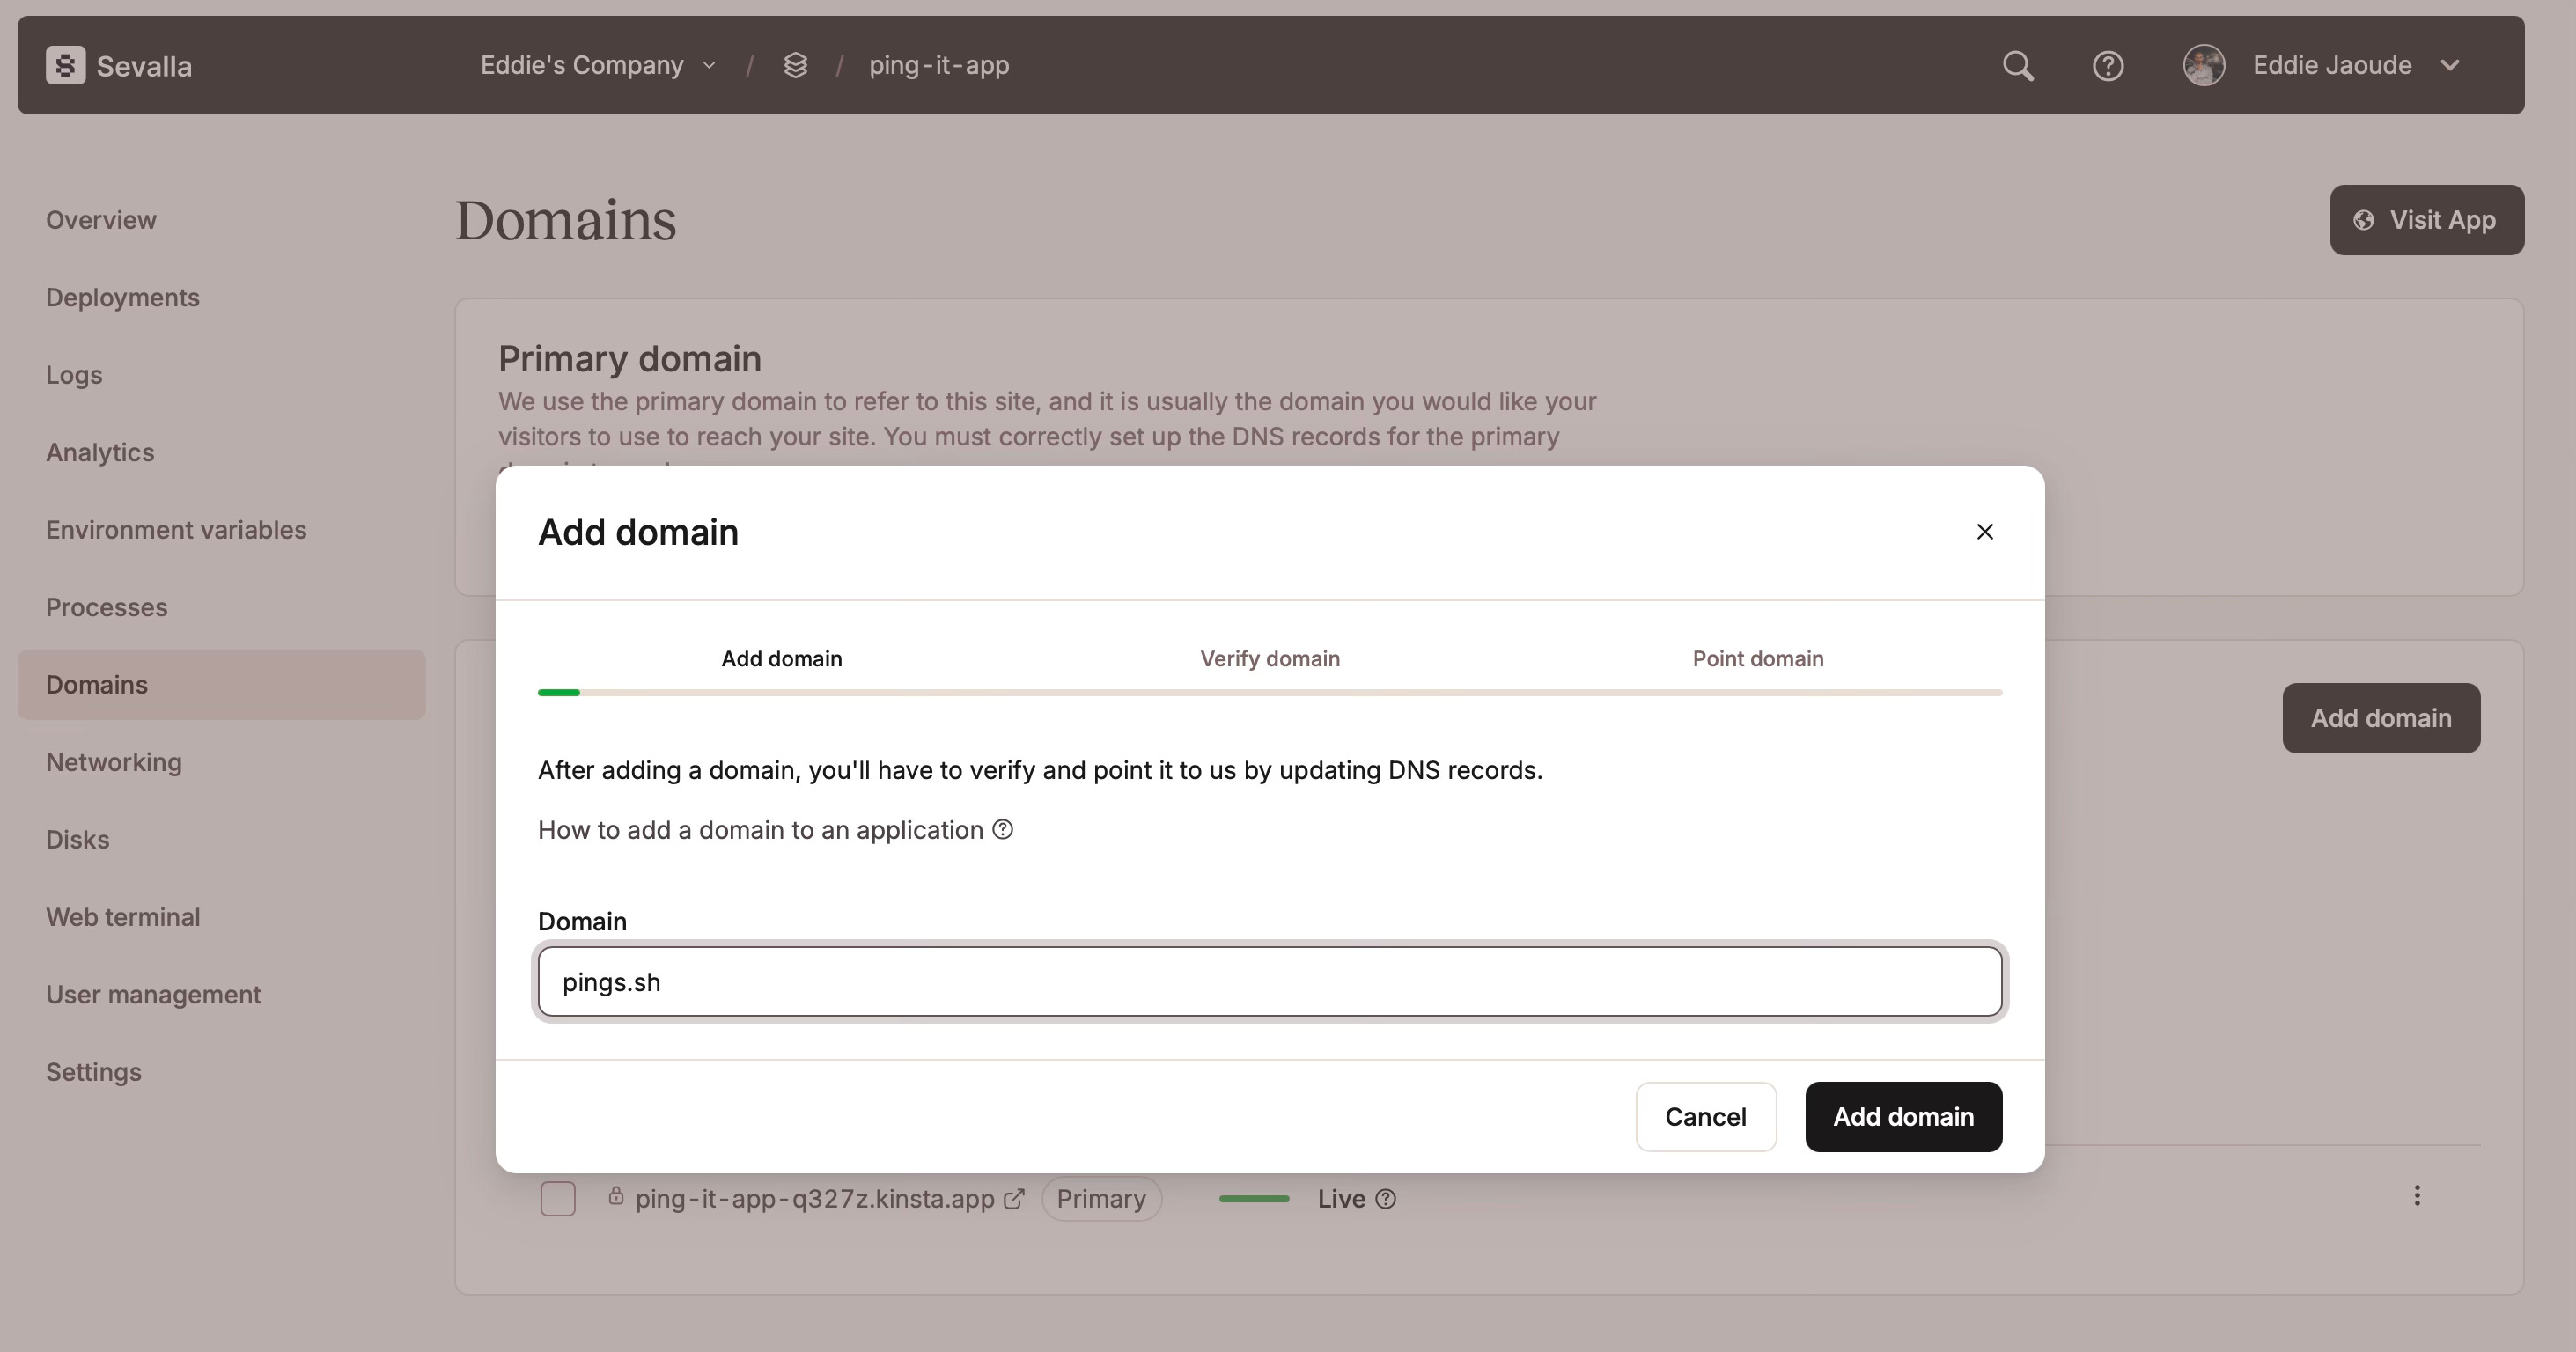
Follow the wizard’s step-by-step instructions to add `TXT` to your domain’s DNS records with the provided values to your domain to prove ownership. Then Sevalla will verify the DNS records.
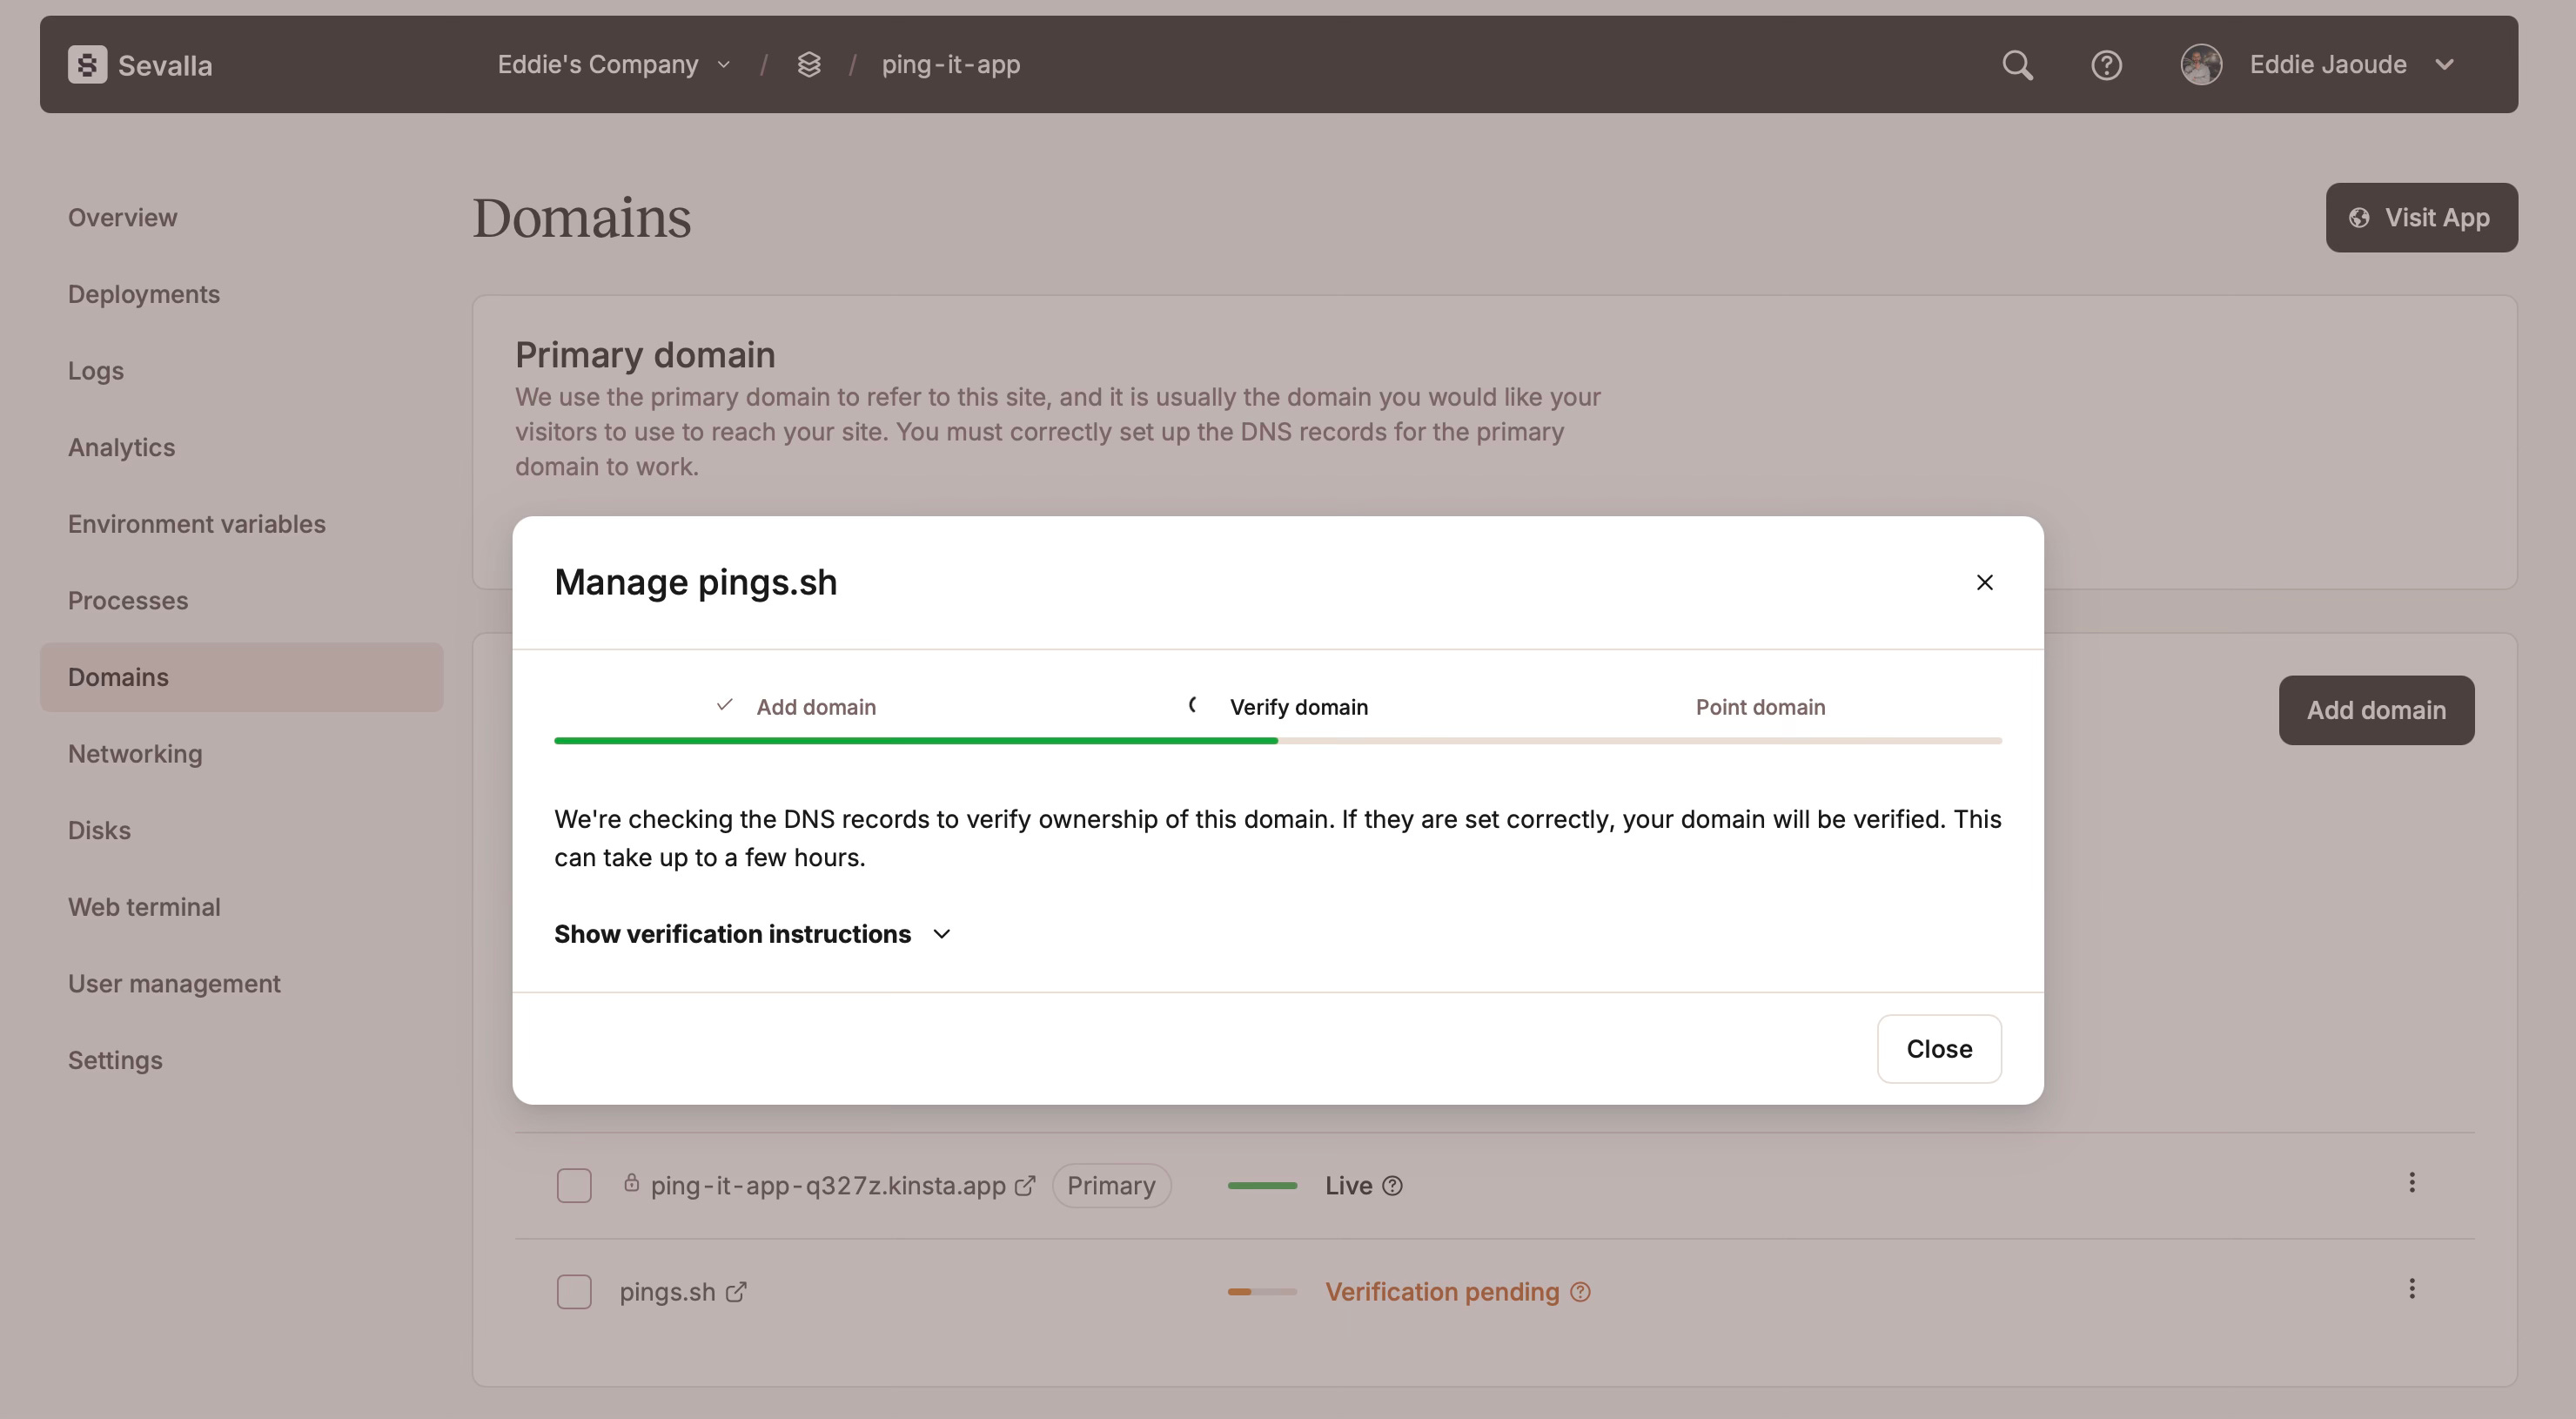
The verification can take some time as it is waiting for DNS to propagate. While you are waiting Sevalla will show that the verification process is pending:
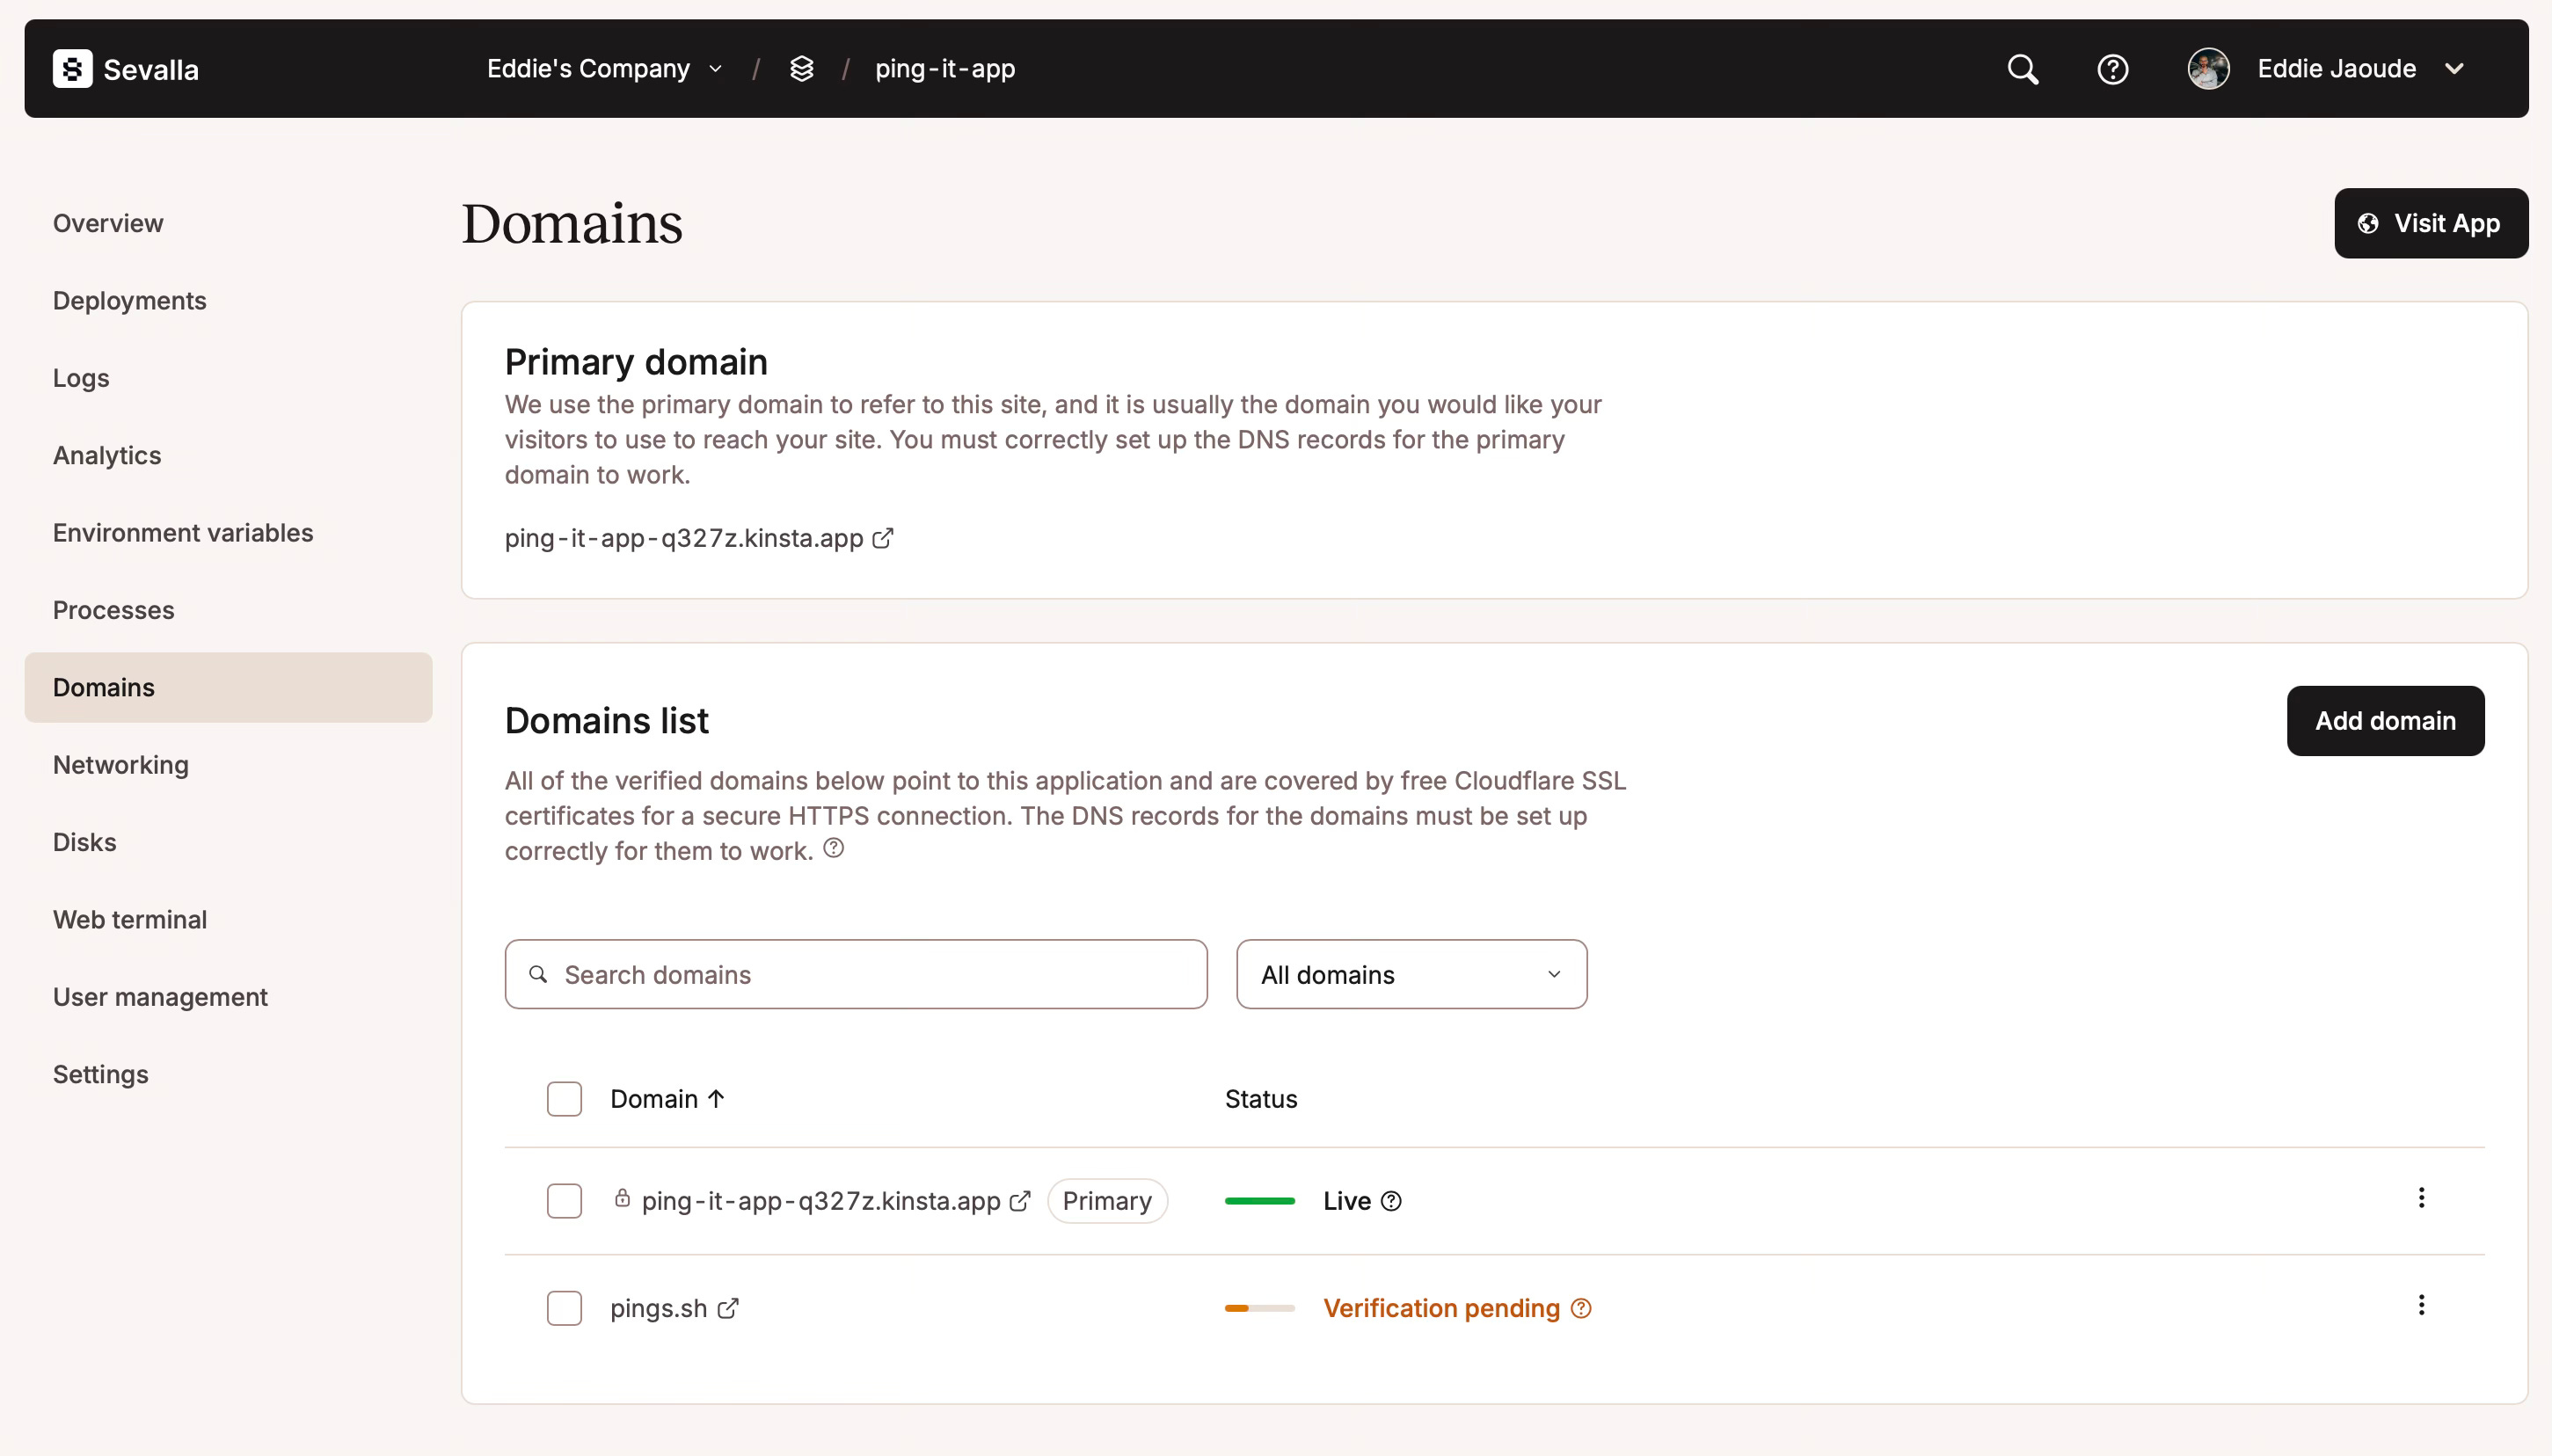
Once verified, it will give you the IP you need to point your DNS `A` record to on your domain, then shortly after you make these changes and they propagate through the internet you are ready!
Official Sevalla docs for domains
https://docs.sevalla.com/application-hosting/application-domains
Chapter 5: Build the project
Now the fun really begins, well for me at least! Creating the fullstack SaaS application.
Before we get started we now to need to remove the static NextJS export we configured earlier in the `next.config.ts` file.
The diff in Cursor will look like this:
Authentication with Clerk
I always recommend starting with authentication. It may not be considered the most “fun”, but it is required and it will be the foundation for the application. What I mean by “foundation” is that almost every database query in this application will be authenticated.
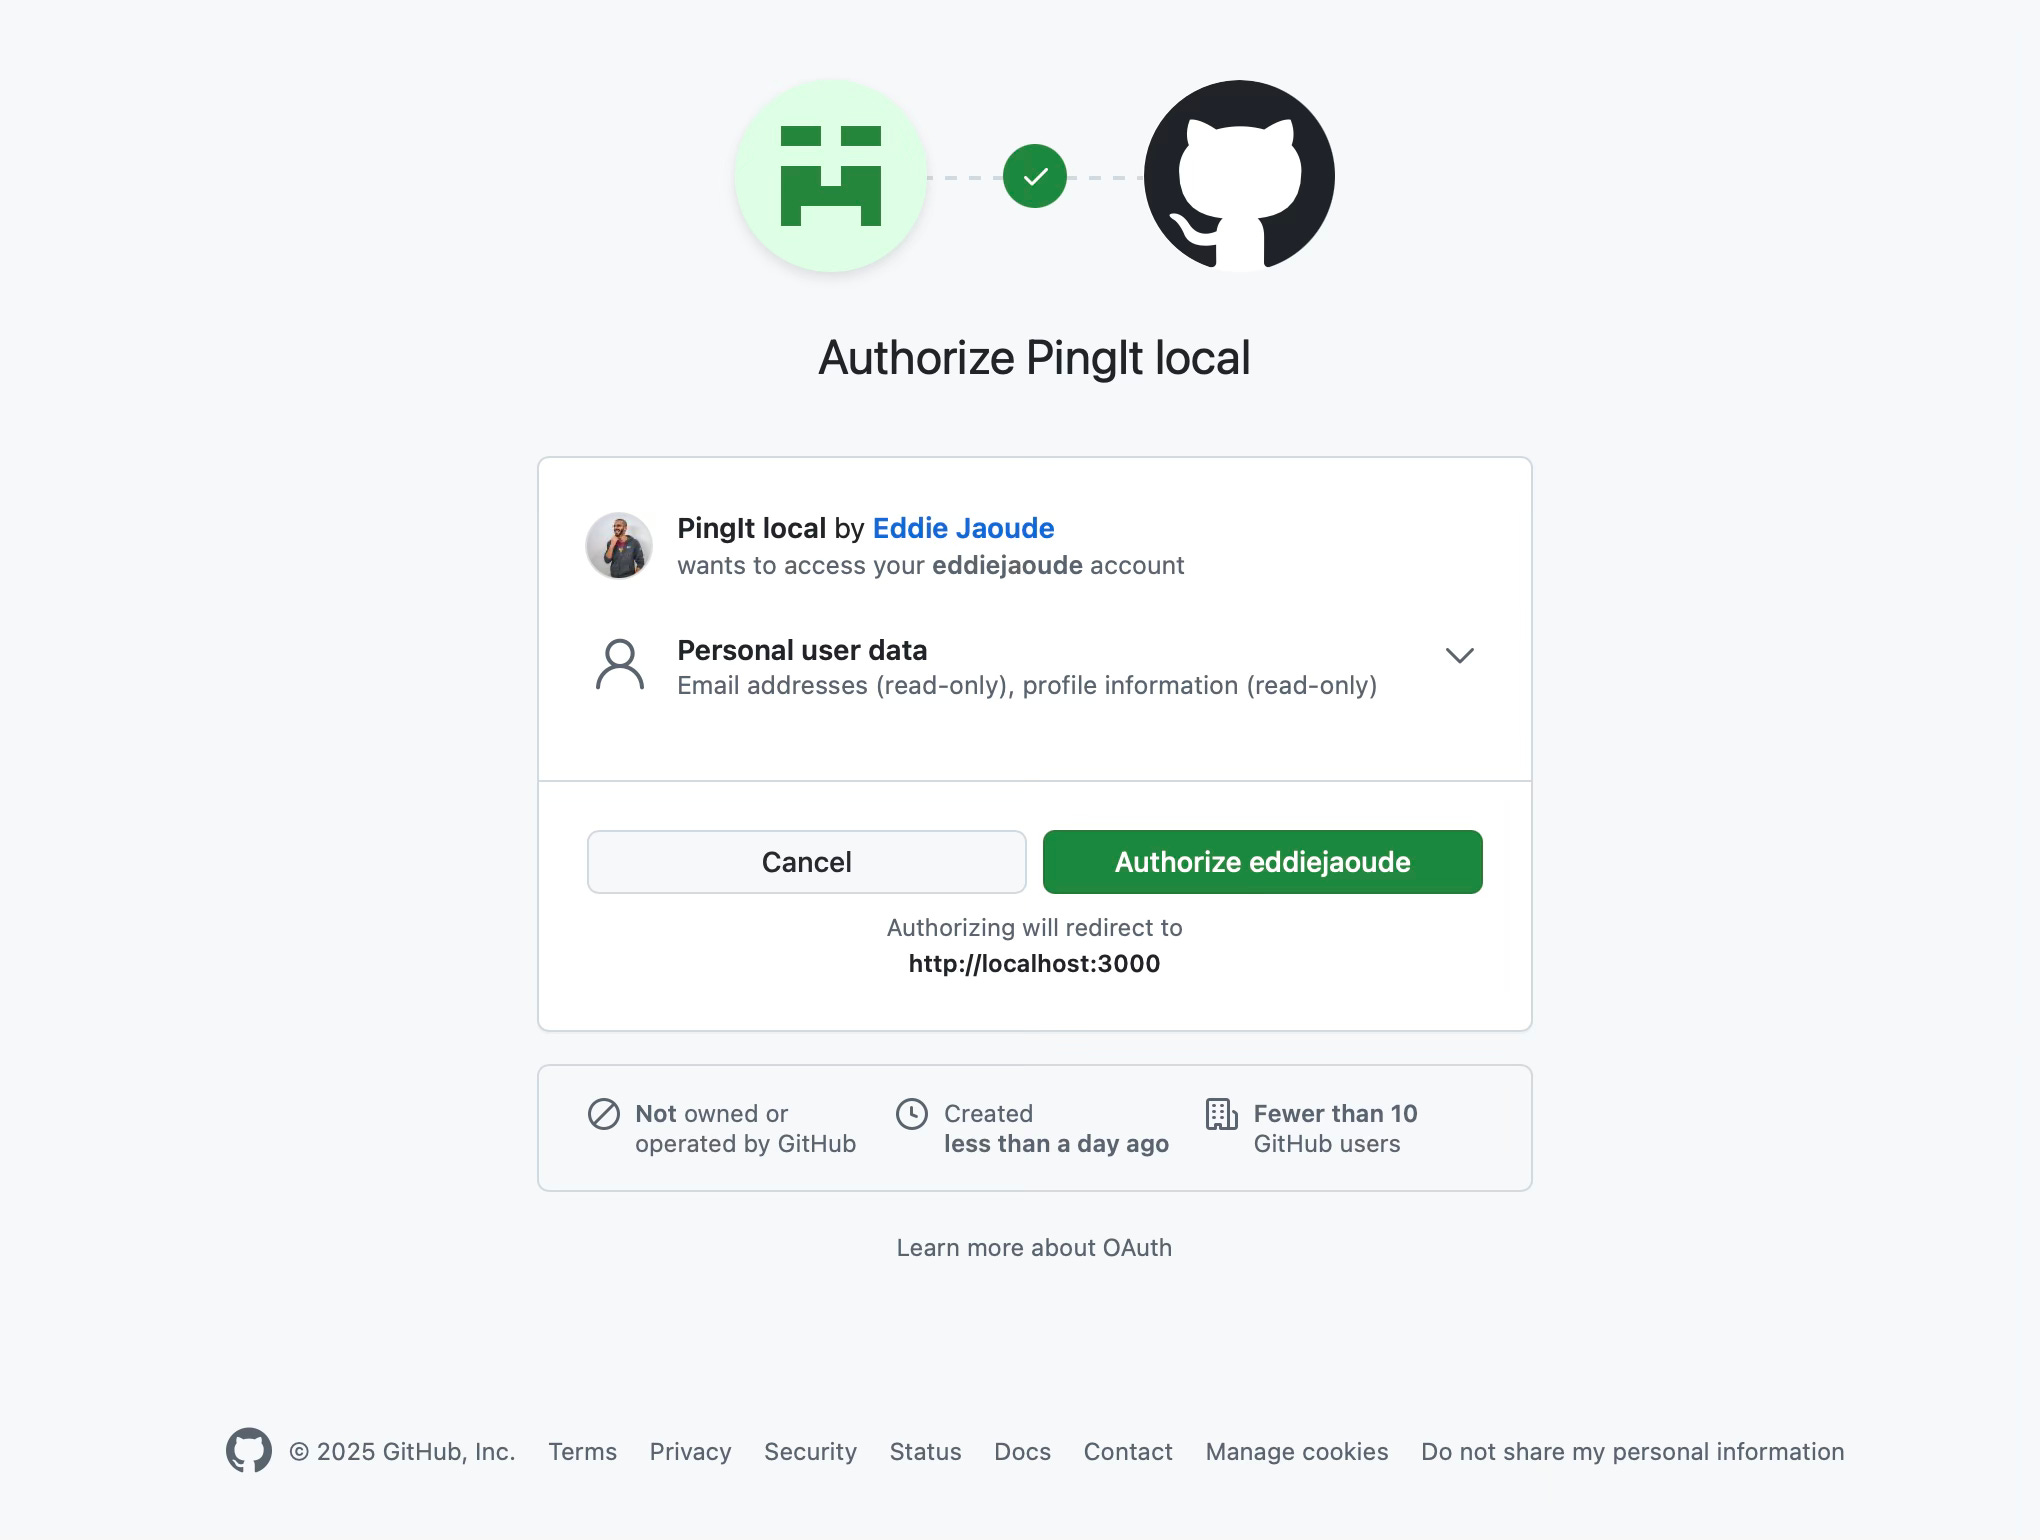
I will ask Cursor AI to “add authentication user Clerk with GitHub OAuth”. I find AI is very good at this because there are so many examples out there. It even gives the steps to set up the account and what secrets are needed to get from the GitHub OAuth provider.
Clerk has great documentation, so if you follow the steps for Clerk with NextJS you will have GitHub OAuth set up in a few minutes. Then you can click login and you will be presented with the following OAuth GitHub page to log in:
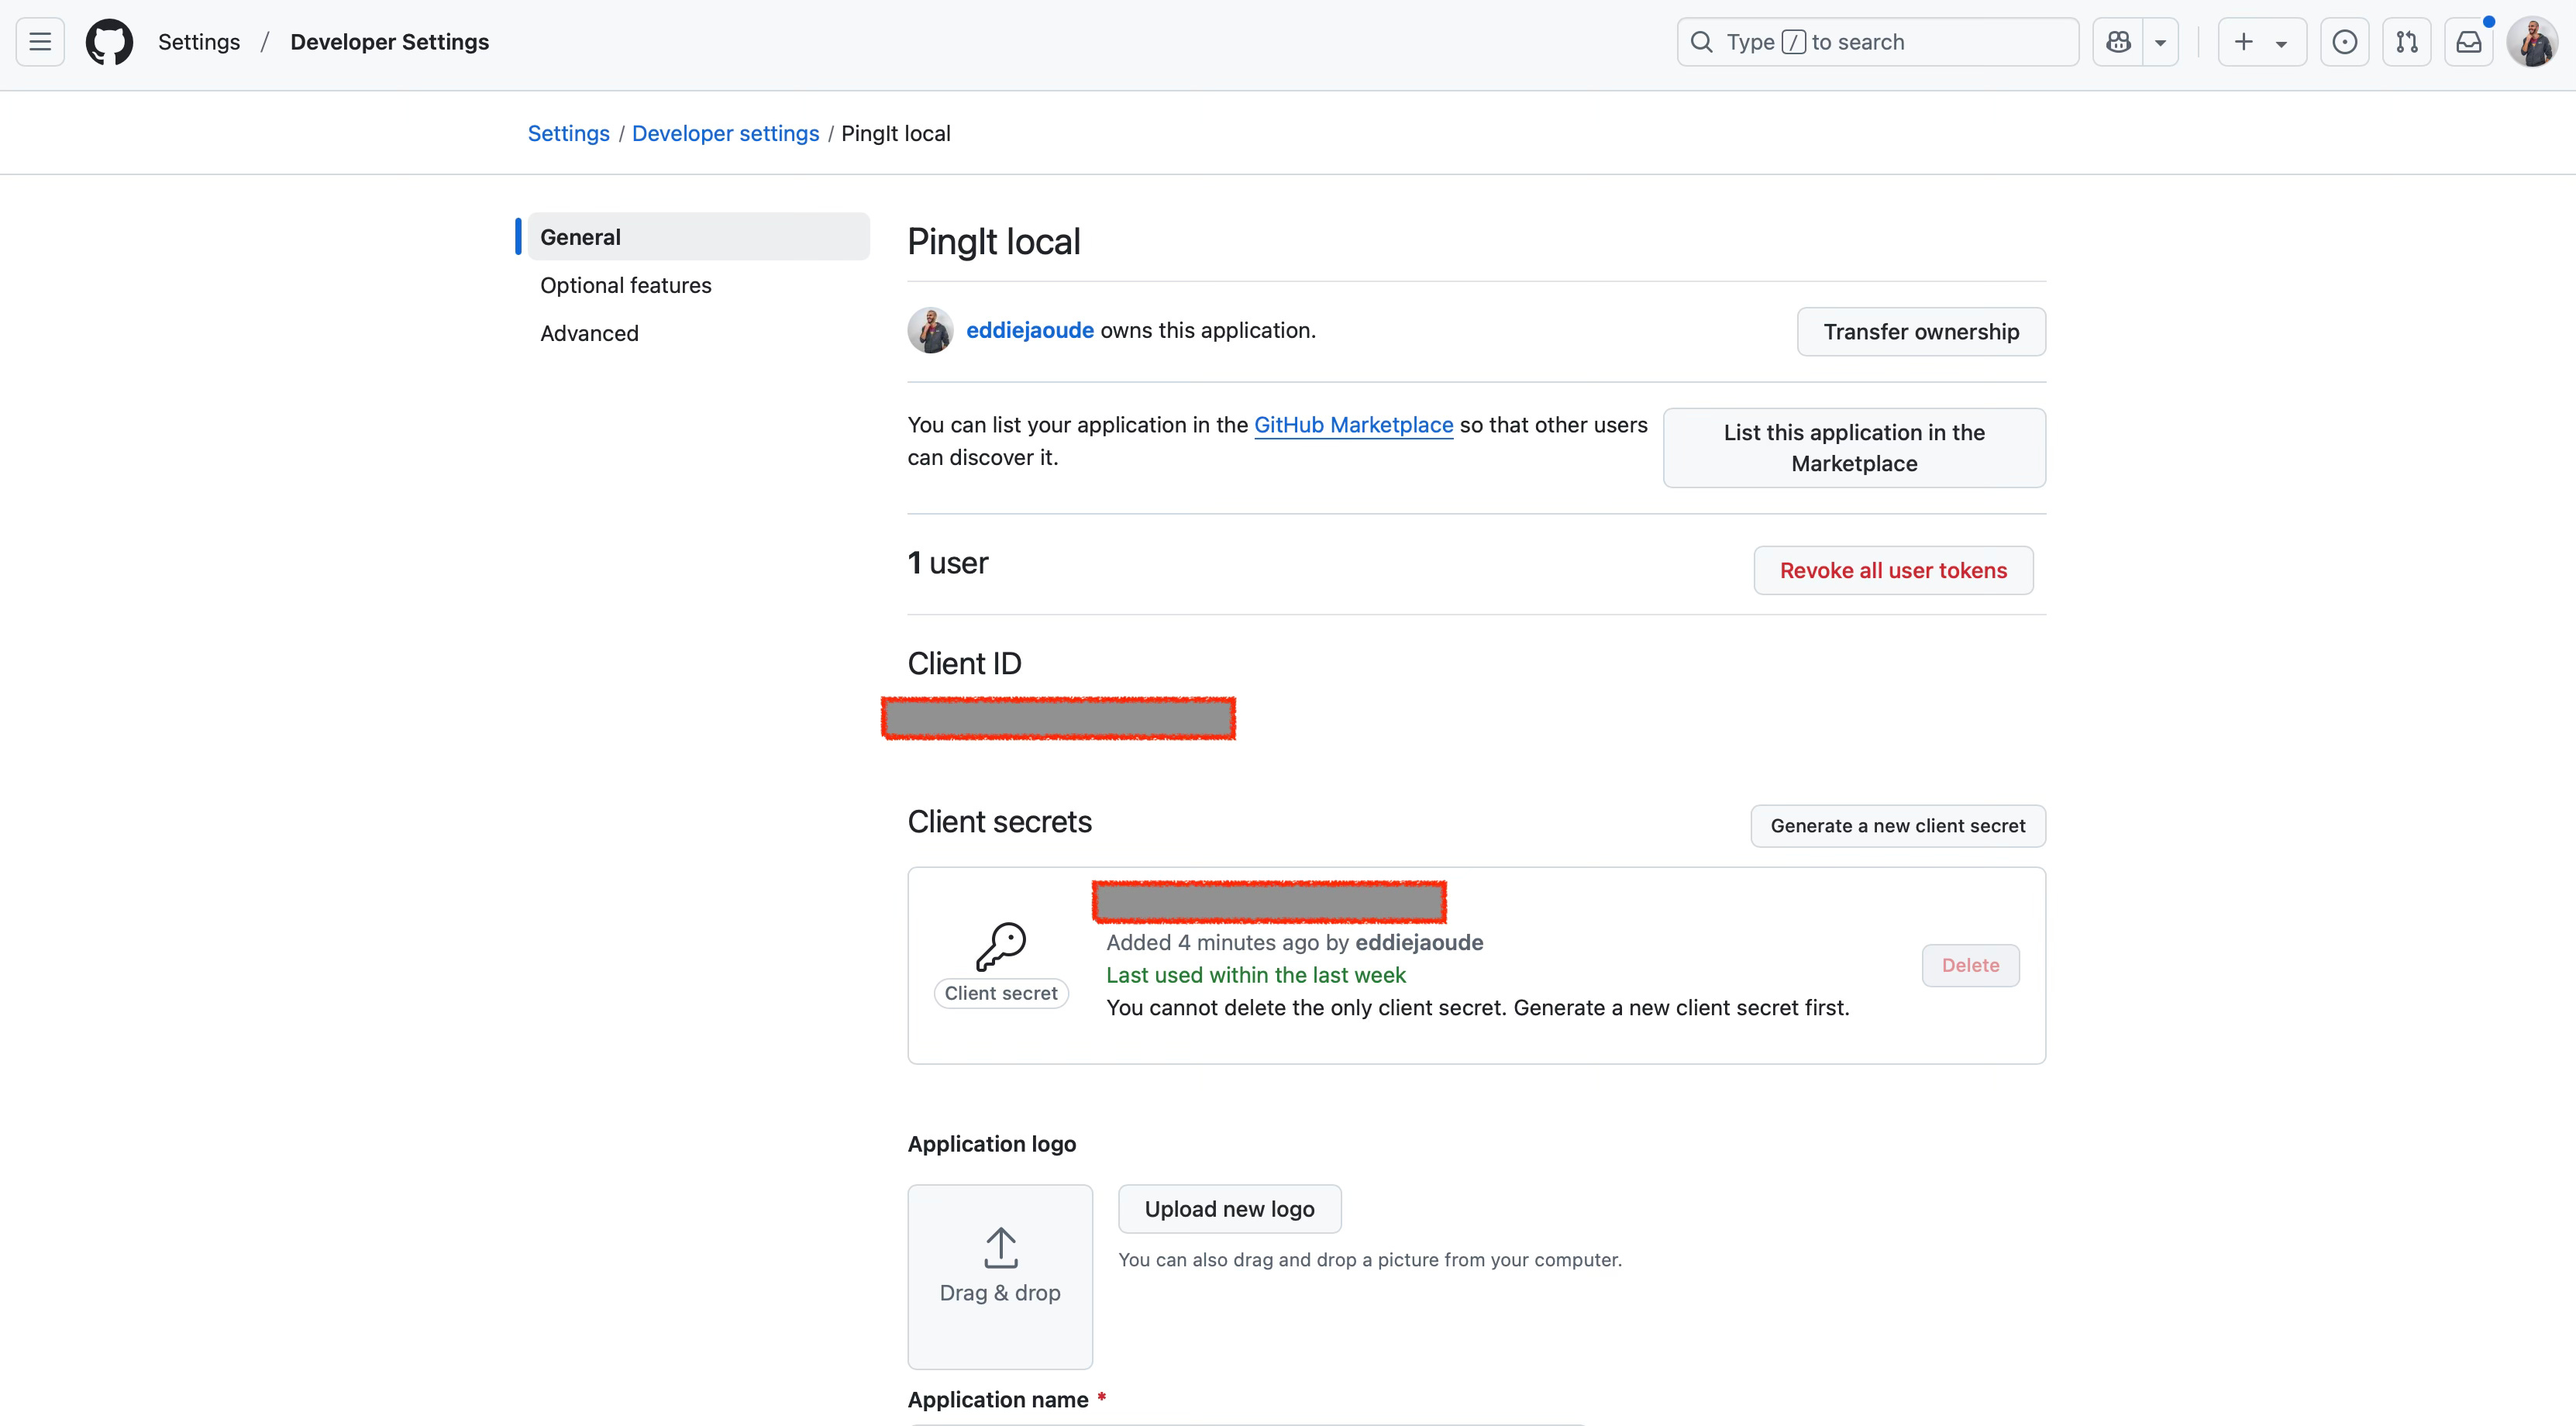
Also Clerk and your GitHub OAuth app will now show 1 user has authenticated, which you can check this on their dashboards:
Clerk’s Dashboard
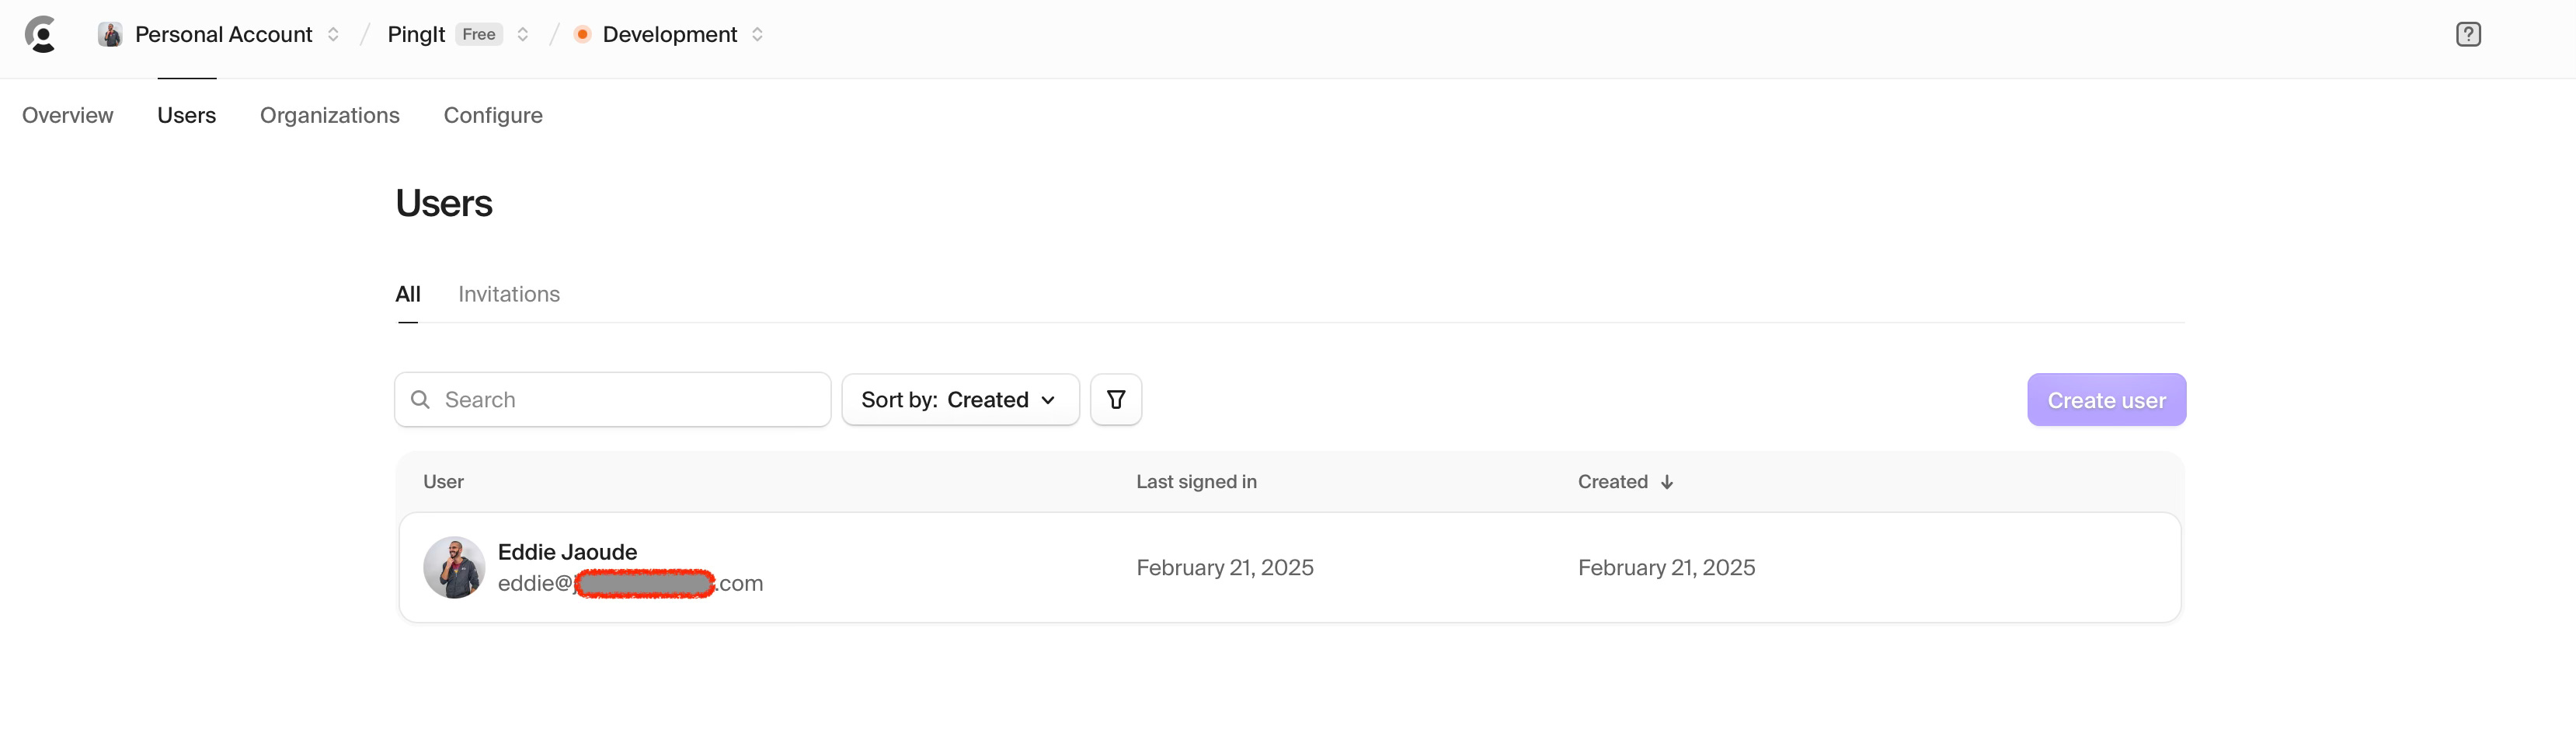
GitHub’s Dashboard
Now I have logged in, I am presented with my GitHub name, which is a good indication that all is working well. Your own page will probably look different as the point is to let AI have a bit of freedom here, but you should have a similar result. If not chat with AI to resolve and move forward. I find this is often needed with AI, so don’t be concerned if things do not turn out exactly as you envisioned first time round, as it can often surprise you with a different result.
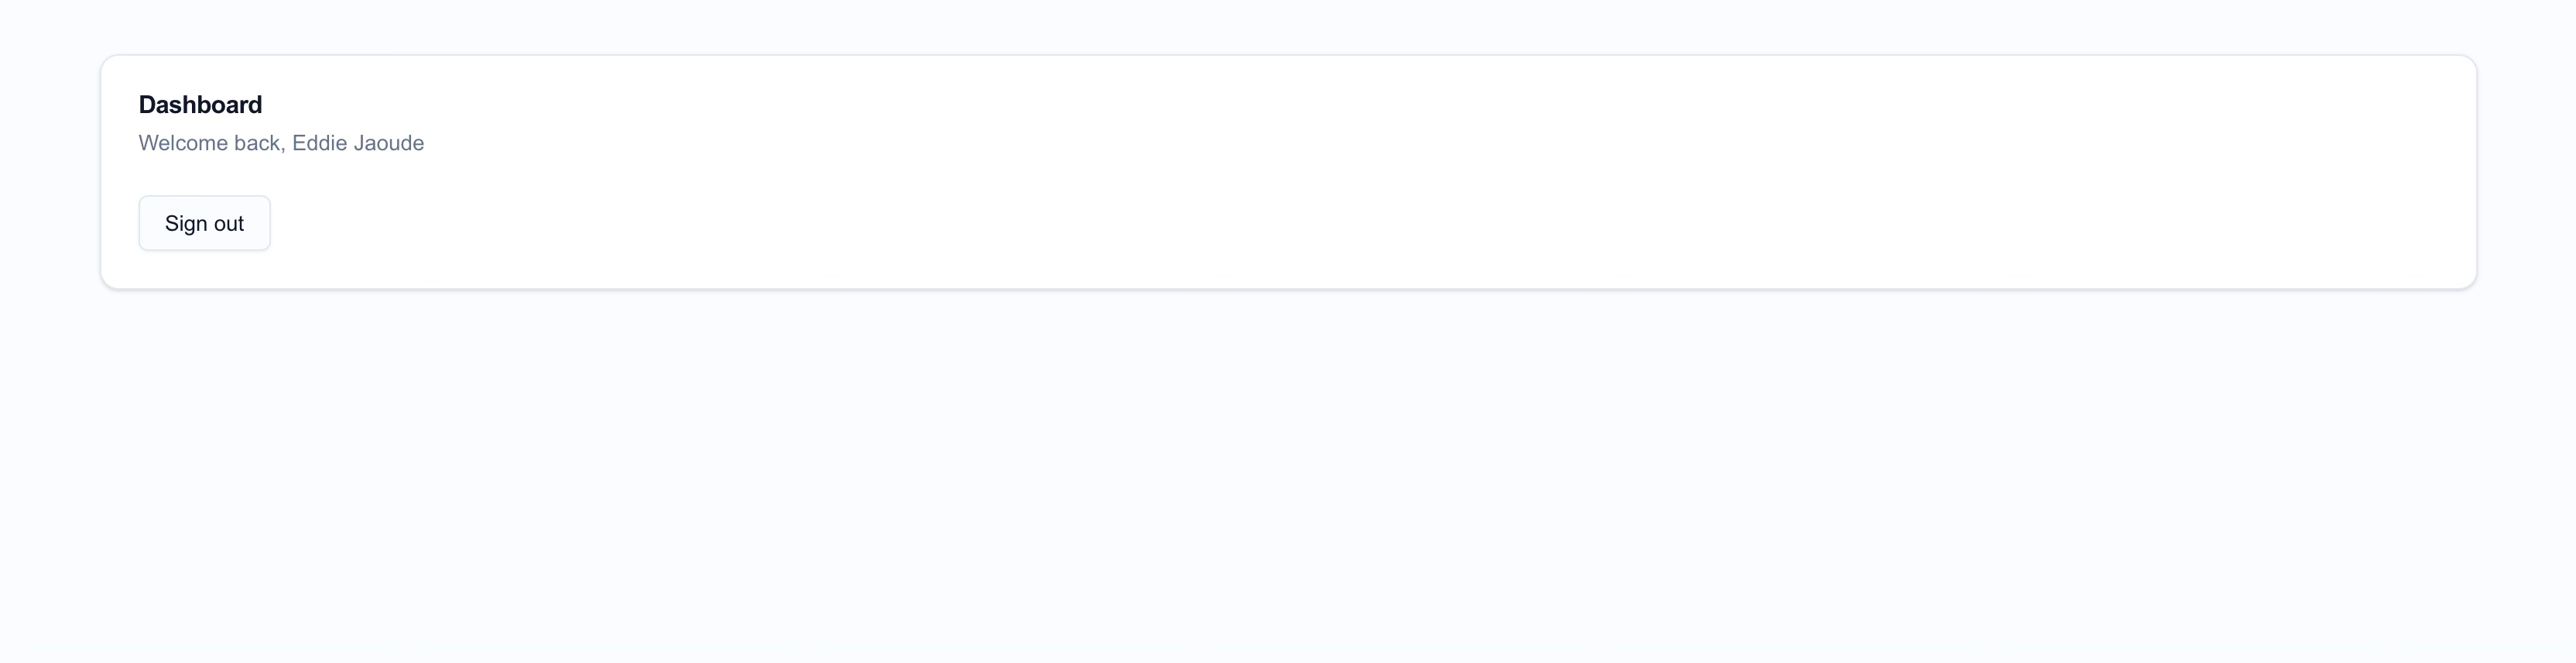
Make sure to check the secure pages that require authentication are protected as AI often forgets things like this. If you do find this is the case, then ask AI to implement a solution. As an extra check remember to test this in your browser as well as private browsing as a guest, and make sure the secure pages are not reachable and you are redirected accordingly usually to the login page.
Automated tests with tools like Playwright are amazing here. They allow you to confidently make changes with the help of AI as you can test all the main features and security in seconds with the automated test suite.
This is a whole topic in itself and I already have a lot of content on automated testing and Continuous Integration (CI). Check it out and any questions let me know.
Prisma (Postgres)
The next step is to save data in my database and I will start with the Monitor data. This will be the foundation of our app and we will need to have the field `userId` for each monitor, so the user can only see and manage their own data. I asked Cursor AI to do this for me and I will review the diff from the changes it creates.
CRUD monitors
Here is what I asked Cursor AI to do:
create a new page for the authenticated user to CRUD their monitor. The monitor form should include a name and url, include client side and server side validation using zod. Use Prisma with postgres to save the monitor data and include the userId field from Clerk.
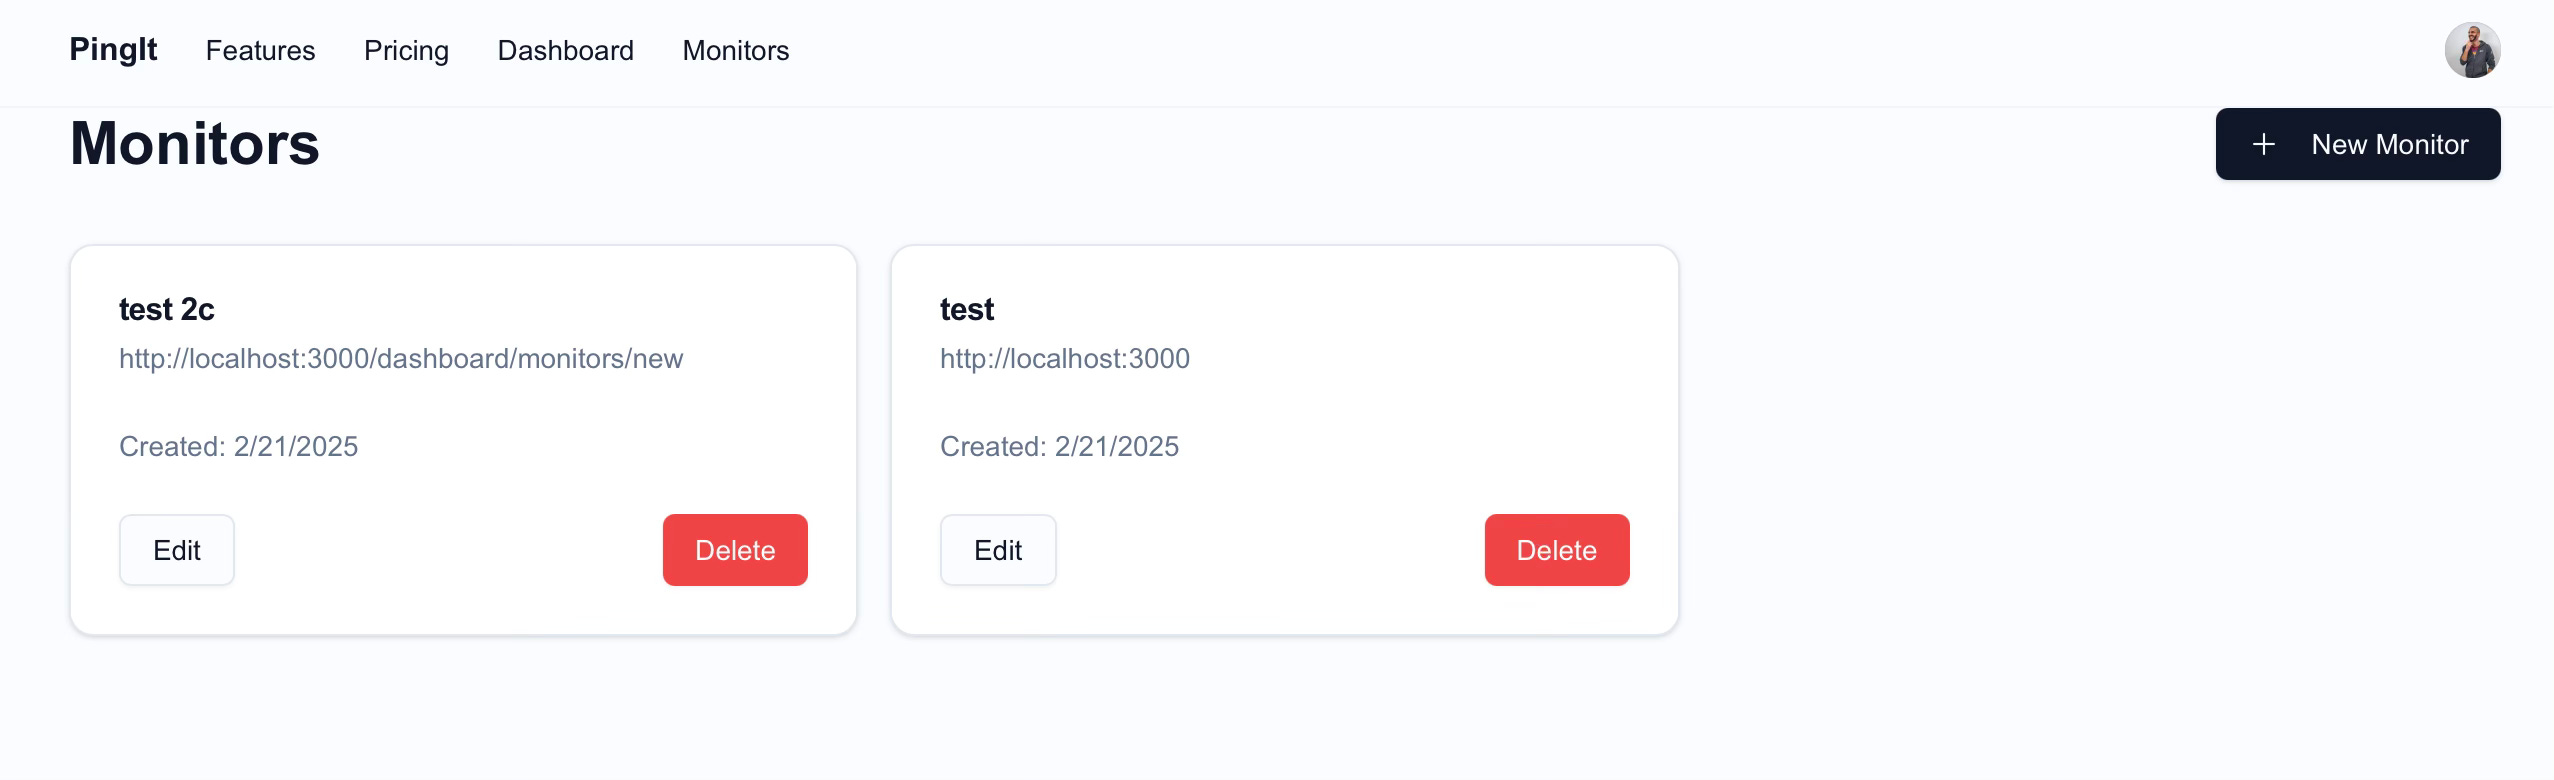
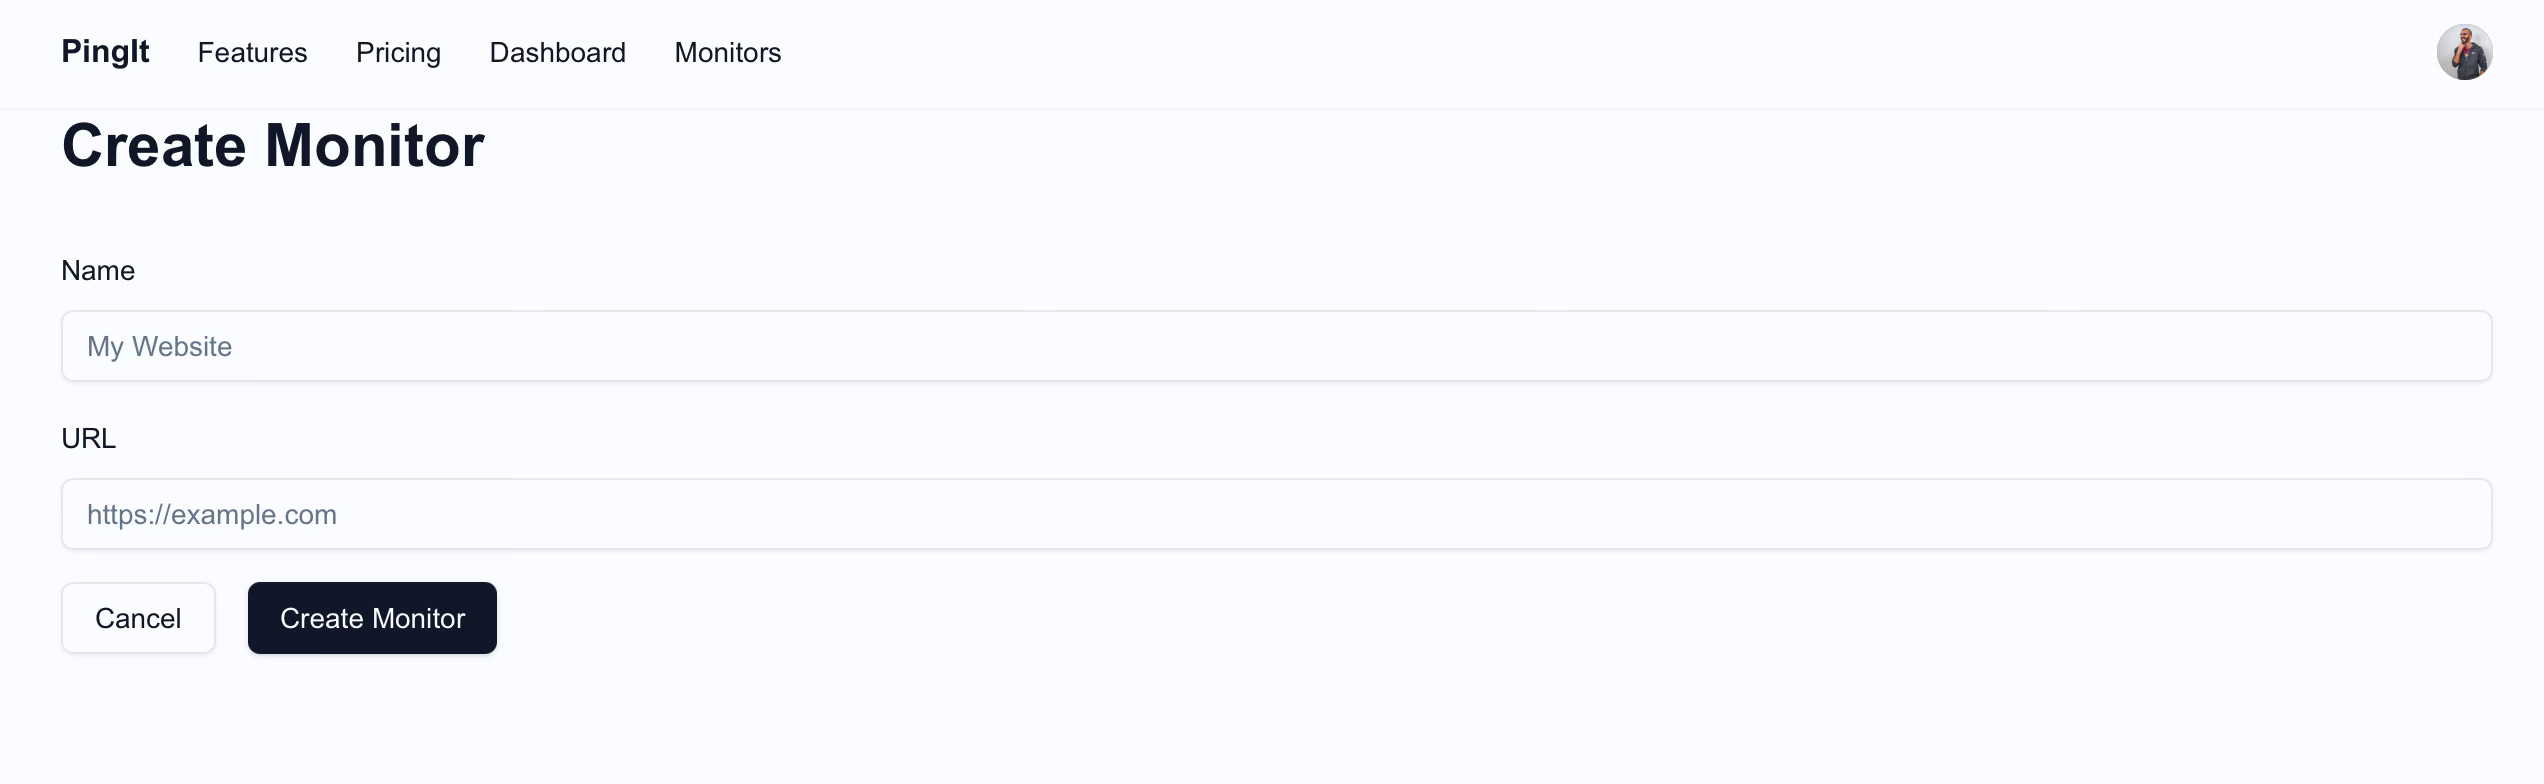
It had the “create new monitor” form on the Monitors list page, which I didn’t like so I went back and asked AI to move this to its own page. That way the edit Monitor could reuse the same code or even page.
This is the result:
Monitor list page
Monitor create / edit page
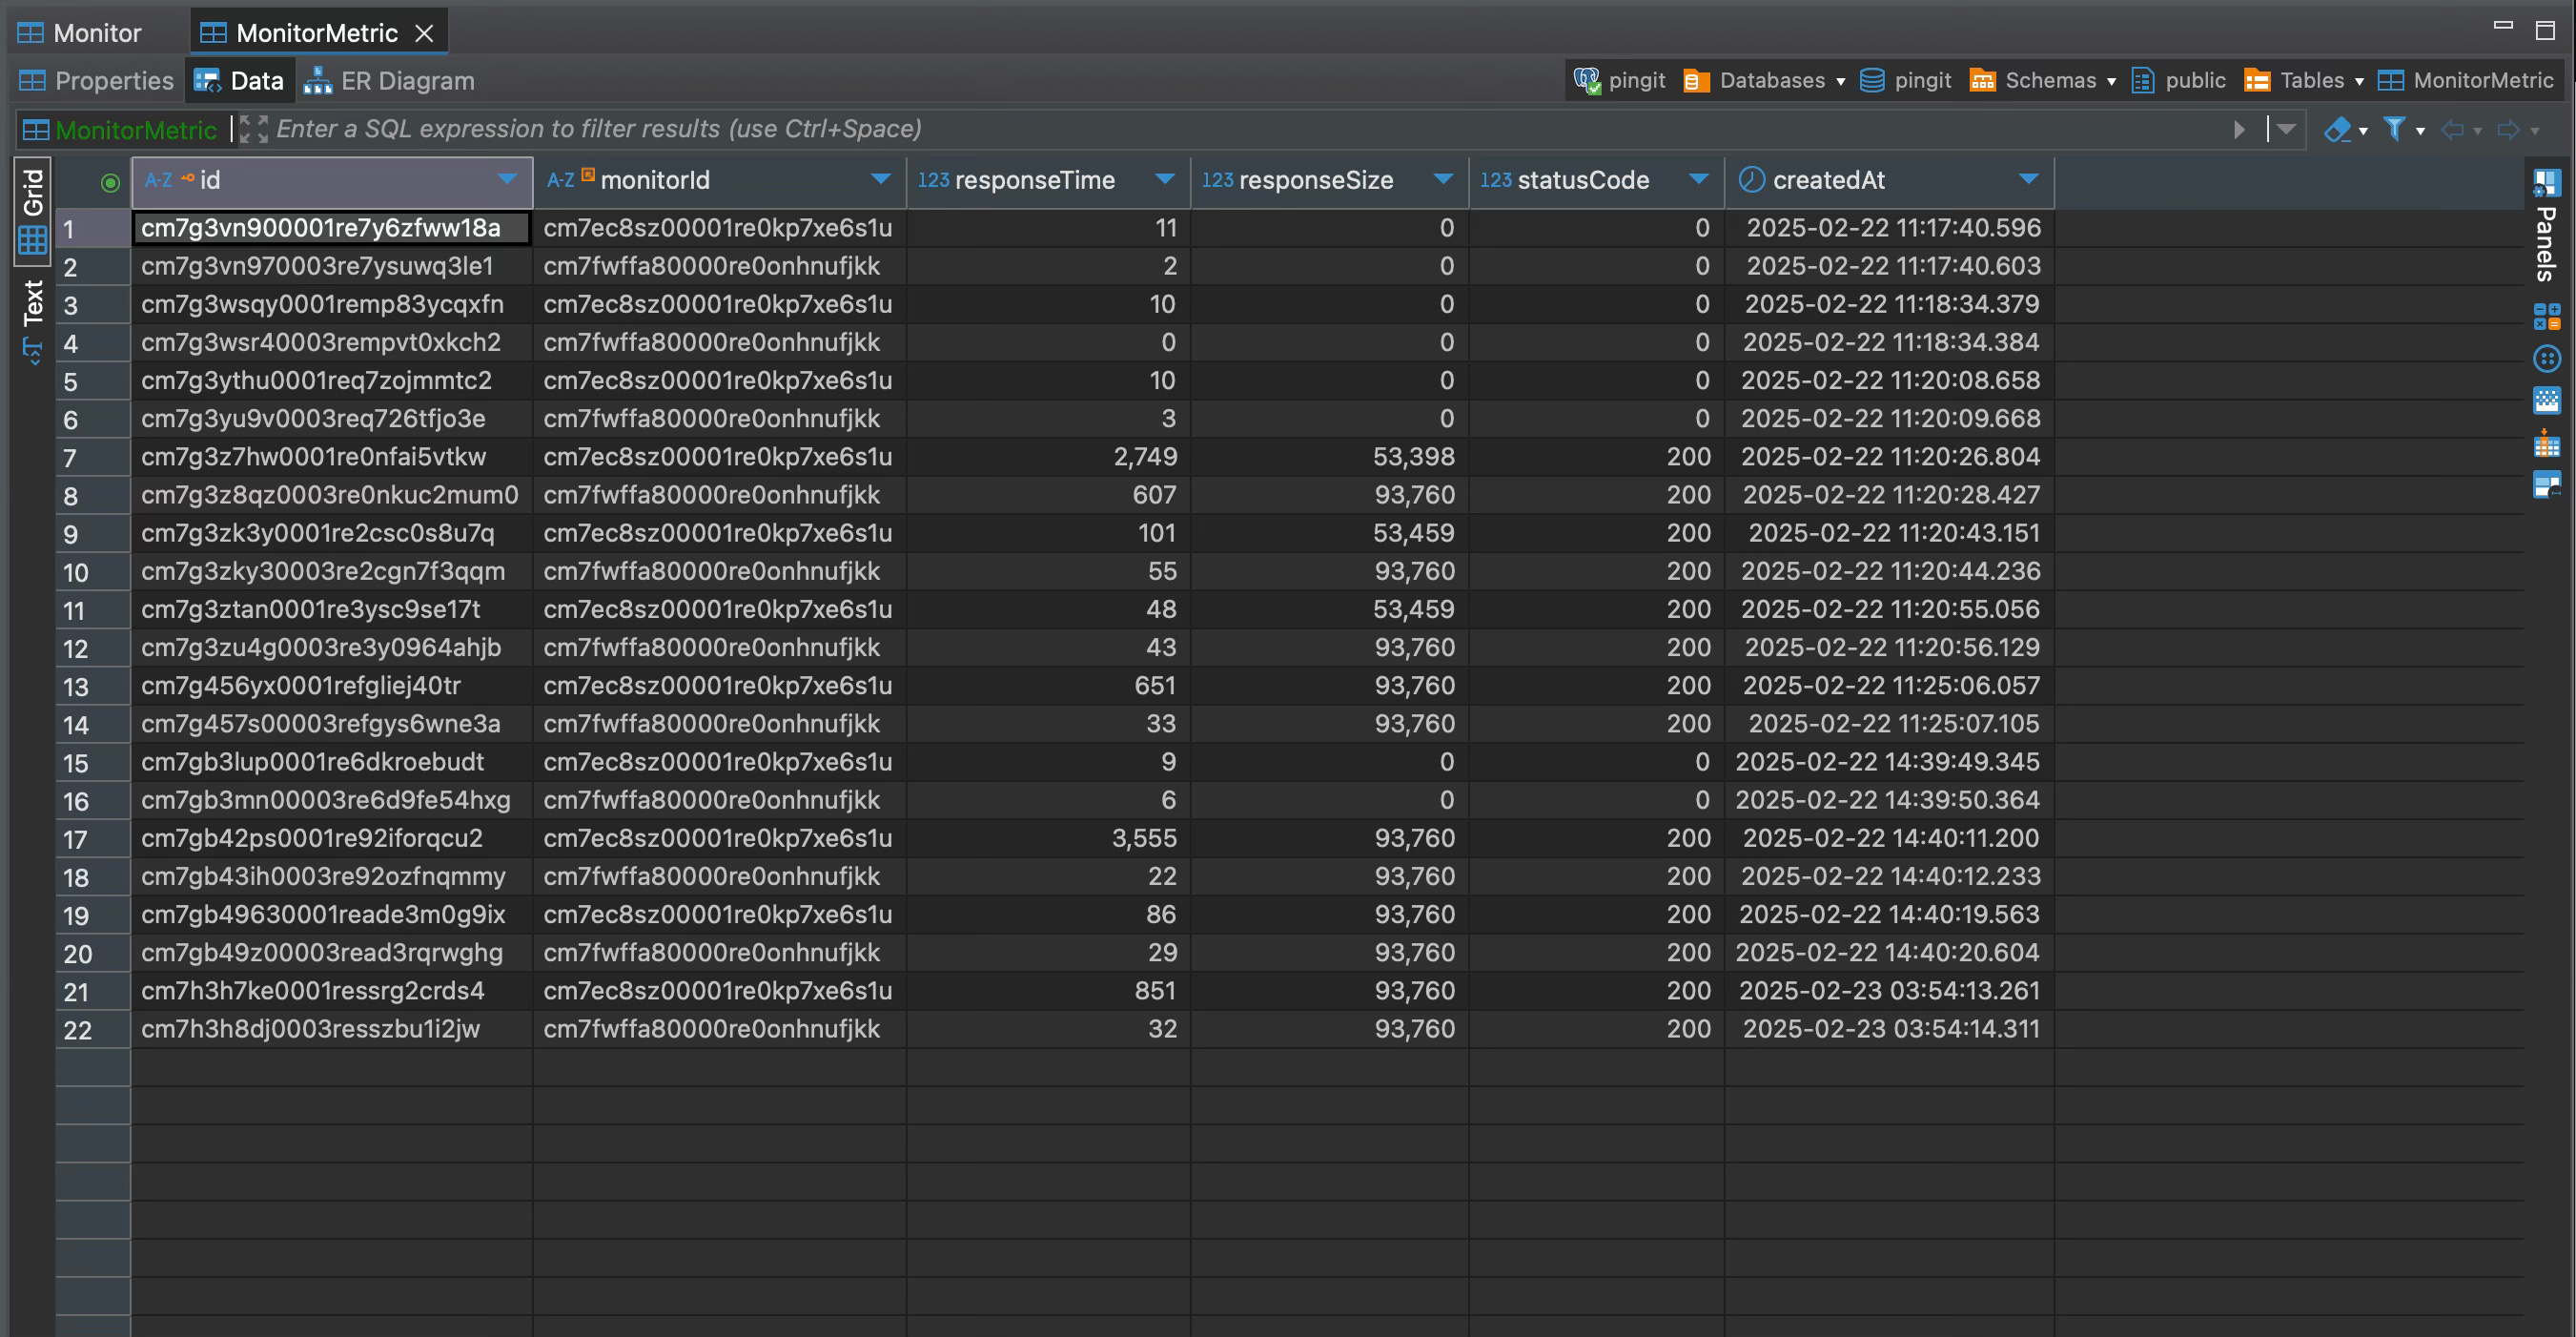
Monitor Postgres database table
The database table Monitor has the column `userId` and all database SQL queries include the following parameter which comes from Clerk’s unique identifier for each user:

Scheduler to run ping for each monitor
Now I have the ability to create, edit and delete monitors, I need to have these run on a scheduler (cron) and save the relevant results. I asked AI to create this for me and it got it right first time - yes I am surprised! Now I have a Typescript script that can be called from npm, which collects the information needed for every monitor. This is not protected per user as it will be a system call only which runs for every monitor on the platform regardless of the user.
Collect data for all the monitors by running the command:
npm run monitorYour command might be named differently. This makes the http request and collects the data in the database for each monitor:
List of ping results for each monitor
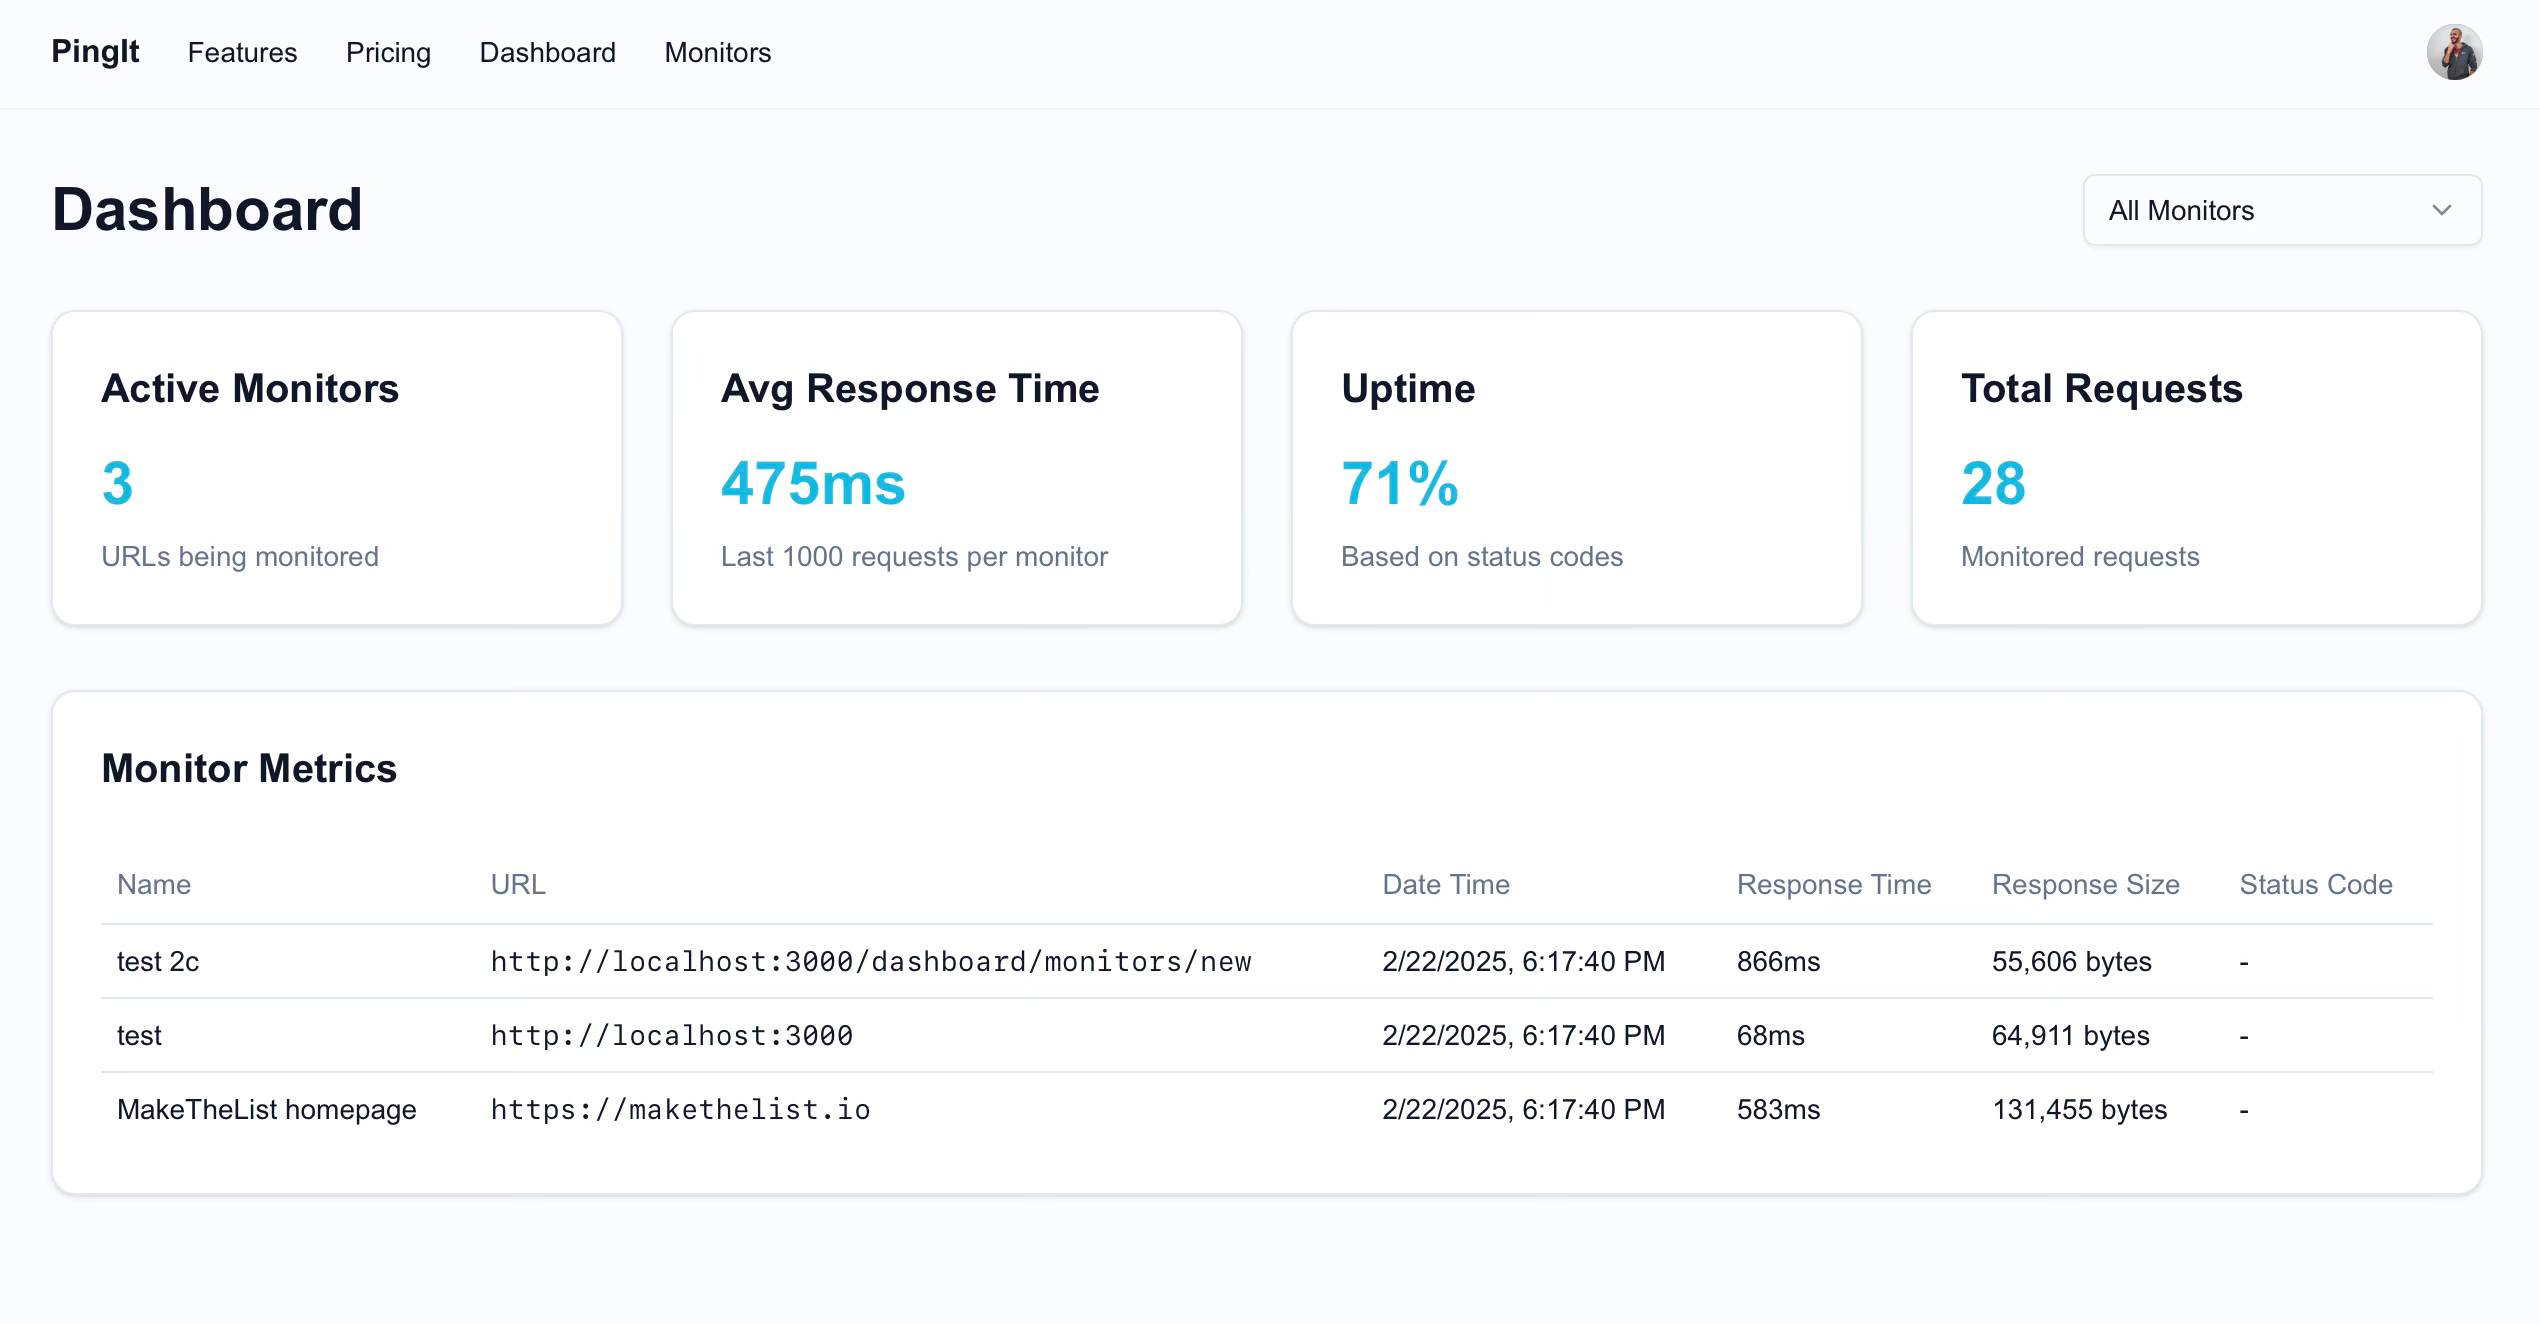
After the previous section of the scheduler and collecting data for each monitor, I need a way to display the results to the user of their own monitors - yes only their own data. I always start with asking AI but purposely keep my instructions a bit vague to see what it generates. Why? It might generate something I didn’t think of as well as giving me some ideas!
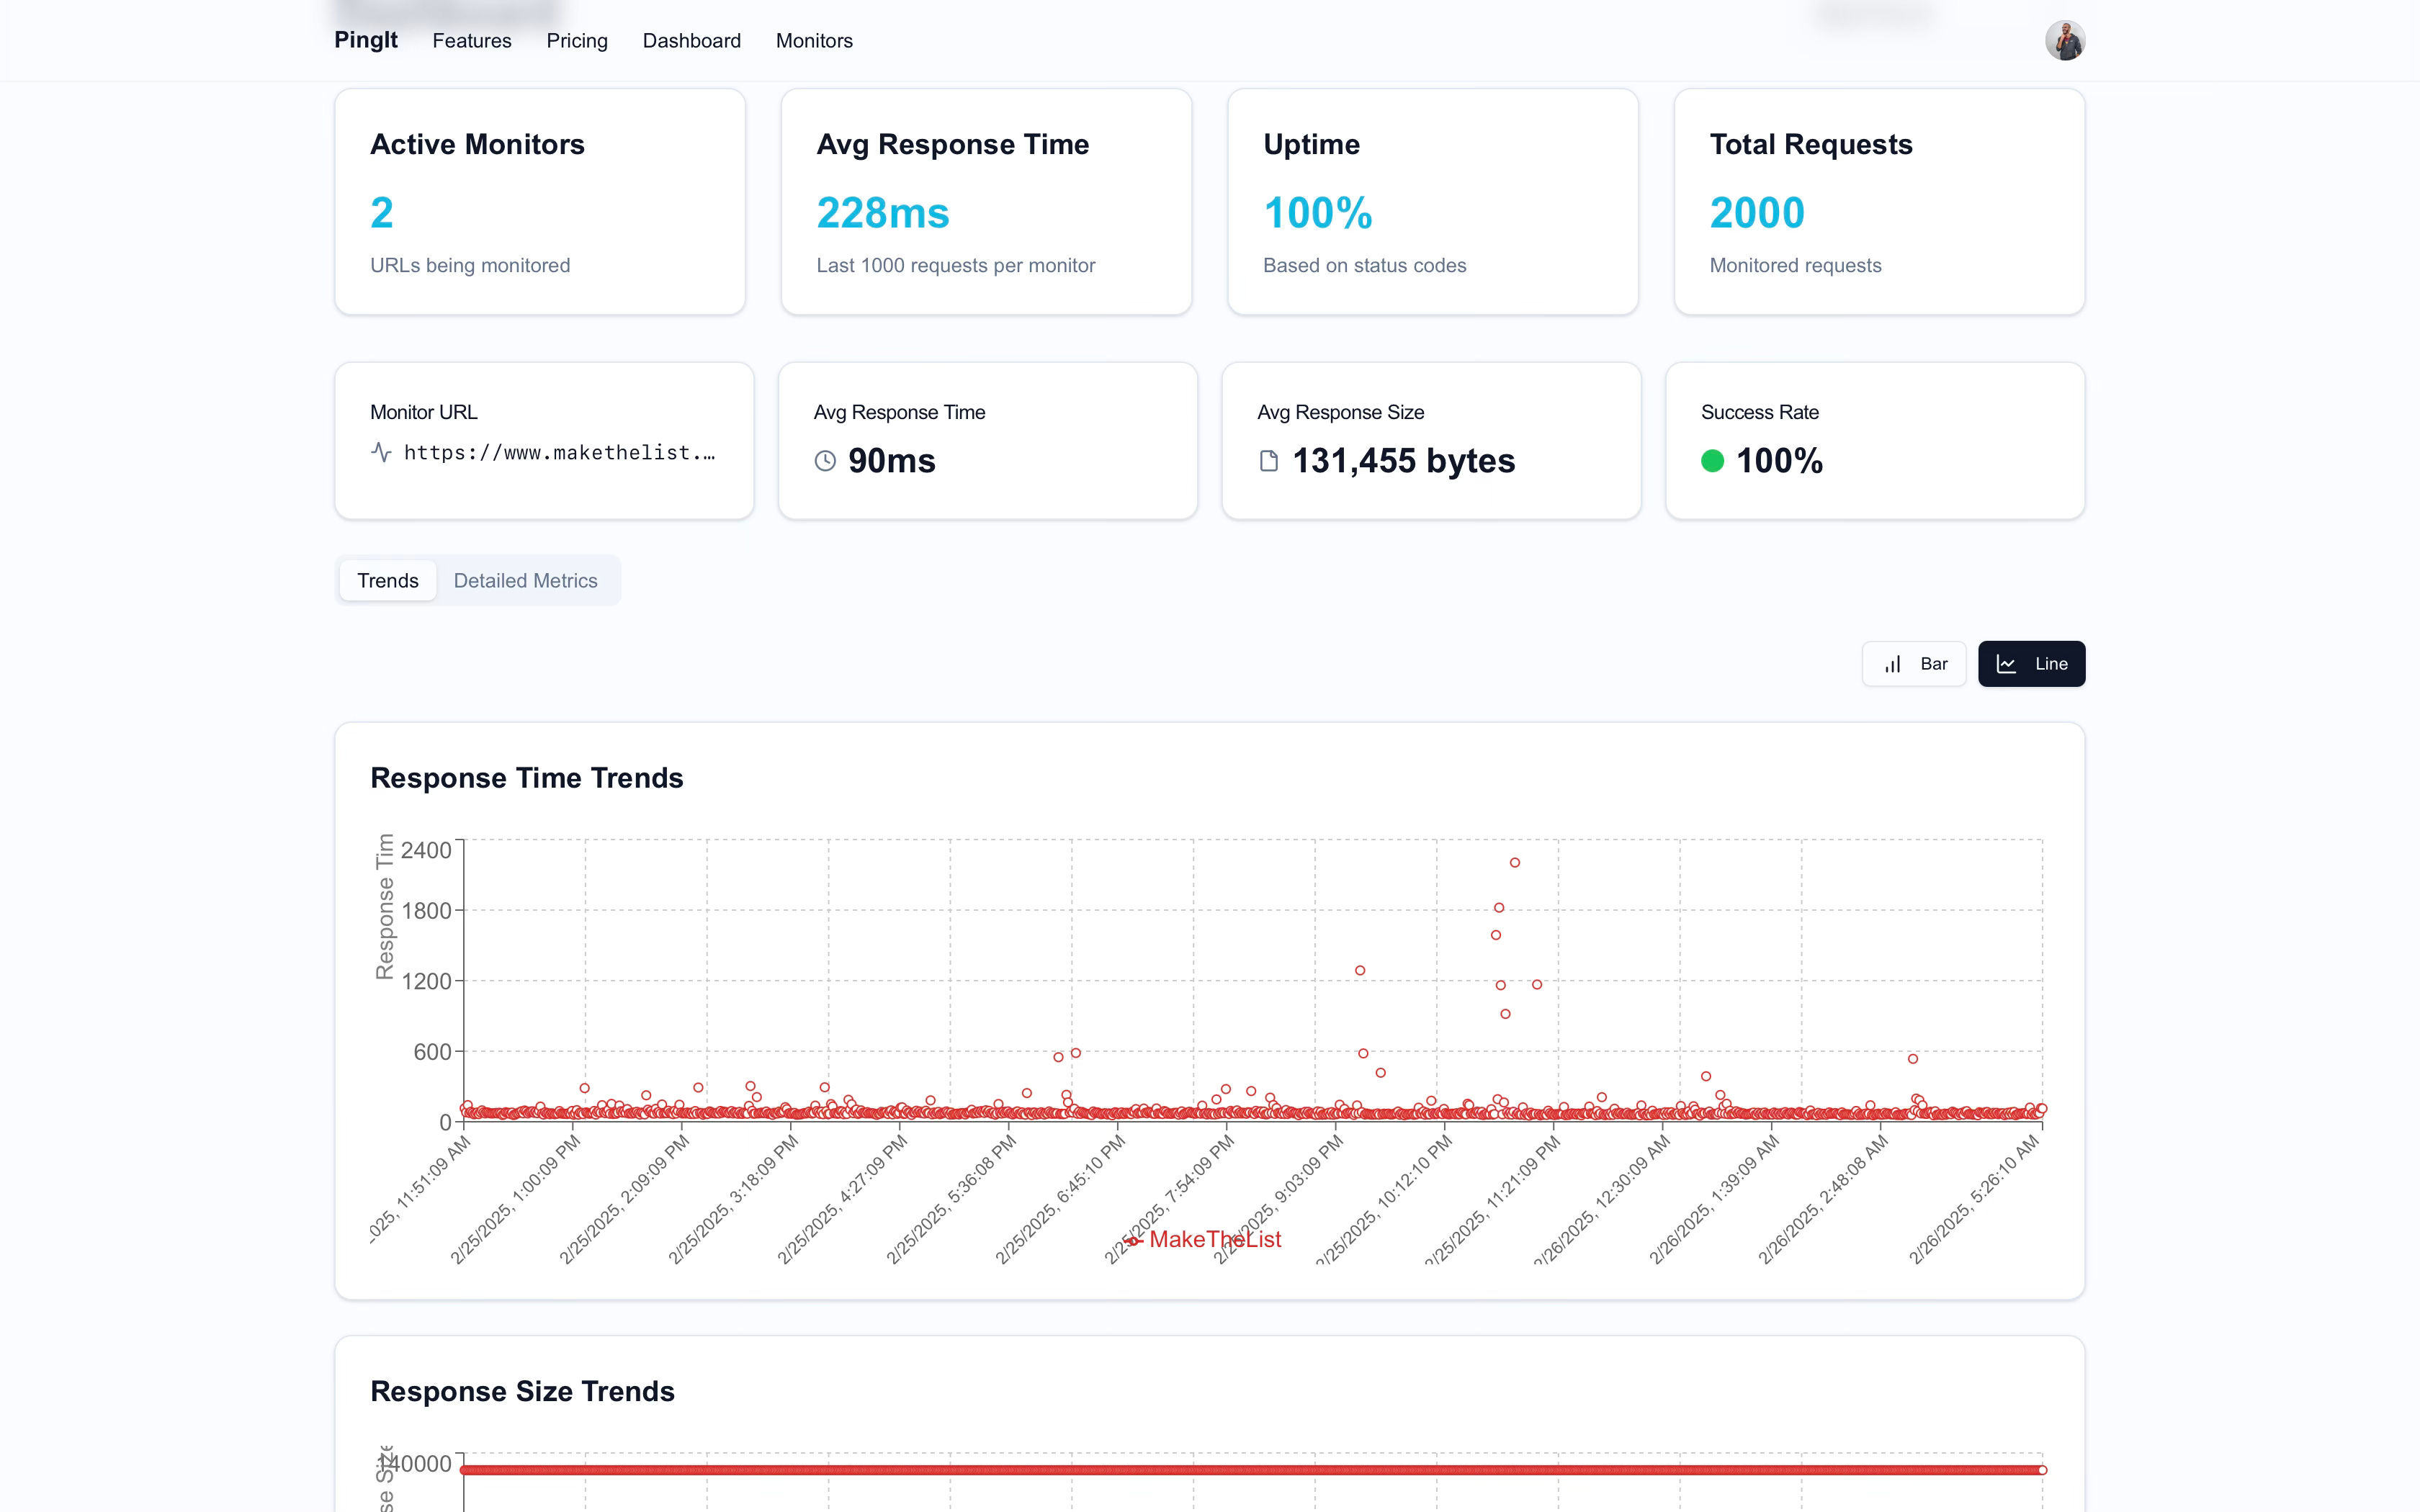
After a few iterations, I ended up with the following dashboard that shows the total statistics at the top and the latest results for each monitor:
There is a dropdown to select a specific monitor, then the graphs are shown for the history of that specific monitor:
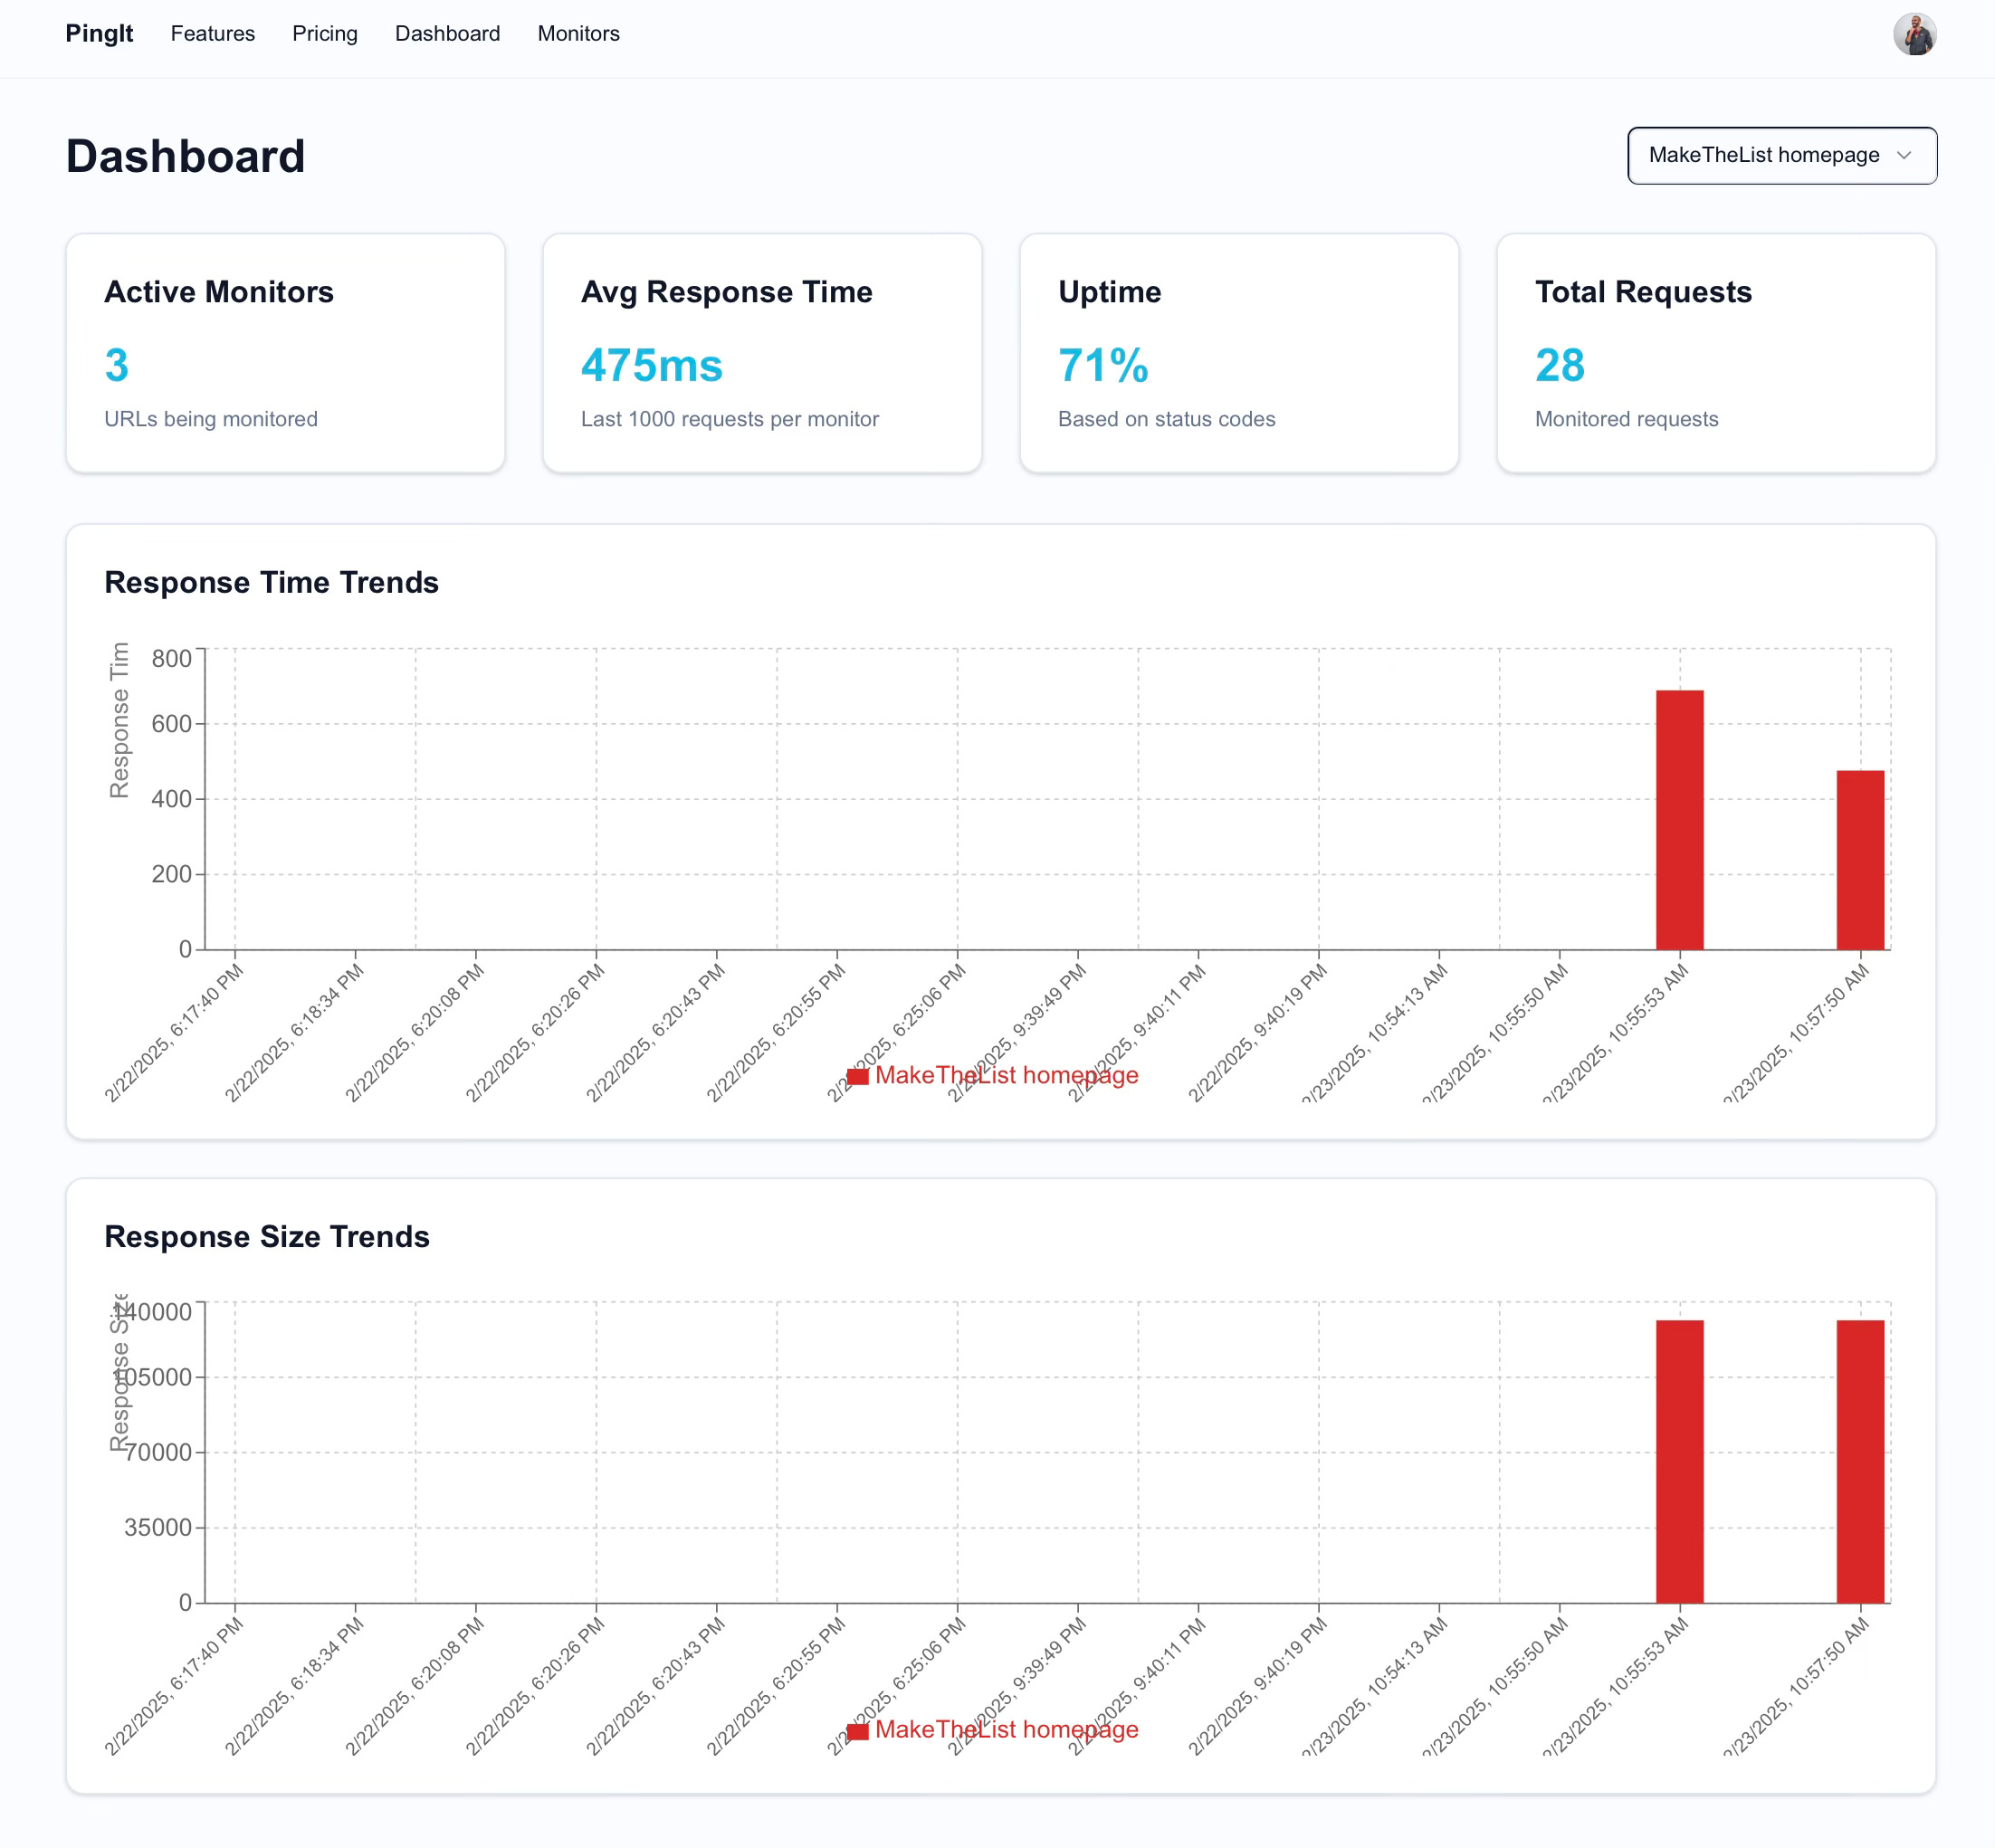
There are some UI improvements to be made, but I will get this deploying to the end user now. Then I can go back and make further tweaks to improve the UI while I wait for user feedback.
Chapter 6: Deploy full stack project to Sevalla
To get the fullstack app to the end user, we need to deploy 3 parts: the database with Prisma migrations, the NextJS app itself and the scheduler (cron). This is not as scary as it sounds, you will see we are almost complete.
Create database on Sevalla
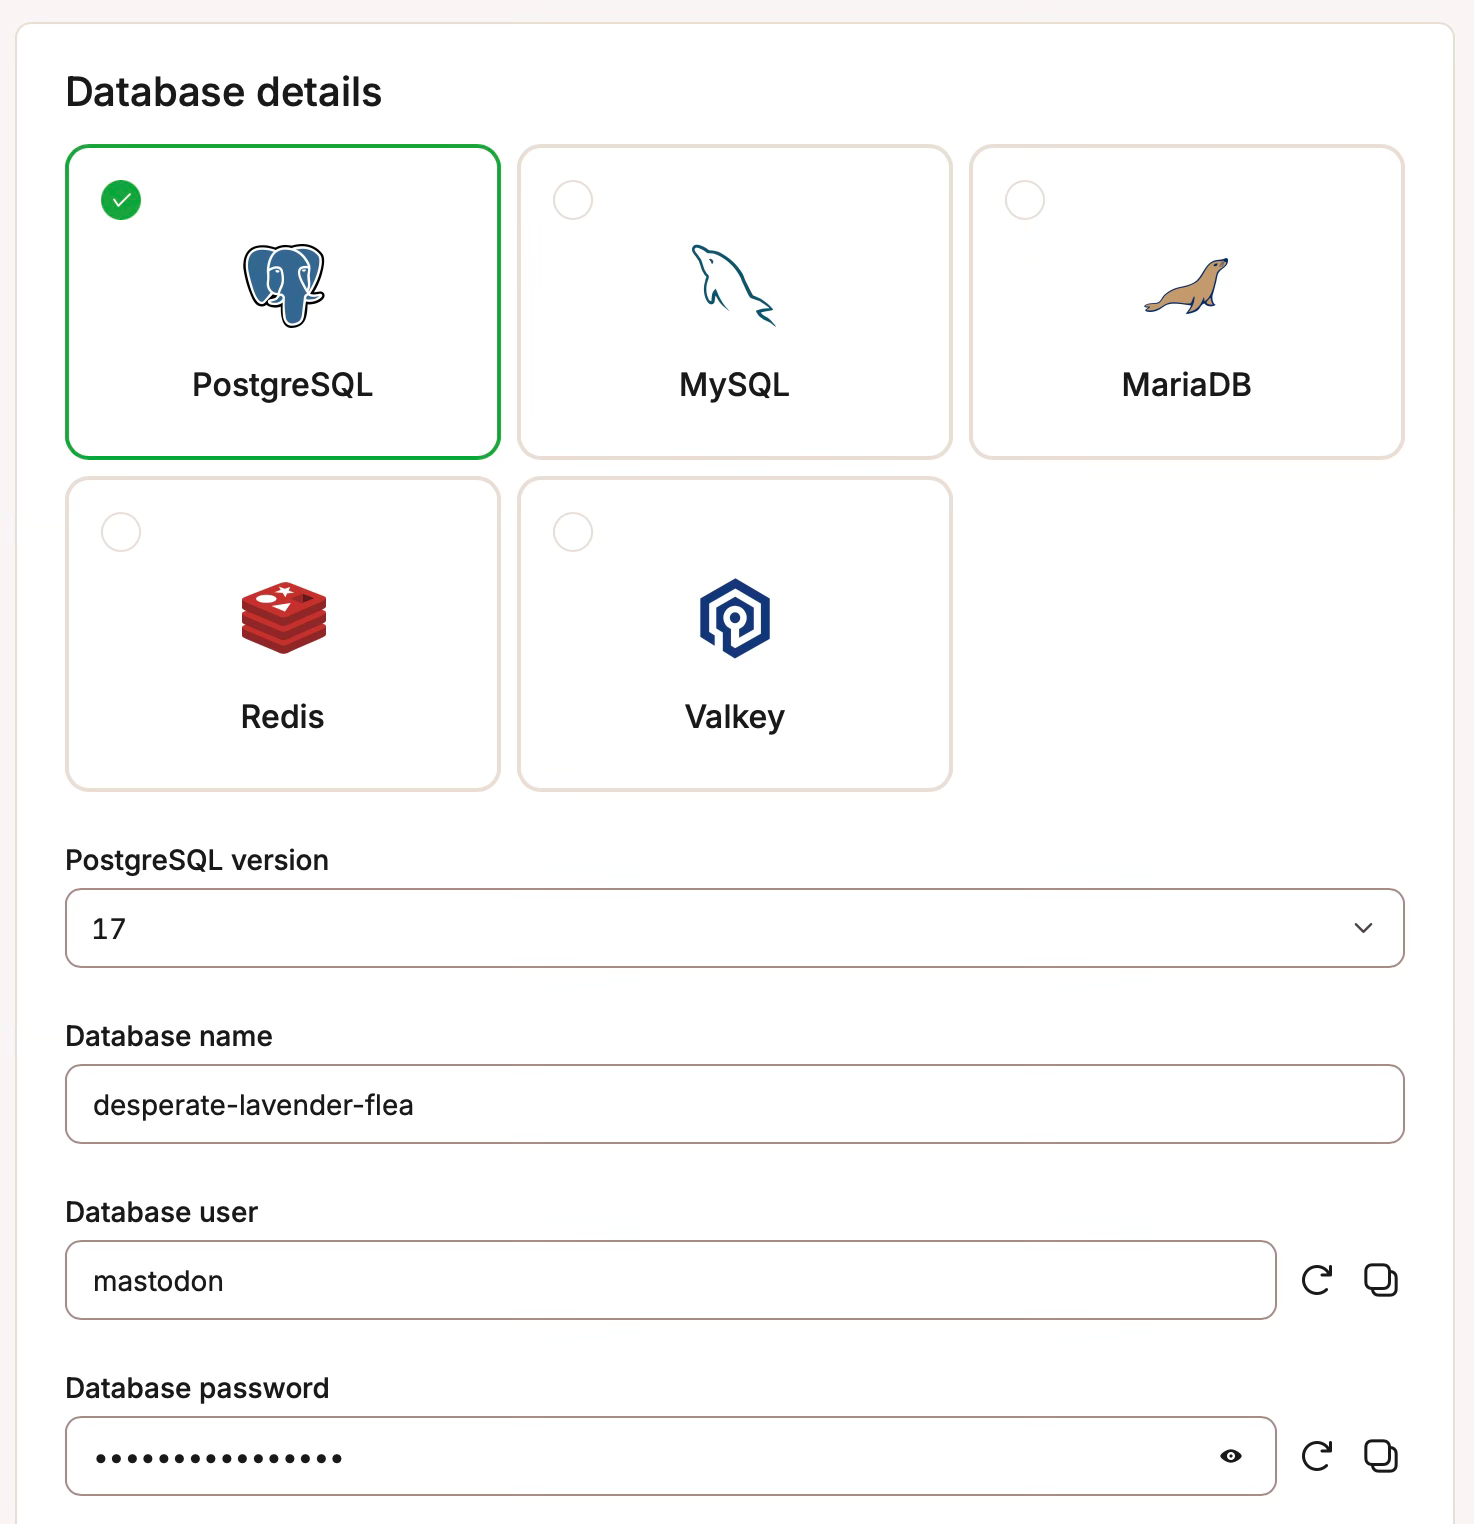
Firstly click on “Databases” on the left navigation menu on Sevalla, then click “add database”. You will be presented with a small form where you can select the database type (Postgres, MySQL, MariaDB, Redis, Valley), version, name and location:
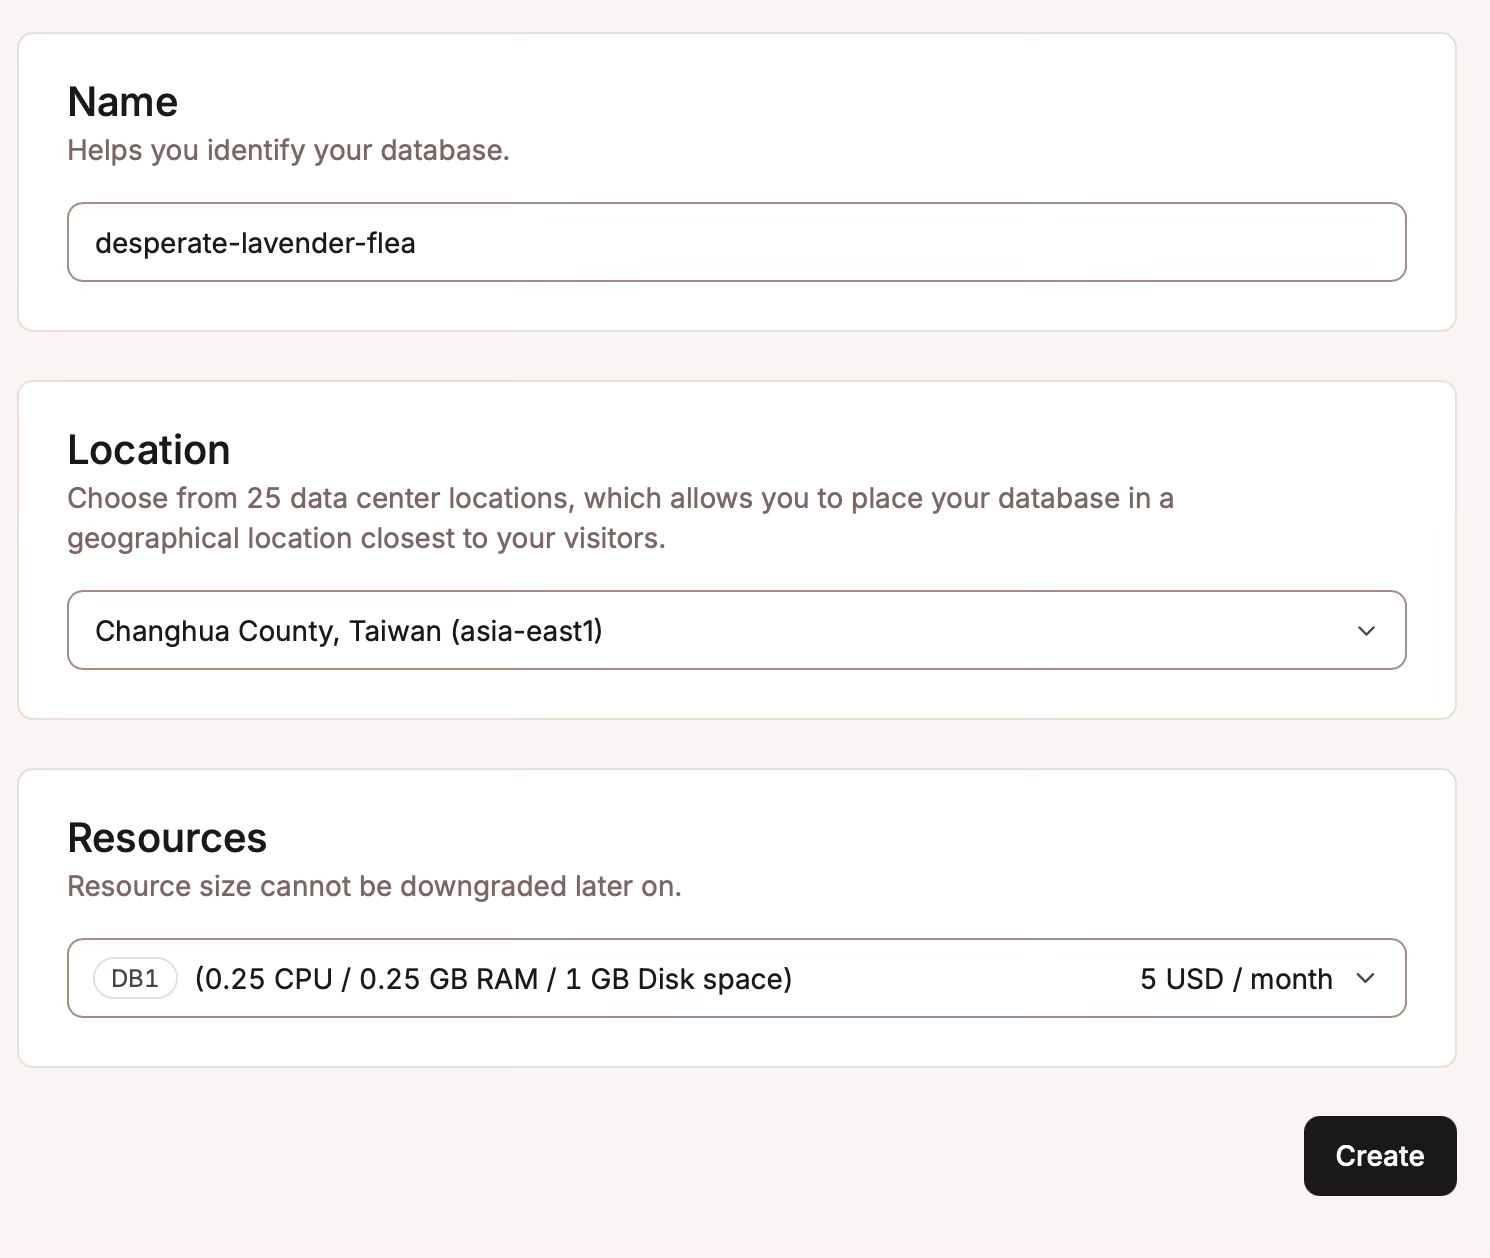
Sevalla auto generates the username and password, which I don’t change. There is also the resource size:
After clicking “create” you will be taken to the overview page of your database, which will look something like this:
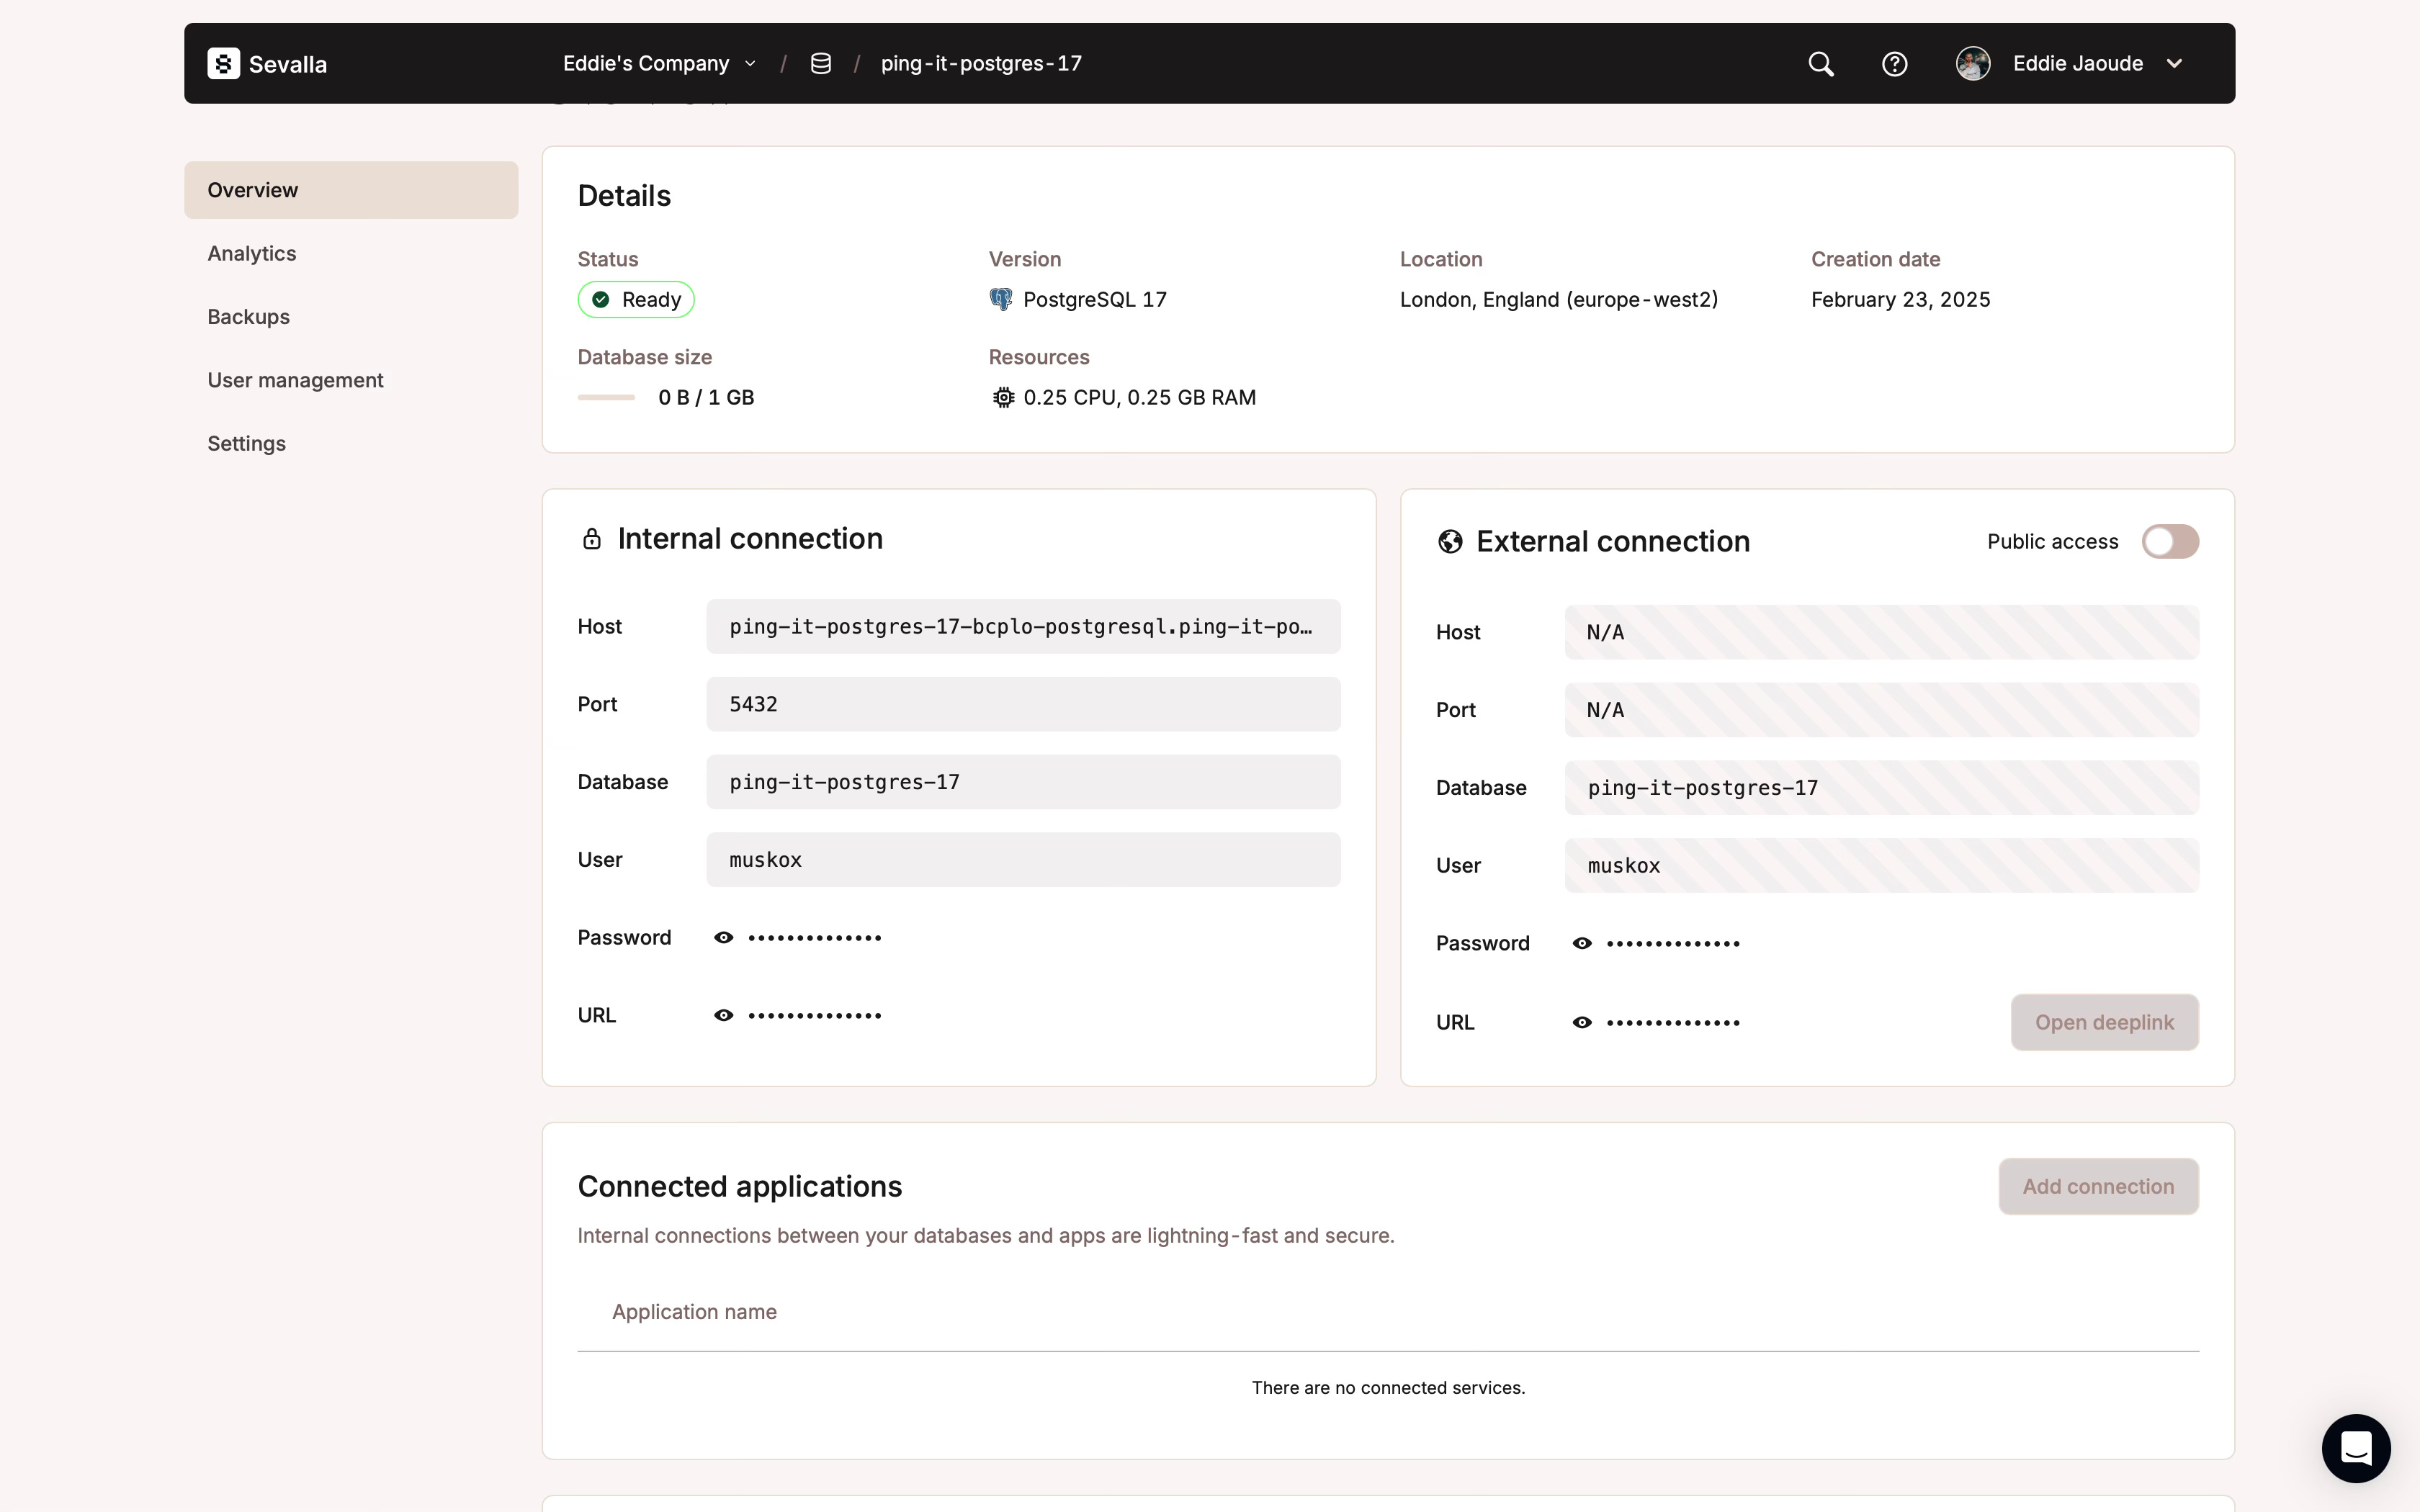
I will connect the app to the database in the next step, so it has an internal database connection that is fast and secure. It is possible to enable the external connection if required, but I wouldn’t recommend doing this by default, but only if you have a specific requirement.
Create an app on Sevalla
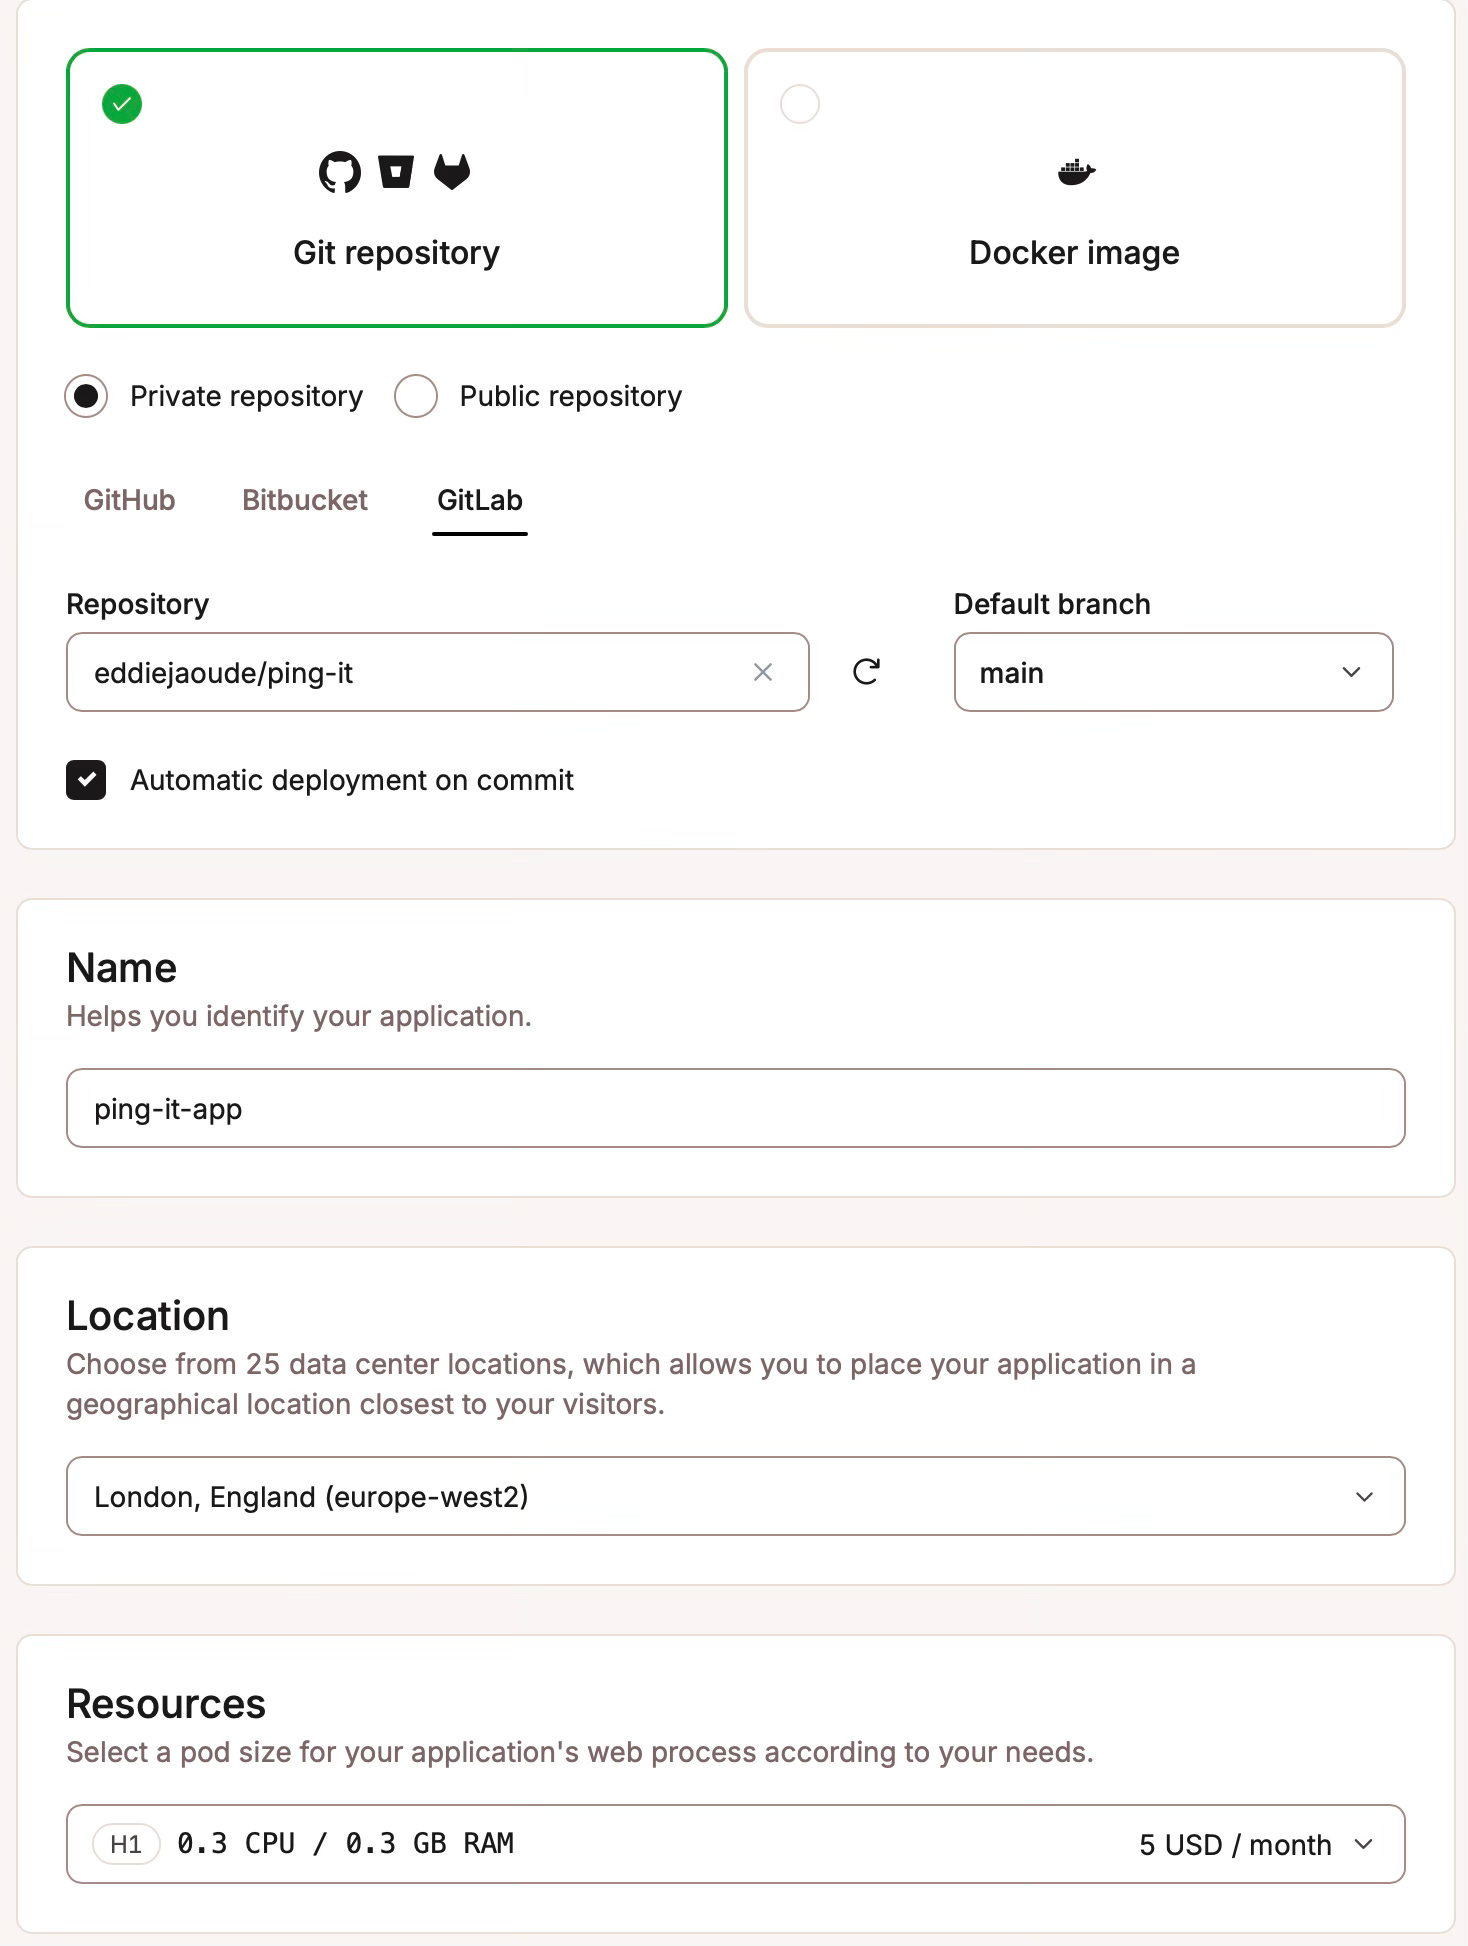
From your Sevalla Dashboard you can click “Add service” and select “Application”. Or in the same way as to how the Postgresql database was created, alternatively you can click on “Applications” on the left menu then “Add application”. Either way you will be presented with the following page:
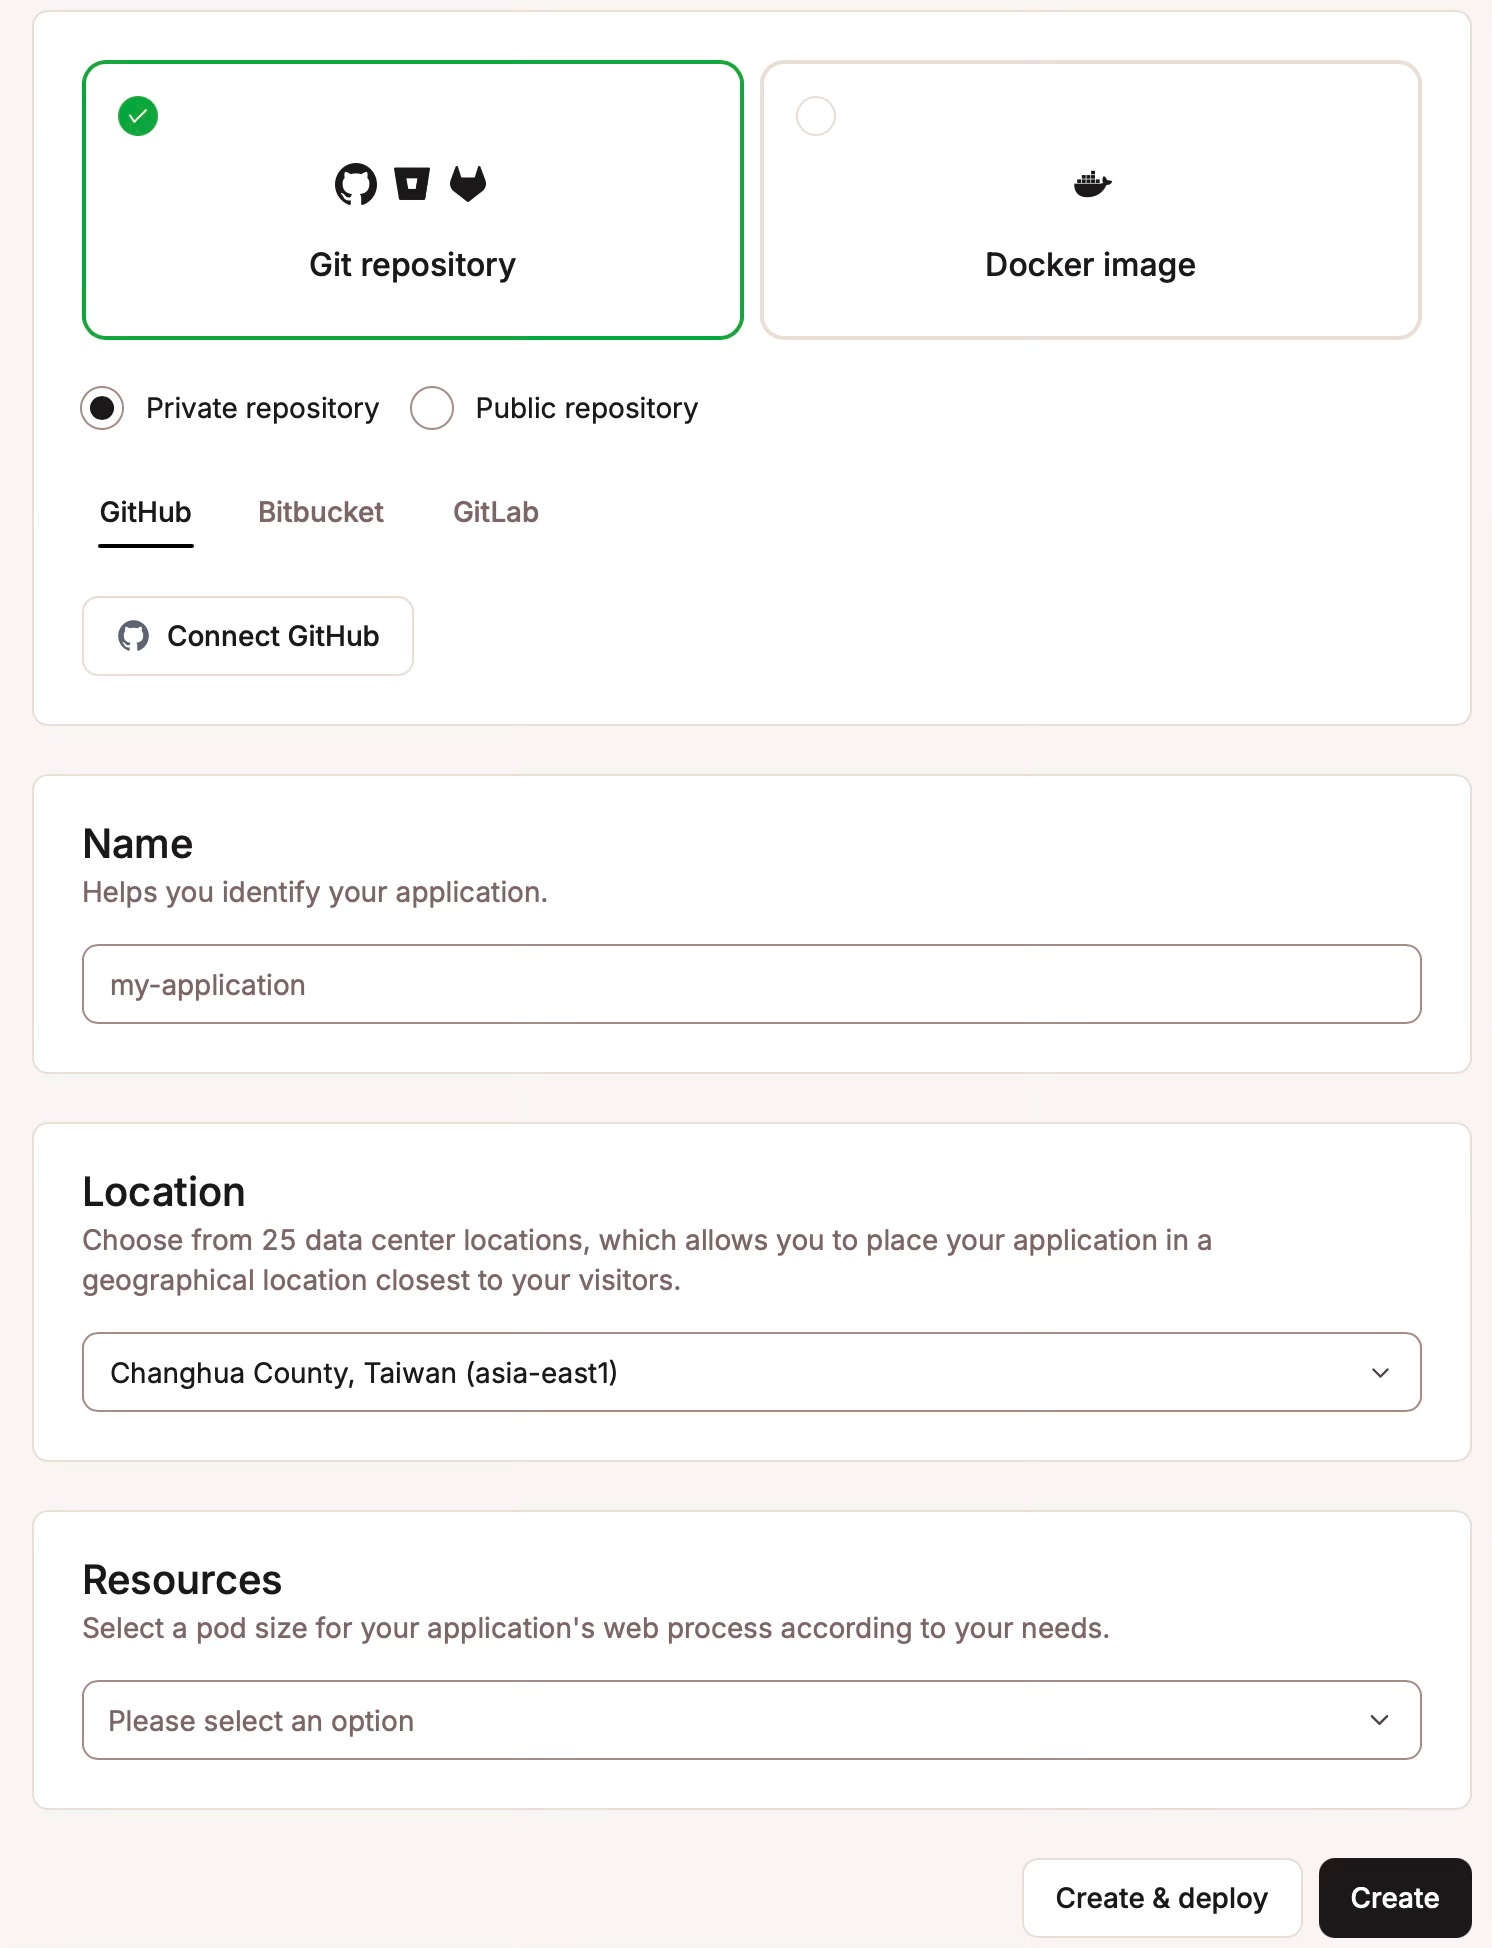
I have filled in the Sevalla application creation with the following details (but you would change them to match your project requirements):
Git repository.
Private repository.
GitLab tab.
`ping-it` repository in the dropdown.
The `main` branch is automatically selected for me.
I checked “Automatic deployment on commit”.
The name is pre-populated with the name of the repo which is great, but I appended `-app` to it. This is not required, just my personal preference.
I selected `London` for my location, but you have many options around the globe.
As to the size of your pod there are a variety of options, which clearly show the price. Plus you can increase/decrease these later as your project requires.
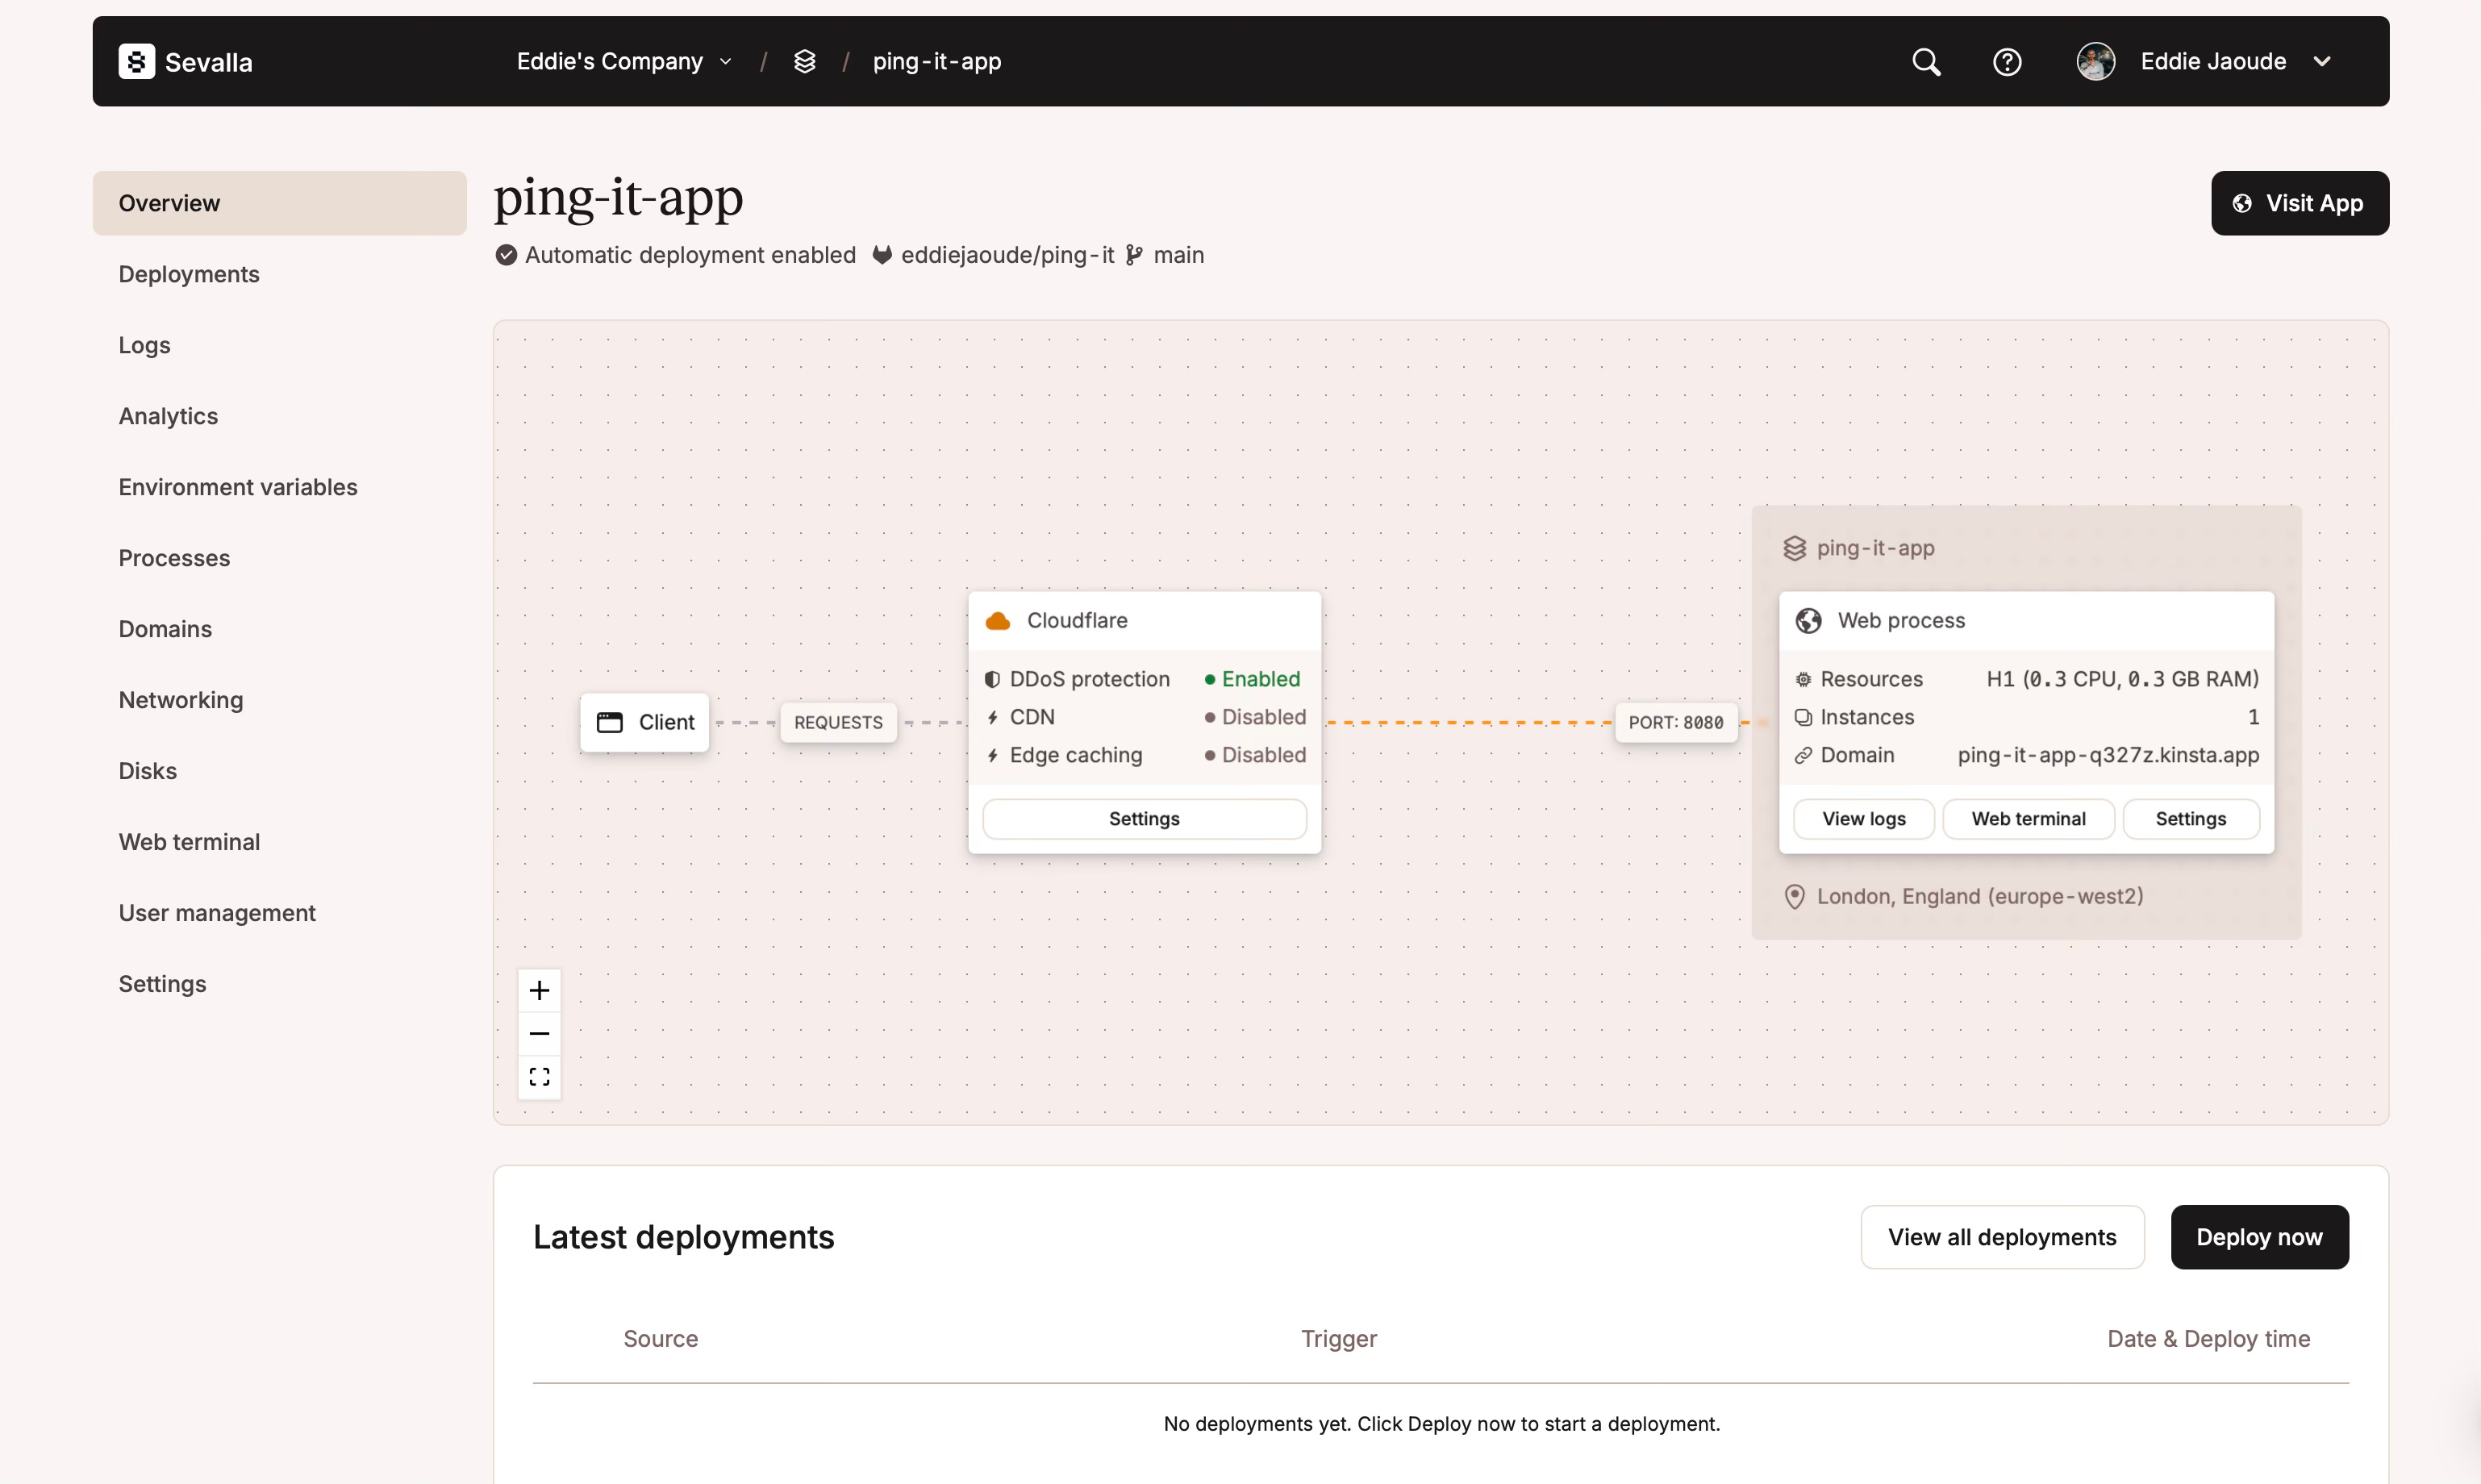
Next you will be taken to the “Applications Dashboard” page, which will show you a great diagram of the architecture overview: from the client through to your web process (and more later as I connect more services). There is the temptation to click the “Deploy now” button for the first deploy immediately, but I need to connect the database first otherwise the application will not work properly.
Connect the app to the database on Sevalla
Connecting the database and web process together can be done in two ways: either from the application or from the database. Whichever one you pick you will achieve the same result.
Connecting the app to the database via the database
In the database overview, scroll down to “Add connection” and select the application you wish to have a connection to the database.
The dropdown will list your applications:
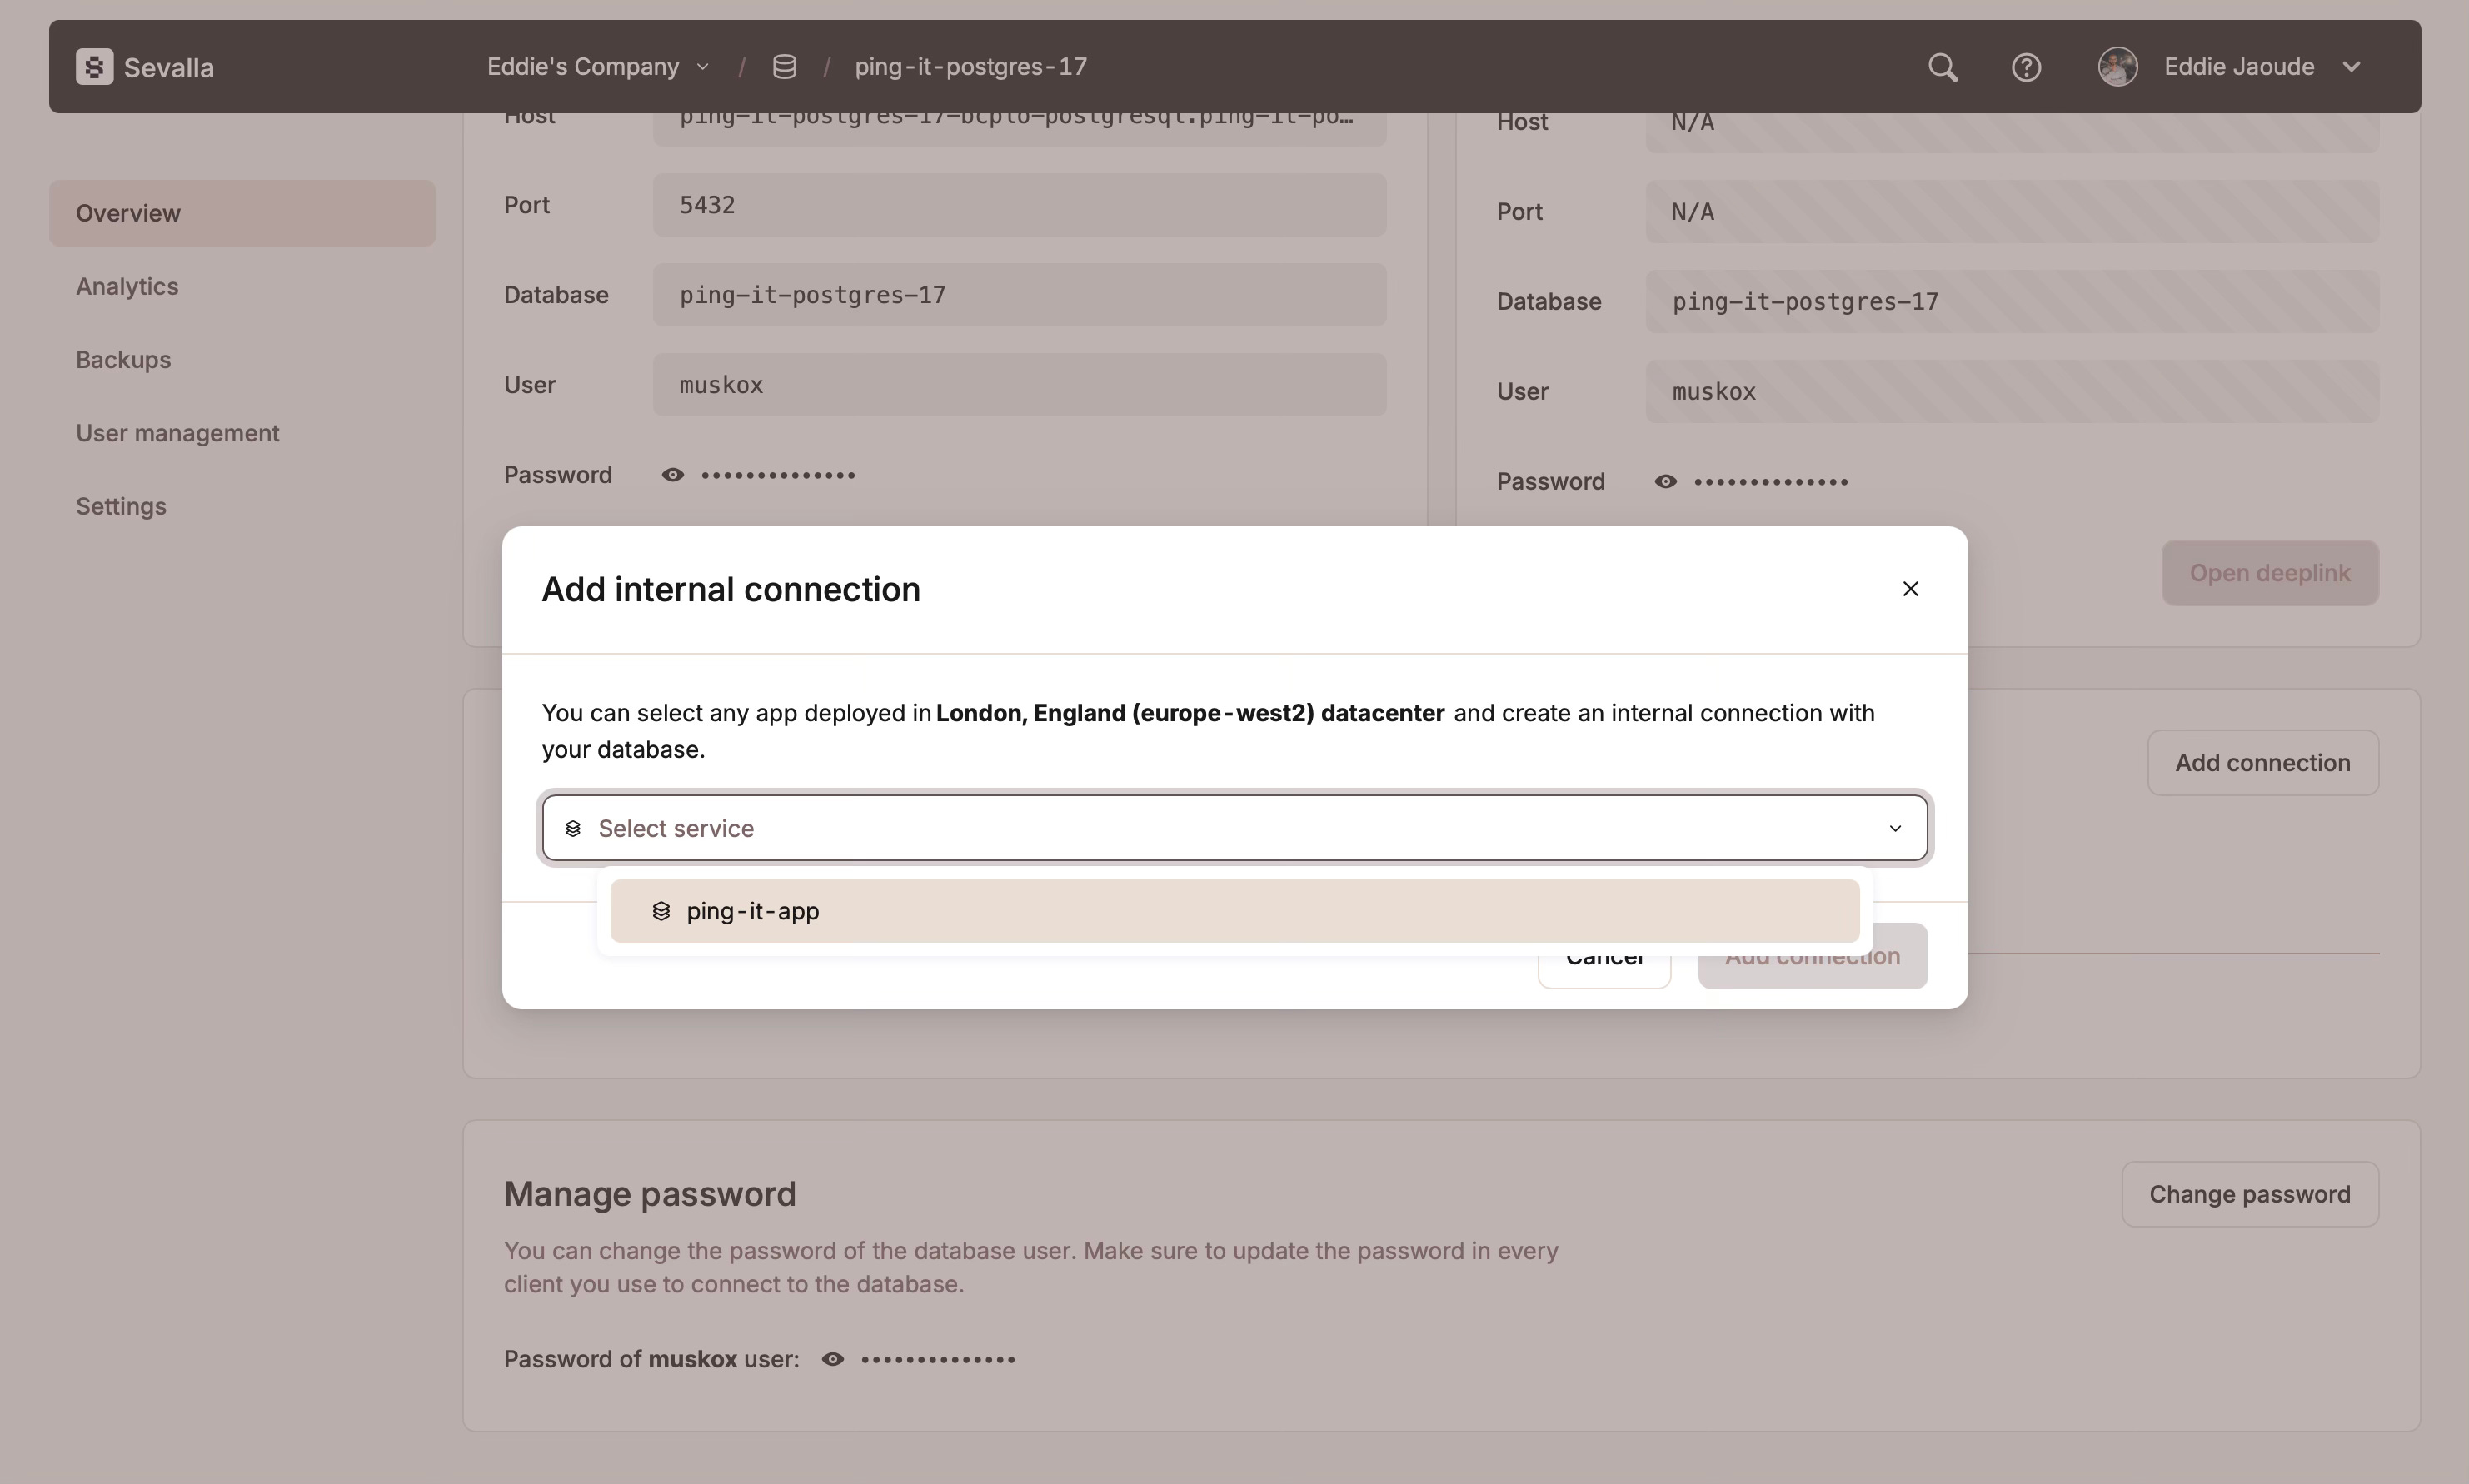
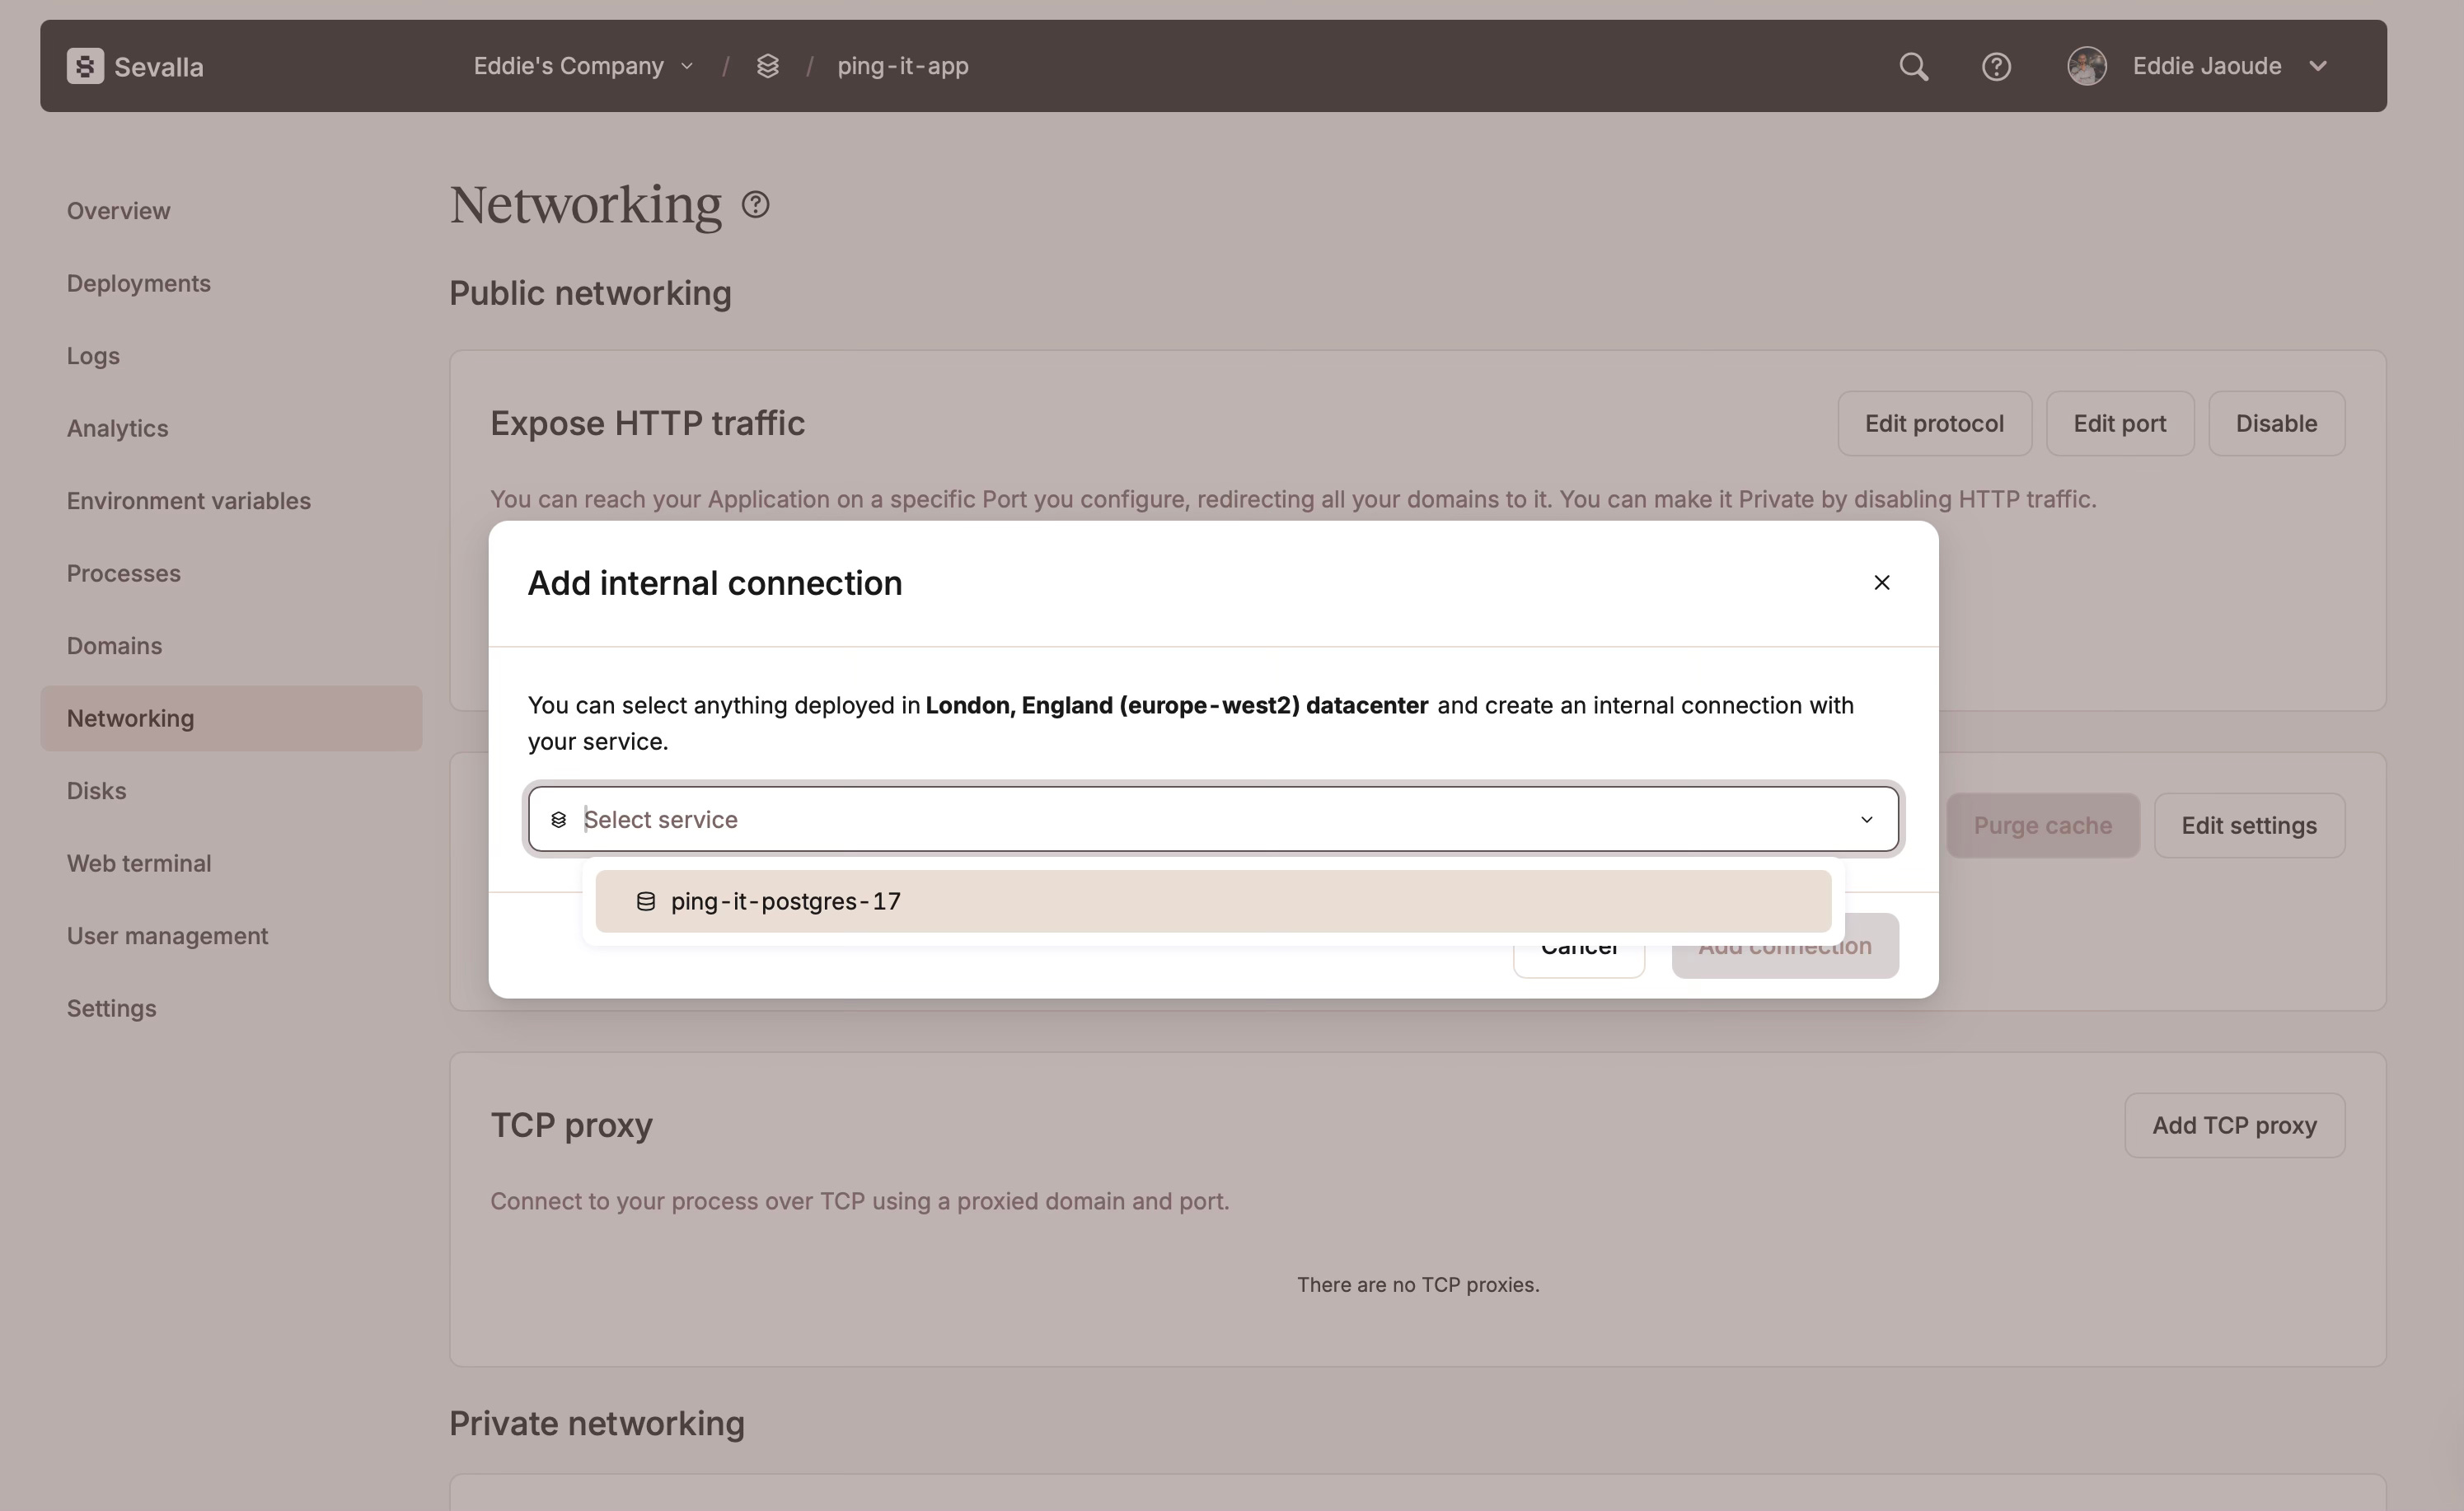
Connecting the app to the database via the app
In the application dashboard, on the left navigation click “Networking” and then scroll down to connected service and click “Add connection”. Similarly to before the dropdown will show you the databases you can connect and I will look for the Postgresql database I created earlier.
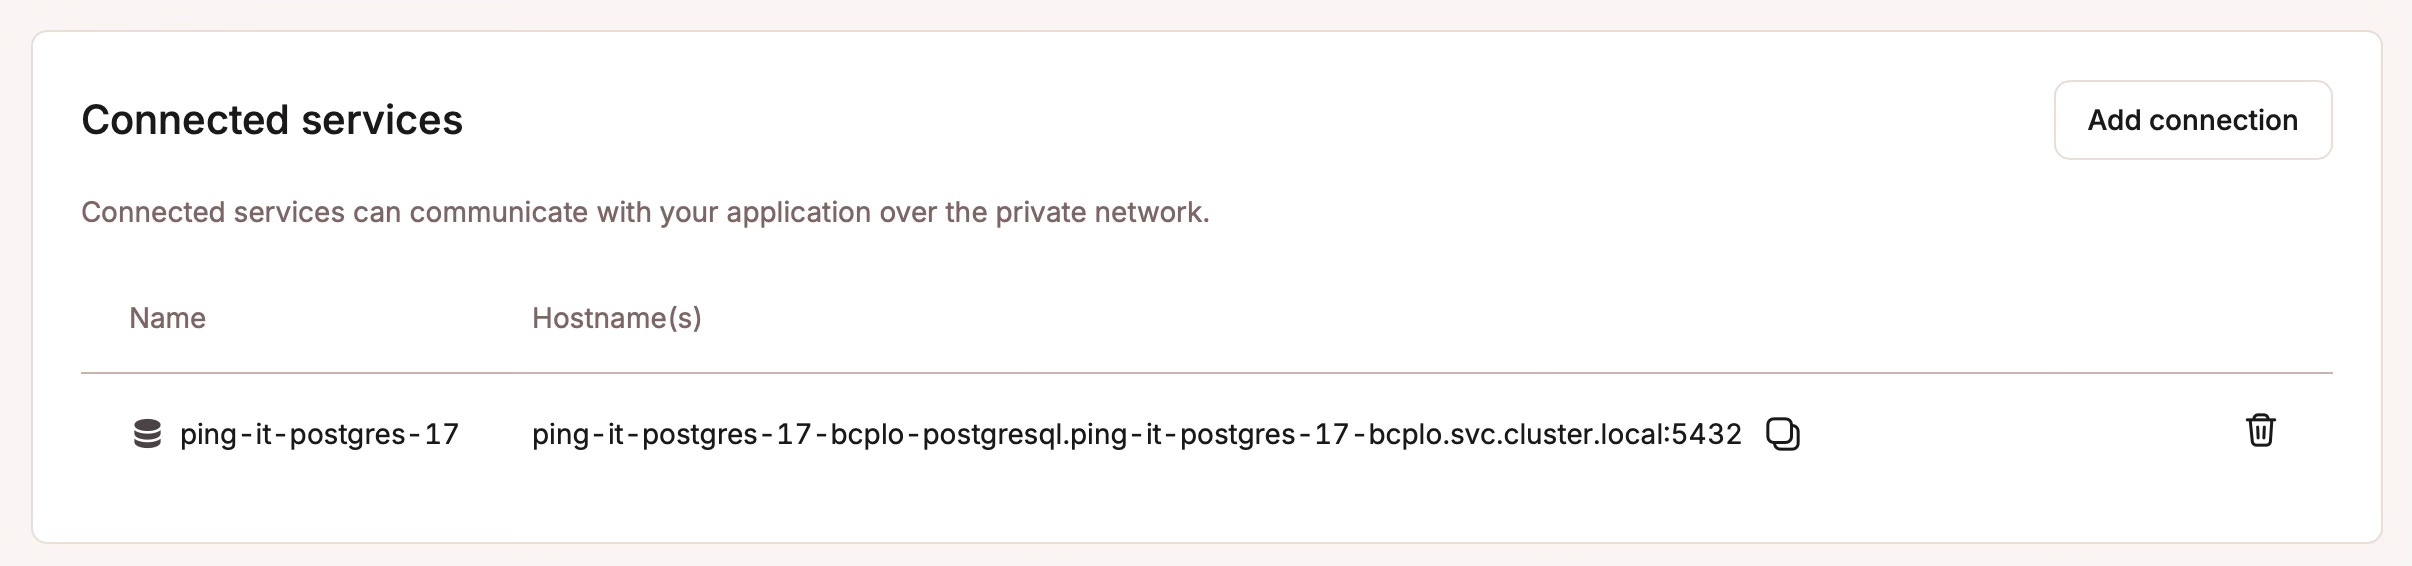
Once the database is selected Sevalla does ask with a toggle whether I want to “Add environment variables to the application”. This is super convenient but I prefer to do this myself manually. Now the connection will show in the “Connected services” list.
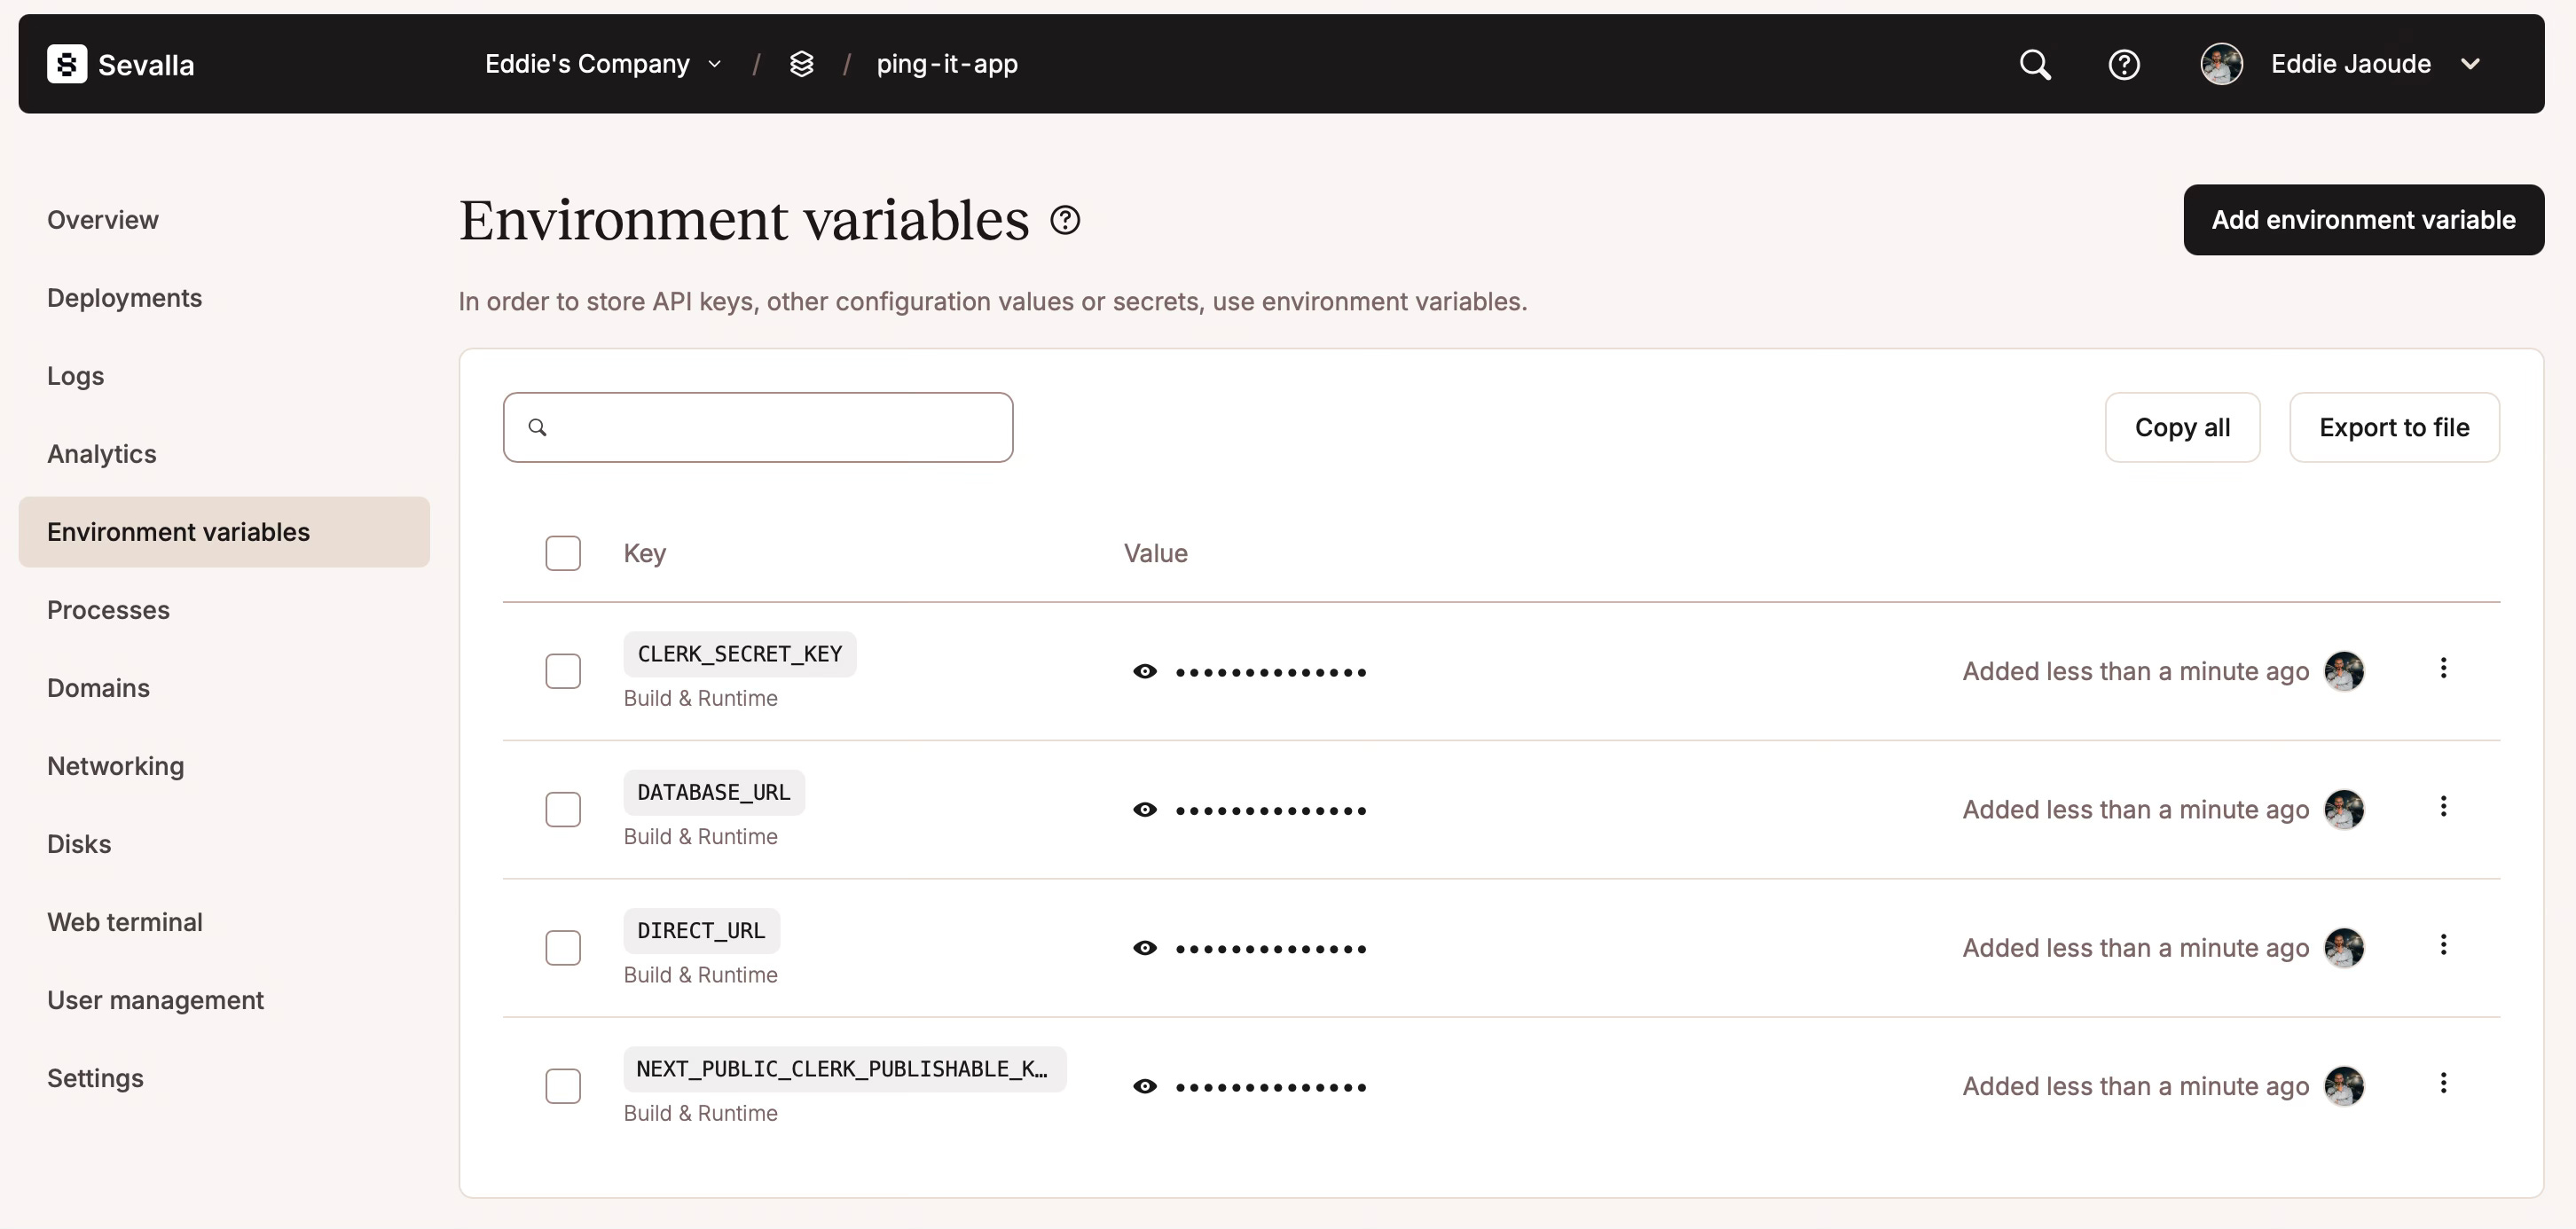
Add environment variables Sevalla
I will then click on “Environment variables” in the app’s side menu and add my application’s environment variables. For the app I built we need 4: I can get the database environments from database overview page.
Migration command
For ease let’s add the Prisma migration commands to our `package.json` file:
"db:migrate": "prisma generate && prisma migrate deploy"generate: creates the Prisma client
migrate deploy: apply pending migrations to environment
We have combined both commands into a reusable npm command.
We want the `db:migrate` npm command to run after the npm dependencies have been installed and we can do it with the following command using the `postinstall` npm hook:
"postinstall": "npm run db:migrate"First deployment
I am now ready to deploy, so I click the “Deploy now” button. After a few minutes you should see 2 things:
A successful deployment with a green check.
The “Visit app” button at the top right will take you to your live app on the internet.
If your build fails and goes red, then click on “logs” and find out why.
I have one step left to do, which is the scheduler / cron to run the checks for each monitor. Before I do that though, I am going to log in in and create some monitors.
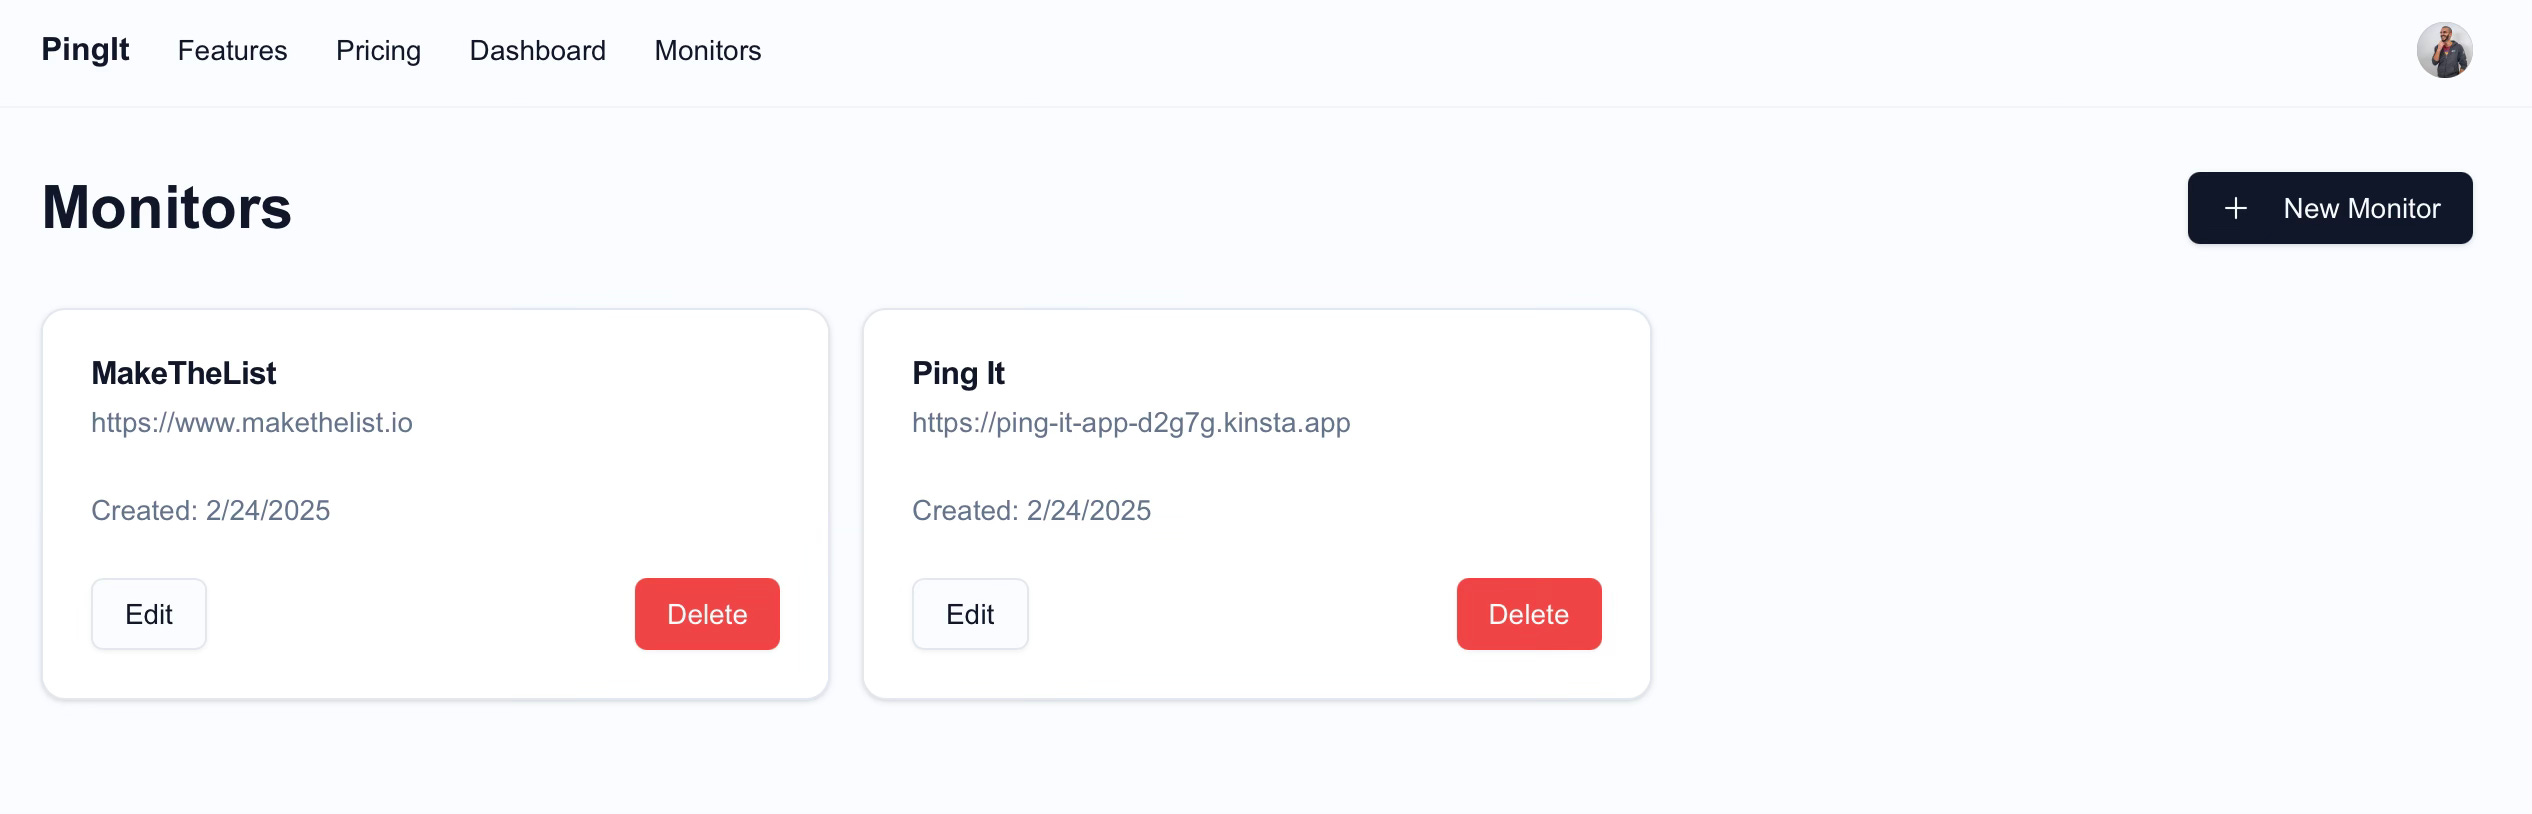
I have created 2 monitors:
Monitor my own project Ping It.
Monitor my other project MakeTheList.io homepage.
Add the scheduler / cron on Sevalla
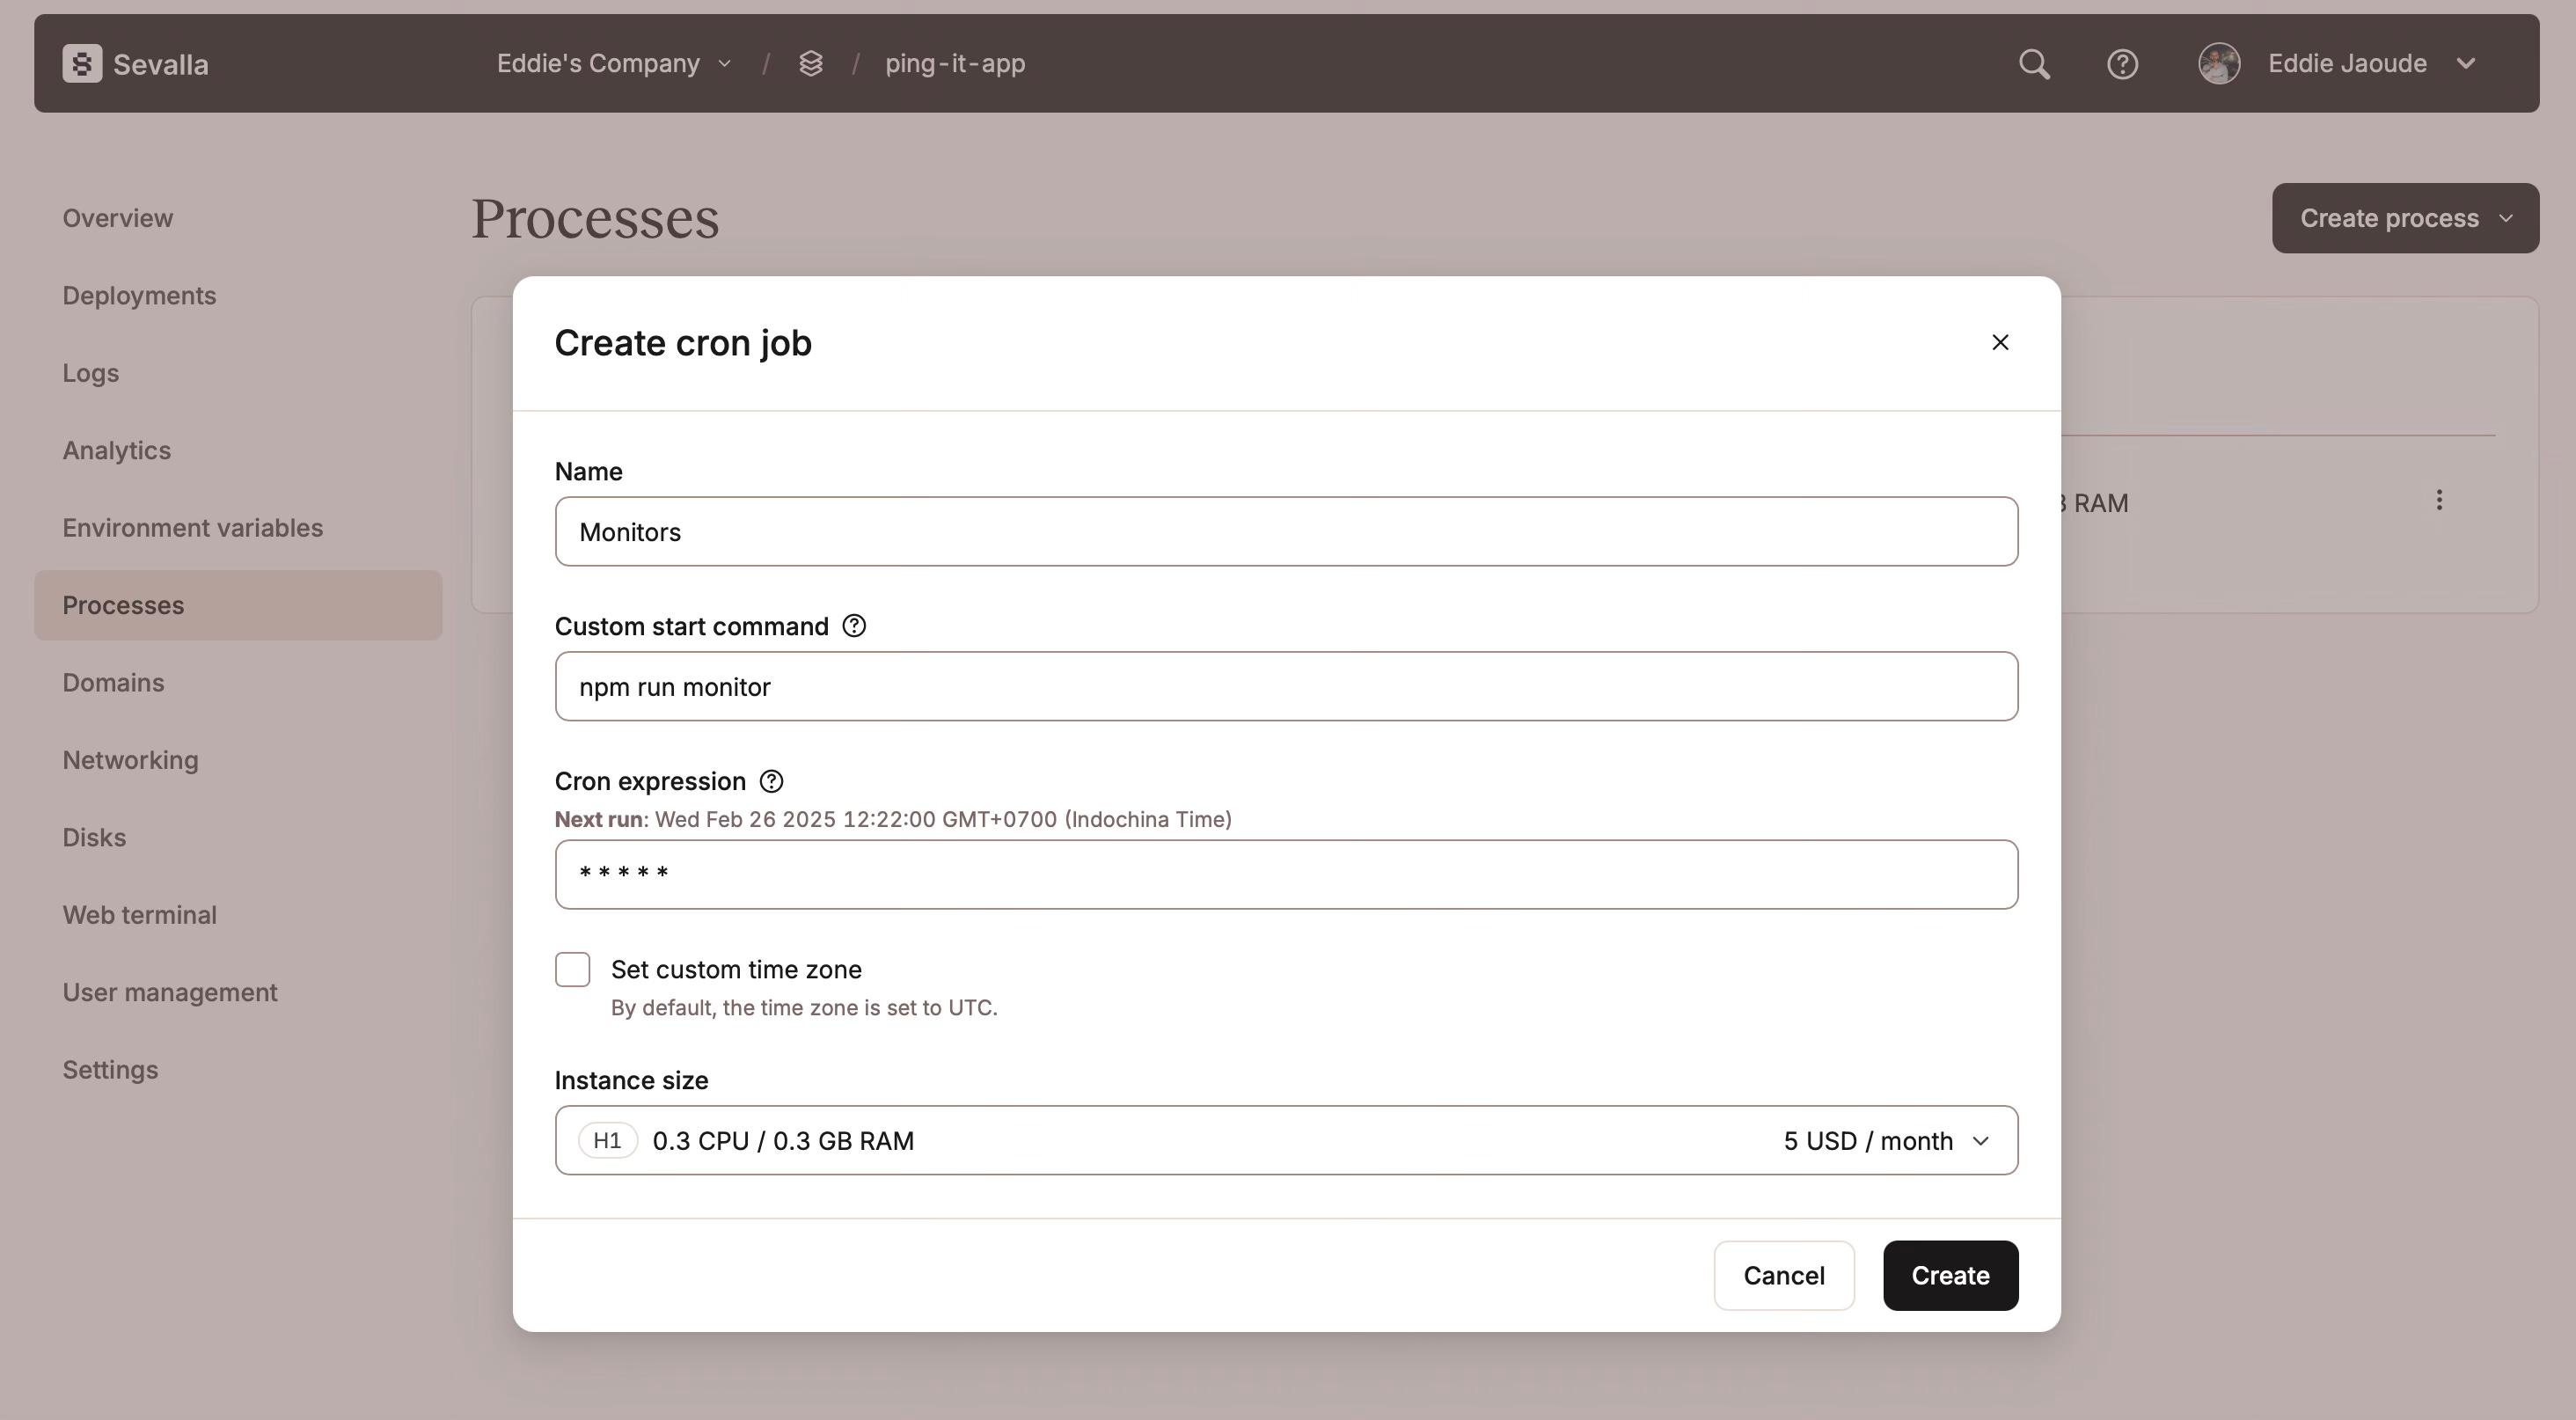
Earlier with the help of AI I created a script to run using npm that collected data using the URL from the user’s Monitor, but now I need to run it frequently on a scheduler (cron). With Sevalla this is really straight forward to do with a couple of clicks.
In the app page on the side navigation click “Processes”, then at the top right of the page click “Create process“, where you will be presented with a form. Fill in the details: the important fields are the “command” which we will use the npm command created earlier and the “cron expression” which determines how often this command should run (if you are unsure click the `?` and it will give examples).
Here is what I have used:
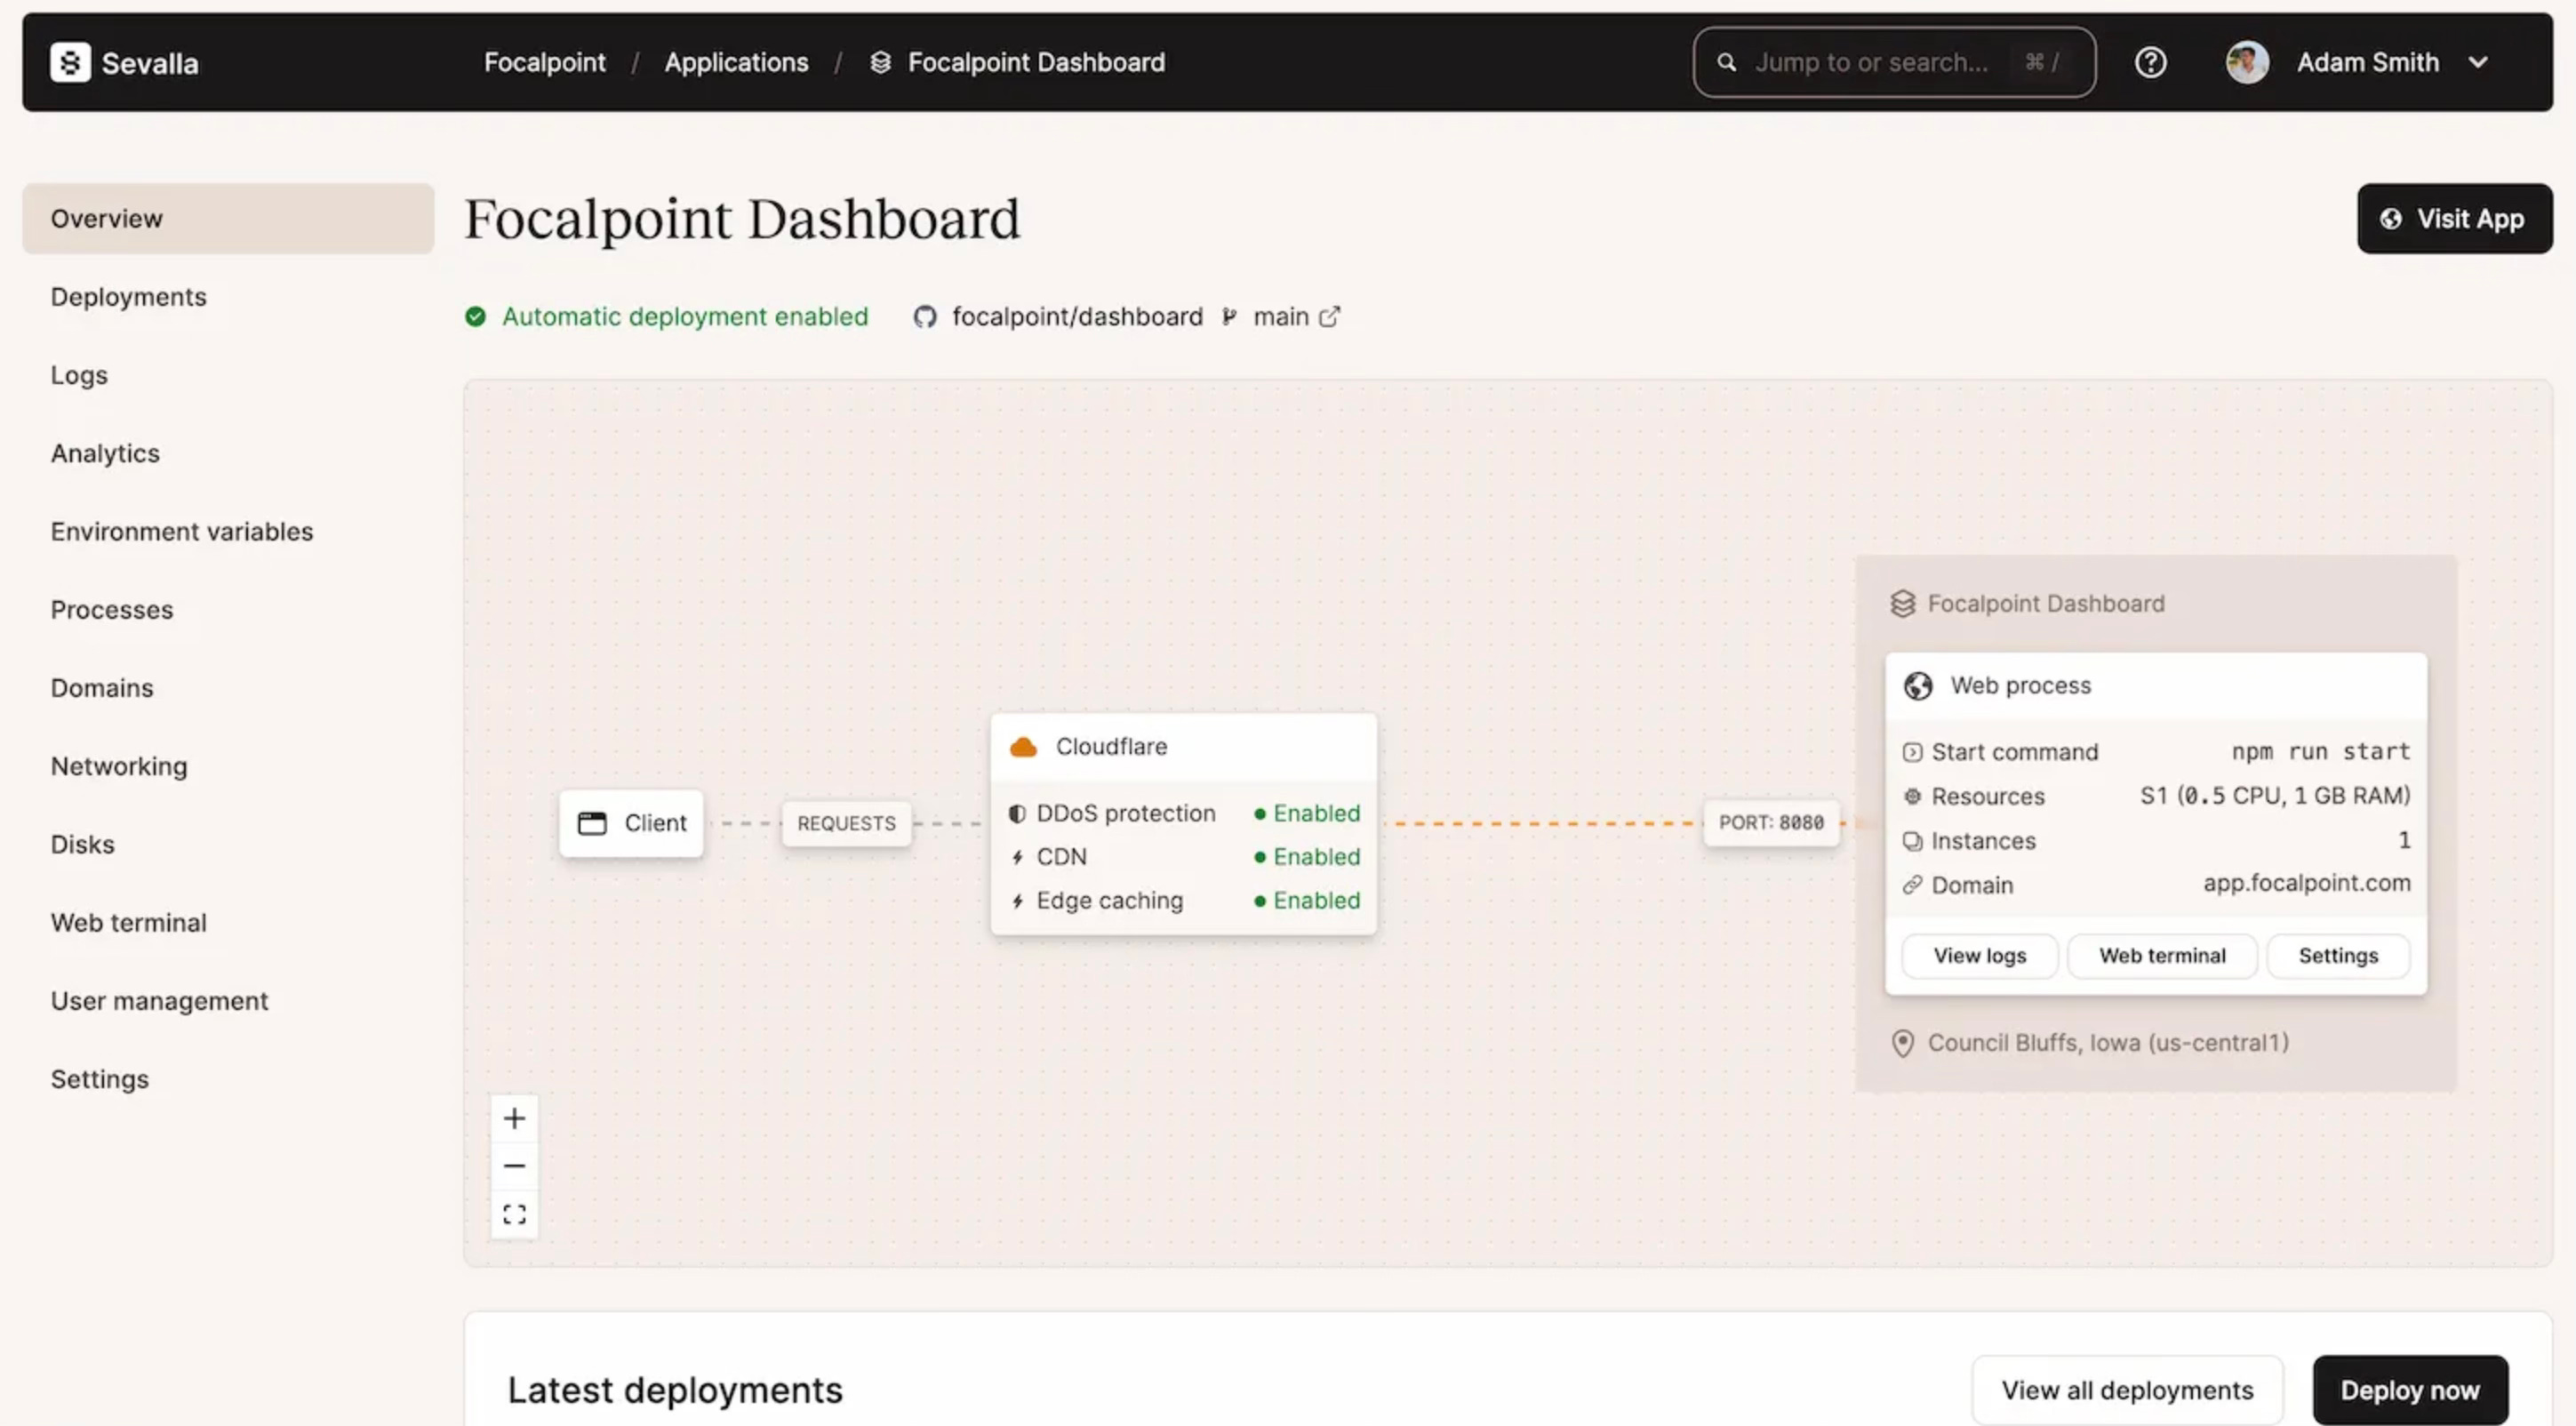
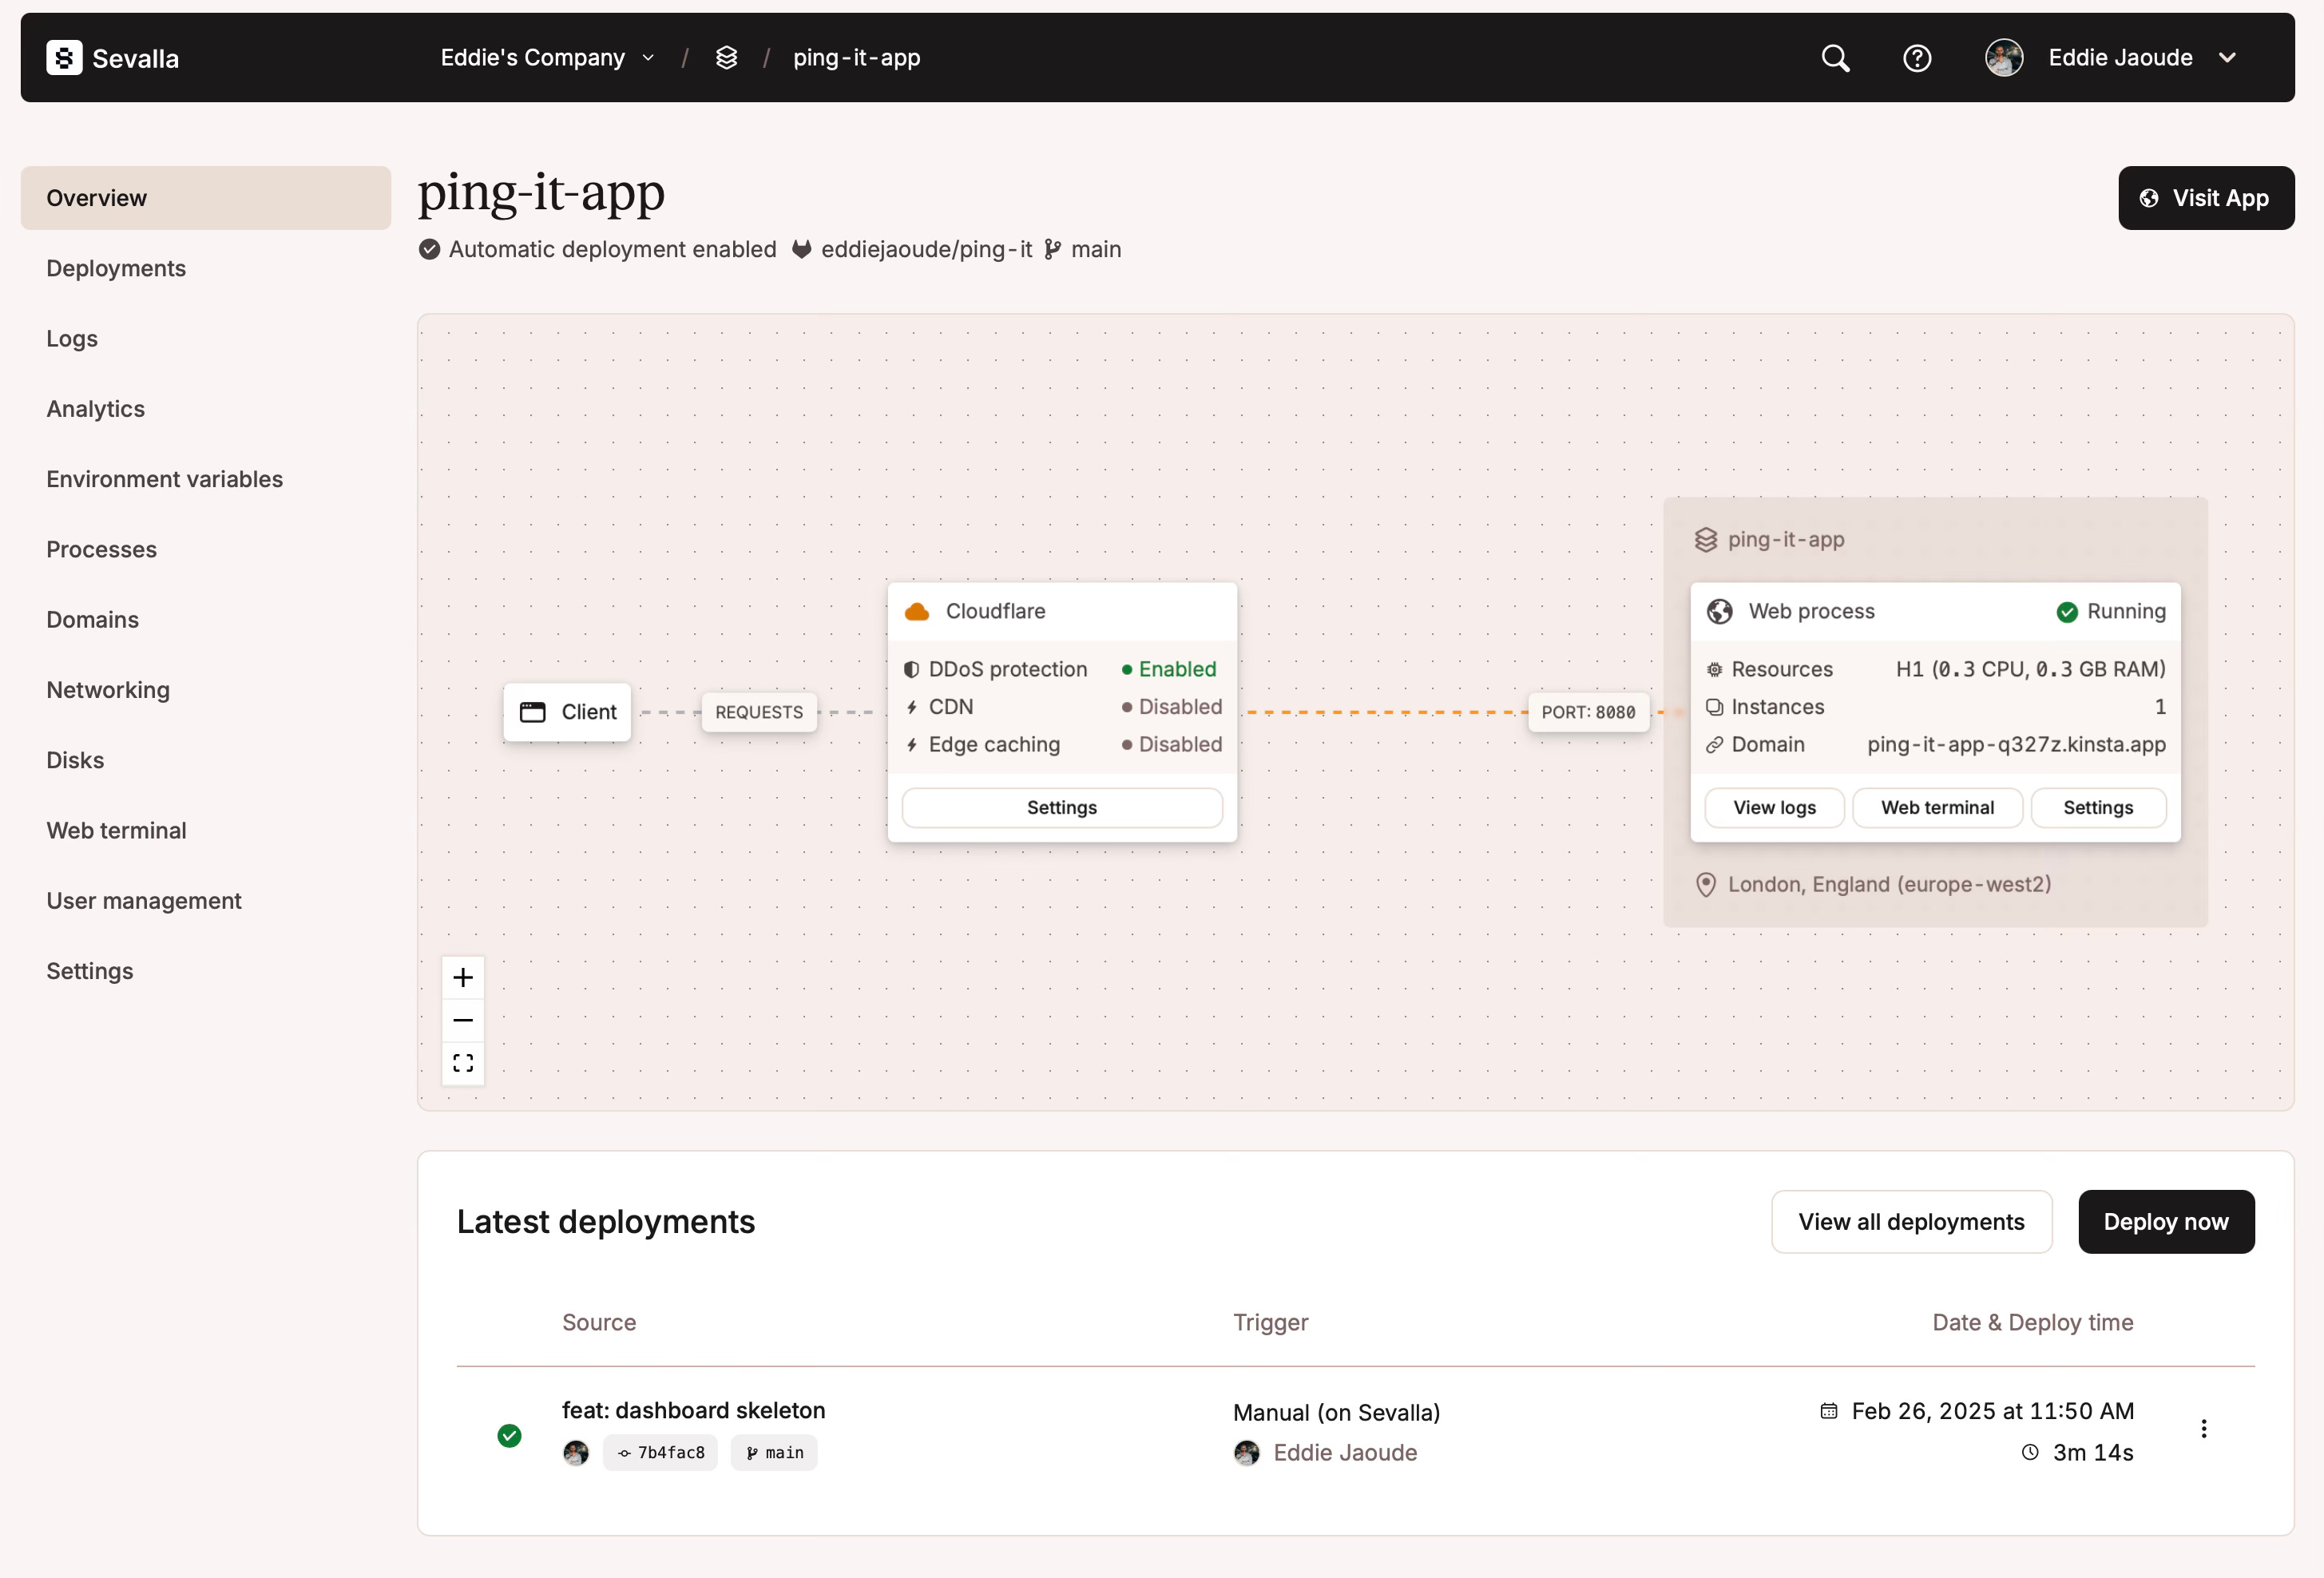
After clicking “create”, these changes will be deployed and the app dashboard will show a visual representation of the projects architecture as before, but this time with the scheduler / cron added:
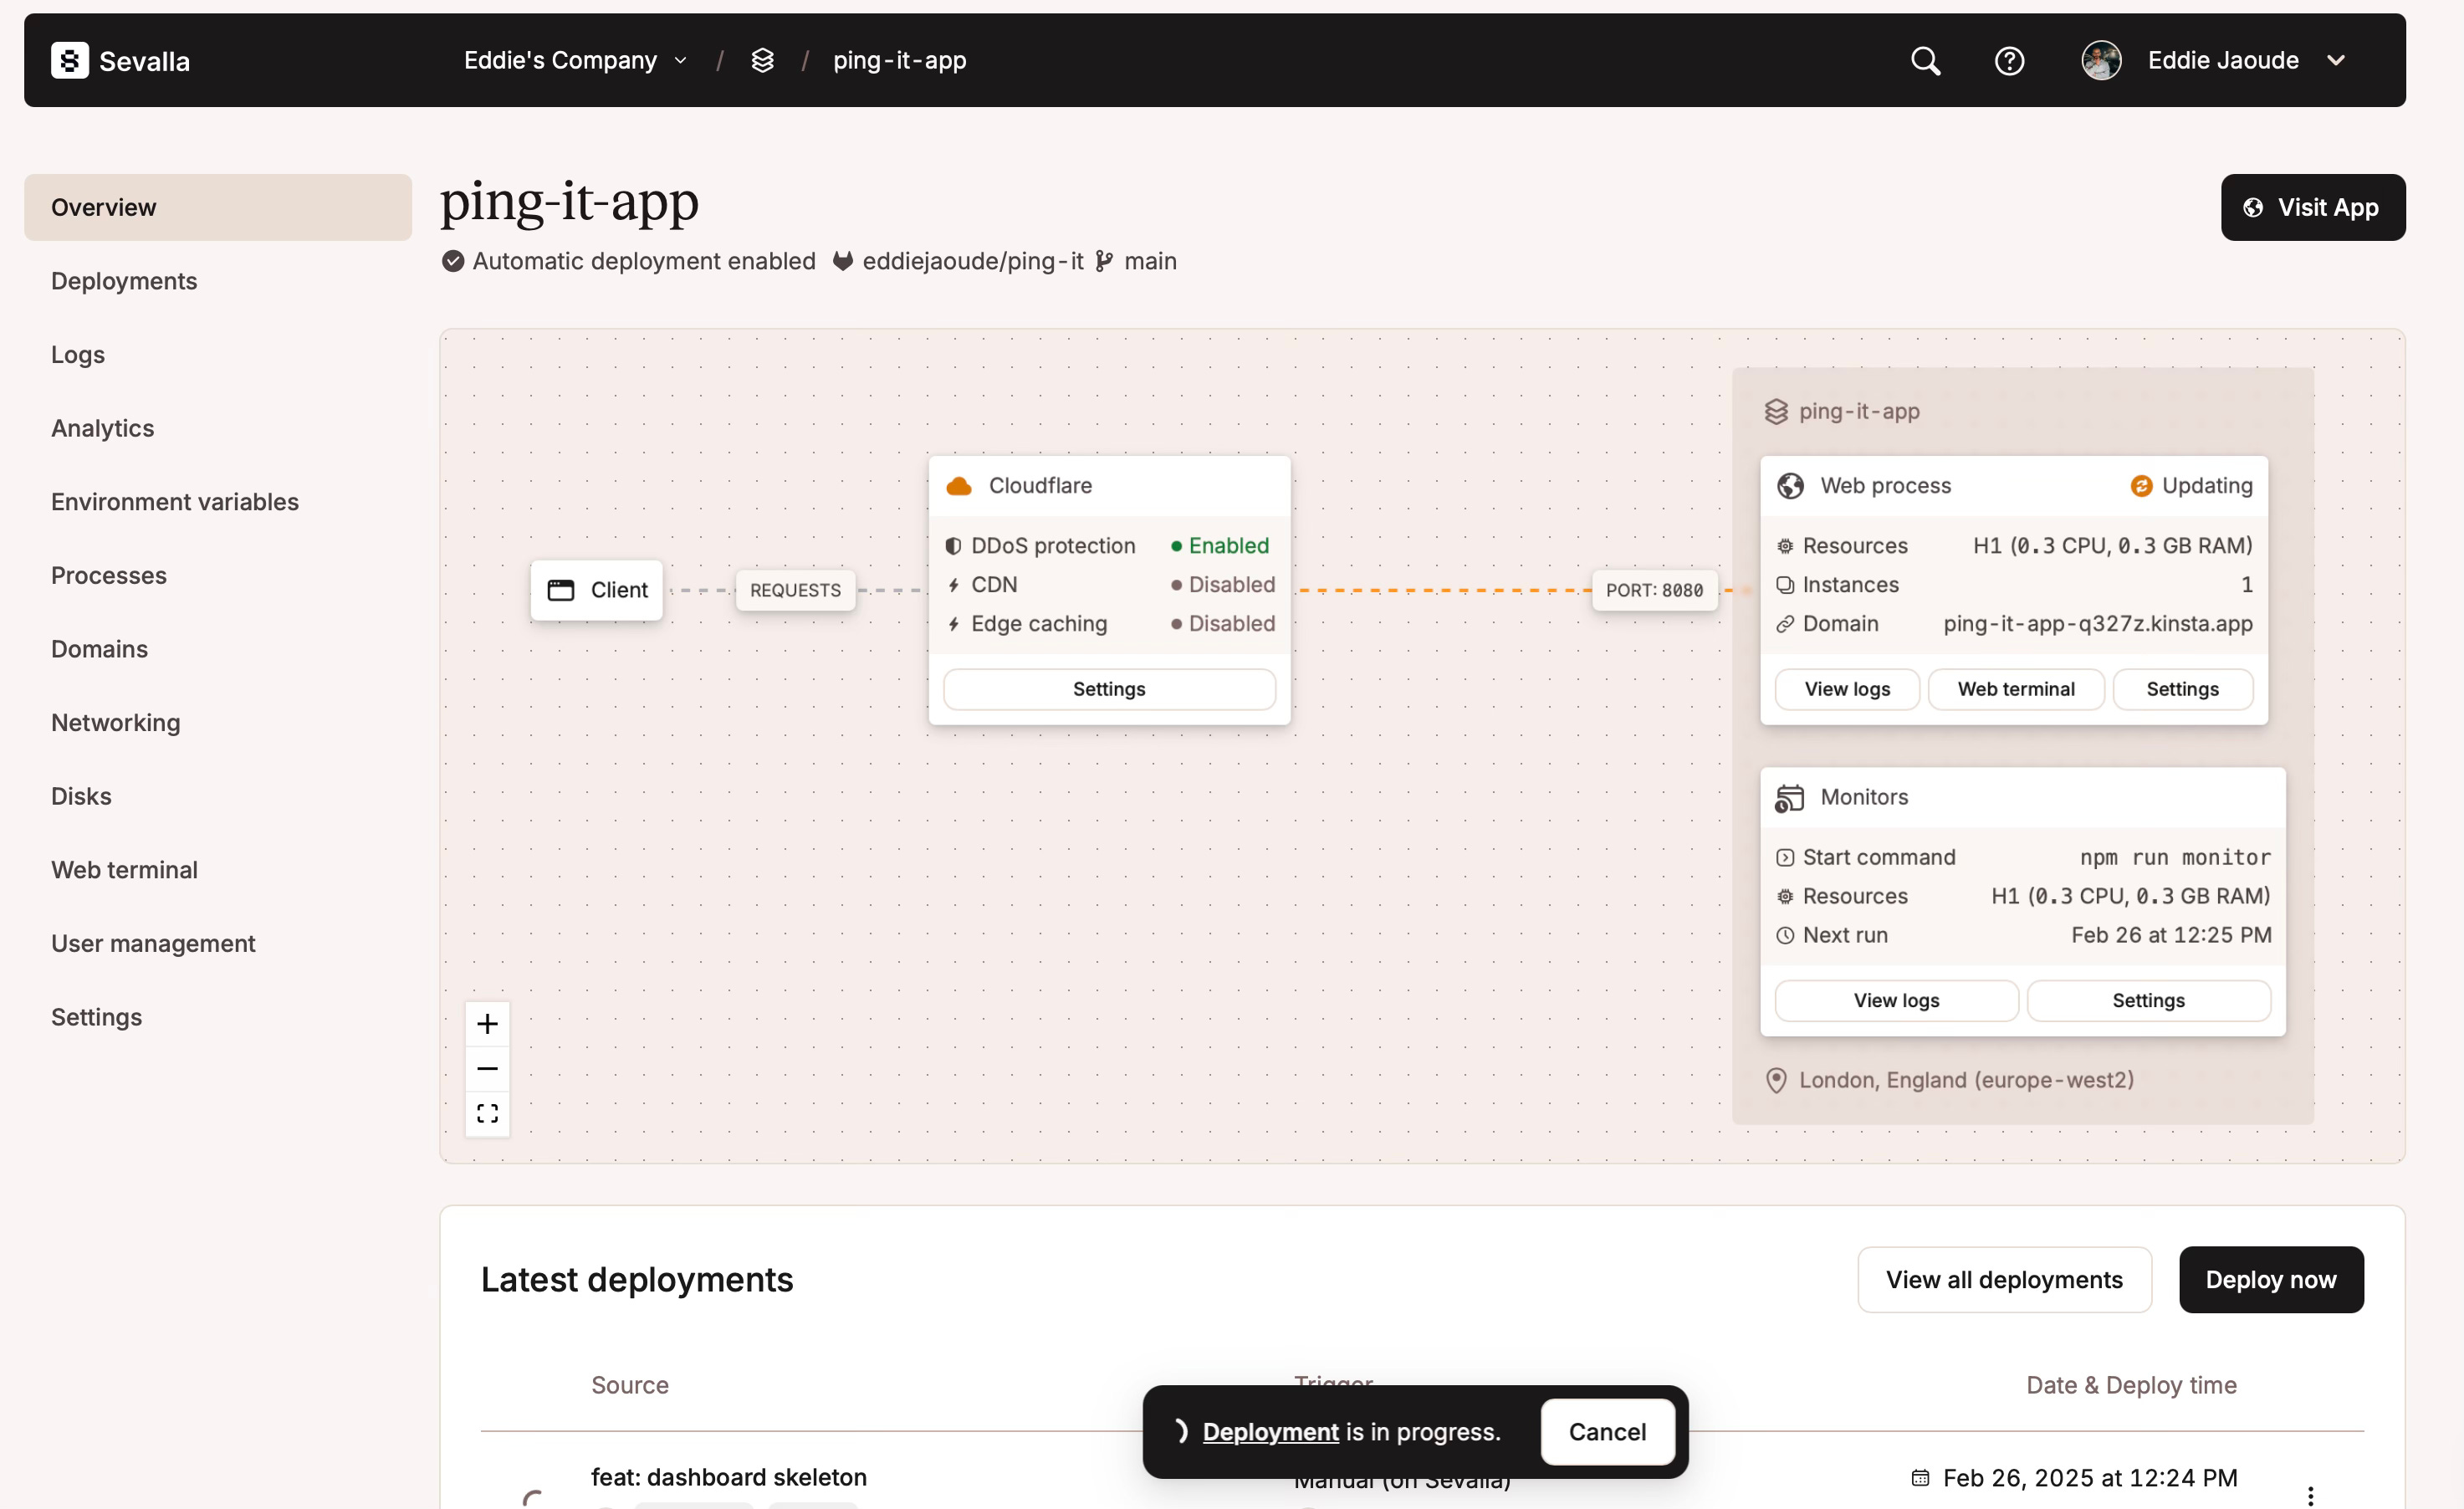
I love this Sevalla view of my project, it shows me the status of the project and also reminds me how the architecture setup is - which is very important when we have multiple projects plus super helpful when onboarding new team members.
Results
By leaving the app running with the Sevalla process that has the scheduler (cron) there are now results on the dashboard:
What I really like about Sevalla is that it is user friendly but also feature rich. The Sevalla cloud hosting platform has all the features needed to support our SaaS products as they grow, as well as controlling spending and no hidden surprises.
Chapter 7: Other SaaS considerations
As the blog is about how to build and deploy a SaaS, I am keen to also mention what other considerations you need to think about if you want make it a serious project with paying users.
Payment provider
You will need to add a payment integration. There are many options out there, like Stripe or Paddle. They both have a quick way to integrate which can be more generic, or a more advanced option if you wish to have this look consistent with your existing design. In my opinion, I highly recommend going down the simplest route so you can get your product out as soon as possible and get user feedback.
User notifications
With our monitoring platform, if there is an unexpected error when the app makes a ping to the user’s Monitor URL, we need some way to notify them as they only log into the platform to check the results and statistics once per week. This way they can be proactive if their website goes down.
Automation with CI
Iterating fast is great but we need to make sure we are not breaking anything. So it is important to run commands like: tests, linters etc on every push. This can be achieved with GitLab CI and some YAML config files.
Scaling
With Sevalla you can manually or automatically scale your app horizontally or vertically as required. This is super useful for when your app receives unexpected traiffic or during a marketing campaign. This way you only pay for what you need to use. Sevalla’s official documentation covers this here: https://docs.sevalla.com/application-hosting/scale-application-resources.
On your Sevalla dashboard you can see your spending over the month as well as go into each app or database and see the usage. For example: memory, cpu, requests etc https://docs.sevalla.com/application-hosting/application-analytics.
Chapter 8: Conclusion
I hope that I have showed you that building your own SaaS doesn't have to be a pipe dream and doesn't have to cost you a lot of money. My advice is to use tools and platforms that are recommended and proven - don’t select those which are just hype or “in” right now, as this could come back to haunt you later on.
Let's be honest. When deploying your shiny new project your main objective is to get users and customers. The last thing you want to be worrying about is whether your app is still running, especially when you are not working or sleeping. You just want it to work so your users can use your app confidently and consistently.
I hope this post has inspired you to start your project today. Please let me know in the comments what project you decide to build and keep me updated on your progress.
Watch the full YouTube video here:
Excellent article Eddie 👏👏 can see so much effort gone into this, the screenshots alone!
Perfect for new developers looking to get insights into building a SaaS!
Lets gooo 🙌
Great article. I have a slightly different tech stack, but Clerk and Sevalla seem like two providers that can really speed up the process.