
Contributing to an Enterprise Open Source Project: Kestra
Contributors should add value to Open Source projects, and it is not just about code! I will use the Open Source project Kestra here as an example to fix a bug.

🎥 Full YouTube video contributing to the Kestra Open Source repo
Do you want to up skill faster?
For me, one of the best ways to up skill is to get real World experience. You can achieve this by contributing to Open Source. No matter where you are in your career, even if you are at the very beginning, or if you have been coding for over 15 years like me, getting involved in Open Source will accelerate your learning and career.
Additionally contributing to Open Source and consistently adding value to a project, makes you more visible to companies who may be looking to hire. When companies are looking to grow their team it is natural that they will look at those who already know the project and their maintainers have collaborated with.
Plus, by contributing to Open Source you will be interacting with contributors and maintainers from around the globe - think: different time zones, different languages and different ways of working. Being exposed to this is a great way to improve written communication skills.
In this blog post I have put together a step-by-step guide on how you can contribute to enterprise Open Source projects.
The project I will use for this guide is Kestra and I would suggest that you take a look at their GitHub repo so that you can follow along: https://github.com/kestra-io/kestra
What will we cover in this blog post
What is Open Source
Why you should contribute to Open Source
How to find projects/repos
How to validate the project’s repos
Contributing and getting the Pull Request / Merge request accepted
What to do next
What is Open Source
Let’s start with “What is Open Source?” Yes, it refers to software where the source code, design, or content is made publicly available for anyone to use.
But to me it is more than this. I like to think of Open Source as Instagram for code, but with a twist. The twist is people can contribute to Open Source projects, make changes, suggestions, improvements and use the project itself.
Why you should contribute to Open Source
Getting involved in Open Source is very beneficial for those in the tech space. Coding is an art and you get to see how other artists create features and their projects - I am not just talking about design, but also architecting the project.
Also you will grow your network within the tech community. Networking can be difficult, but what if it doesn’t have to be? If you are thrown into a room with other people and instructed to “network”, that is difficult for most. But if you are doing an activity with others, like playing sports - then you naturally network and grow the relationship without even trying. That is the same with Open Source.
How to find projects
Not all projects are equal. What I mean by this is that whilst public projects might be available, they don’t always mean they are keen on receiving contributions or they are friendly to contributors. You don’t want to waste your time on these, and it can be a turn off from Open Source if you have a bad experience.
You want to contribute to what I call “real” Open Source projects: those that are friendly, welcoming and professional. Just to be clear, that doesn’t mean they are perfect - no project is - and that is where you come in.
Being new to a project you have a super power (and not a disadvantage as the majority of people think). You know the saying… “with great power comes great responsibility”, so when you are trying to understand the project and get it running you are looking at it with a fresh pair of eyes. If something is not clear, make sure you improve the onboarding documentation.
There are multiple ways to find an Open Source project to contribute to:
Social media - people are posting on Twitter (X) about projects, either their own, the company they work for or one that they like. This is a great way to find friendly projects.
Your existing network and friends - what projects are your friends using or contributing to?
GitHub Trending page - there are super popular repos on GitHub’s trending page. There are some filters for trending duration and also technologies used in the repo. However I don’t think this is a good way to find projects to contribute to, because popular doesn’t always mean better.

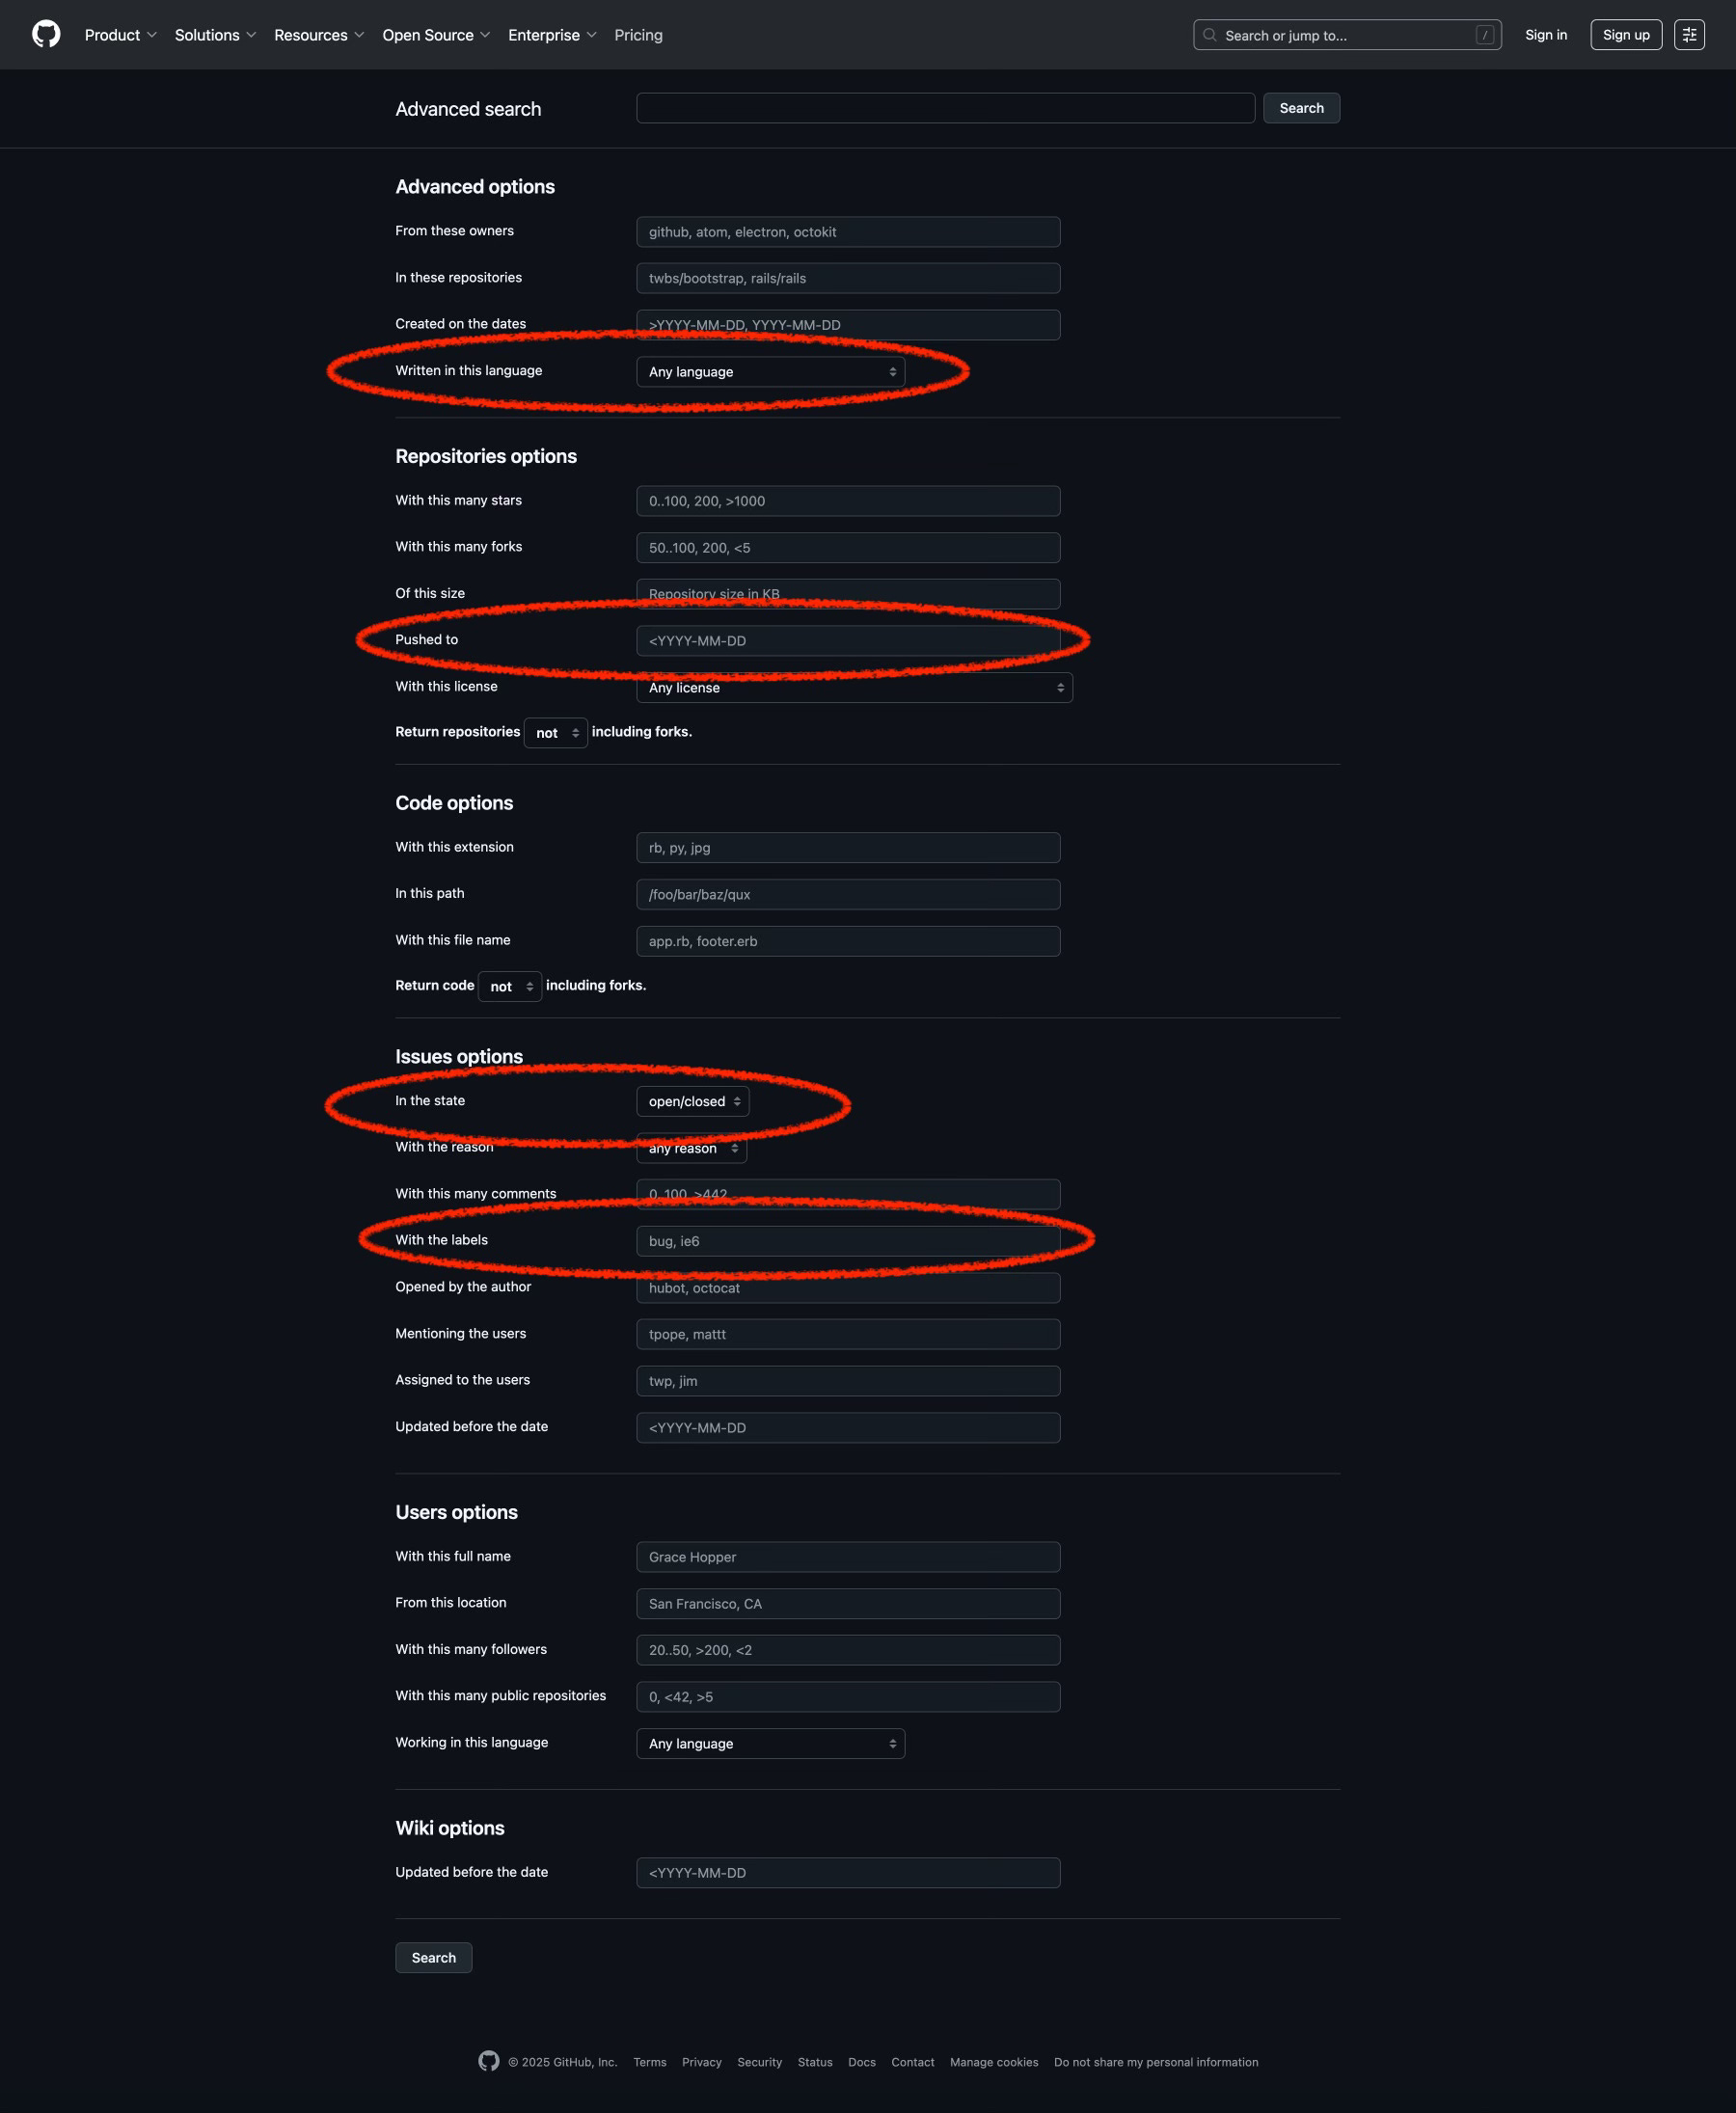
GitHub Advanced Search with a repo focus - using the advanced search page on https://github.com/search/advanced I recommend firstly selecting the language, then making sure the repo has had activity in the last month with the “Pushed to” filter. Include any others filters you think are suitable for you. Using the Advanced Search with a repo focus is a good approach, but the likelihood is that it will return too many results making it difficult to find good repos.
GitHub Advanced Search with an issue search - using the Advanced Search page on https://github.com/search/advanced again, include a language filter like before, then go down to “Issues options”. You definitely want “in the state” to be “open”, in the “With labels” field you can add “good first issue”.
Caution: most “good first issues” are not good first issues. Either the author wants help or it is a three word issue that makes sense to the person who created it but no one else. So use this label with caution and if you realise that you don’t understand most of those issues, that is ok, it is probably not you.
How to validate the project
Once you have found an issue or project you would like to contribute to, it is important to do some due diligence to make sure it is friendly and welcoming for contributors. I suggest:
Check the license - make sure it has an Open Source license. Not having any license does not make it more open, in fact it limits the scope of what is possible. Have a look at a information website created by GitHub with DOs/DONTs of each license with examples https://choosealicense.com
Does the project have a README with instructions how to set it up? You don’t need to try this out immediately at this project finding stage. If the README looks detailed that is good enough for now, you can try it out later if other points are all positive.
Does the repo have a Contributing Guide? This is a great way for repos to onboard new contributors. If this doesn’t exist, it is not necessarily a blocker, if all the other points are positive.
When was the project last active? Look at the latest commit and probably how many commits the repo has had over the last few months.
Are Issues and Pull Requests being looked after by maintainers? For example, are they commenting and in a friendly way.
Bonus tip: go to closed Pull Requests and look for the ones with the red icon, which means they were not accepted. Check these were closed in a friendly way - if some have no comment, take it with a pitch of salt as conversations could have happened elsewhere (such as on Discord). However if most closed PRs don’t have any comments at all, then I would consider this is a warning sign.
How can we contribute
Contribution is not just about writing code. It can be through documentation, automated tests and even project management (for example, highlighting to maintainers where there are duplicate issues). The question you need to think about is “Will this contribution add value?”
There are two directions we can take: creating a new issue because we discovered - for example a bug, or we found an issue we would like to work on.
Here are a few things to keep in mind:
New issue
Firstly, check the repo that the issue doesn’t already exist. Remember to also check the “closed” issues! If the maintainers have closed a similar issue to what you are thinking of raising, this might be for a specific reason - for example, it doesn’t align with the project’s current roadmap.
Before you raise the issue, check the Contributing Guide to see if the project has a specific issue template. Following a template will help both you and the project’s maintainers accept the issue as it has all the information needed.
Existing issues
Filter by labels such as “ready for dev” and “not assigned” - if an issue has recently been assigned to someone, don’t ask for it to be assigned to you.
Also filter by “not assigned”.
Another great label to look out for is the “good first issue”. These are well-defined tasks designed for newcomers to get acquainted with a project without needing deep expertise.
Check the project’s Contributing Guide to see how maintainers would like you to ask for an issue to be assigned to you.
The maintainers may want you to answer certain questions when asking for an issue to be assigned, so do check the issue description for this. Avoid commenting only with “I want to work on this” when this is the case.
I found a project, Kestra
I found an Issue I am keen to work on in the project Kestra https://github.com/kestra-io/kestra
Kestra is a powerful orchestration tool that simplifies workflows. It uses declarative syntax and has the functionality of multiple Event Based Triggers. What I really like is that it has a great UI and code editor, so I can comfortably stay in the yaml config, see any errors I make immediately as well as seeing the visual result in their diagram. However, it others who don’t want to use YAML and who prefer to only use the UI can stay in that view.
Also Kestra has over 600 plugins which allow you to integrate with other services very easily. For example sending notifications to Slack, creating GitHub Issues and so many more. With these building blocks, just like in Lego, we can create anything we need.
In addition there are over 250 Blueprints which are complete workflows you can easily tweak to suit your situation.
Let me show you an example of how Kestra can be used. Here is a workflow I created that pings my website on a schedule and if my website is down, it will create a GitHub Issue on the repo, how great is that? I still love the visual representation.
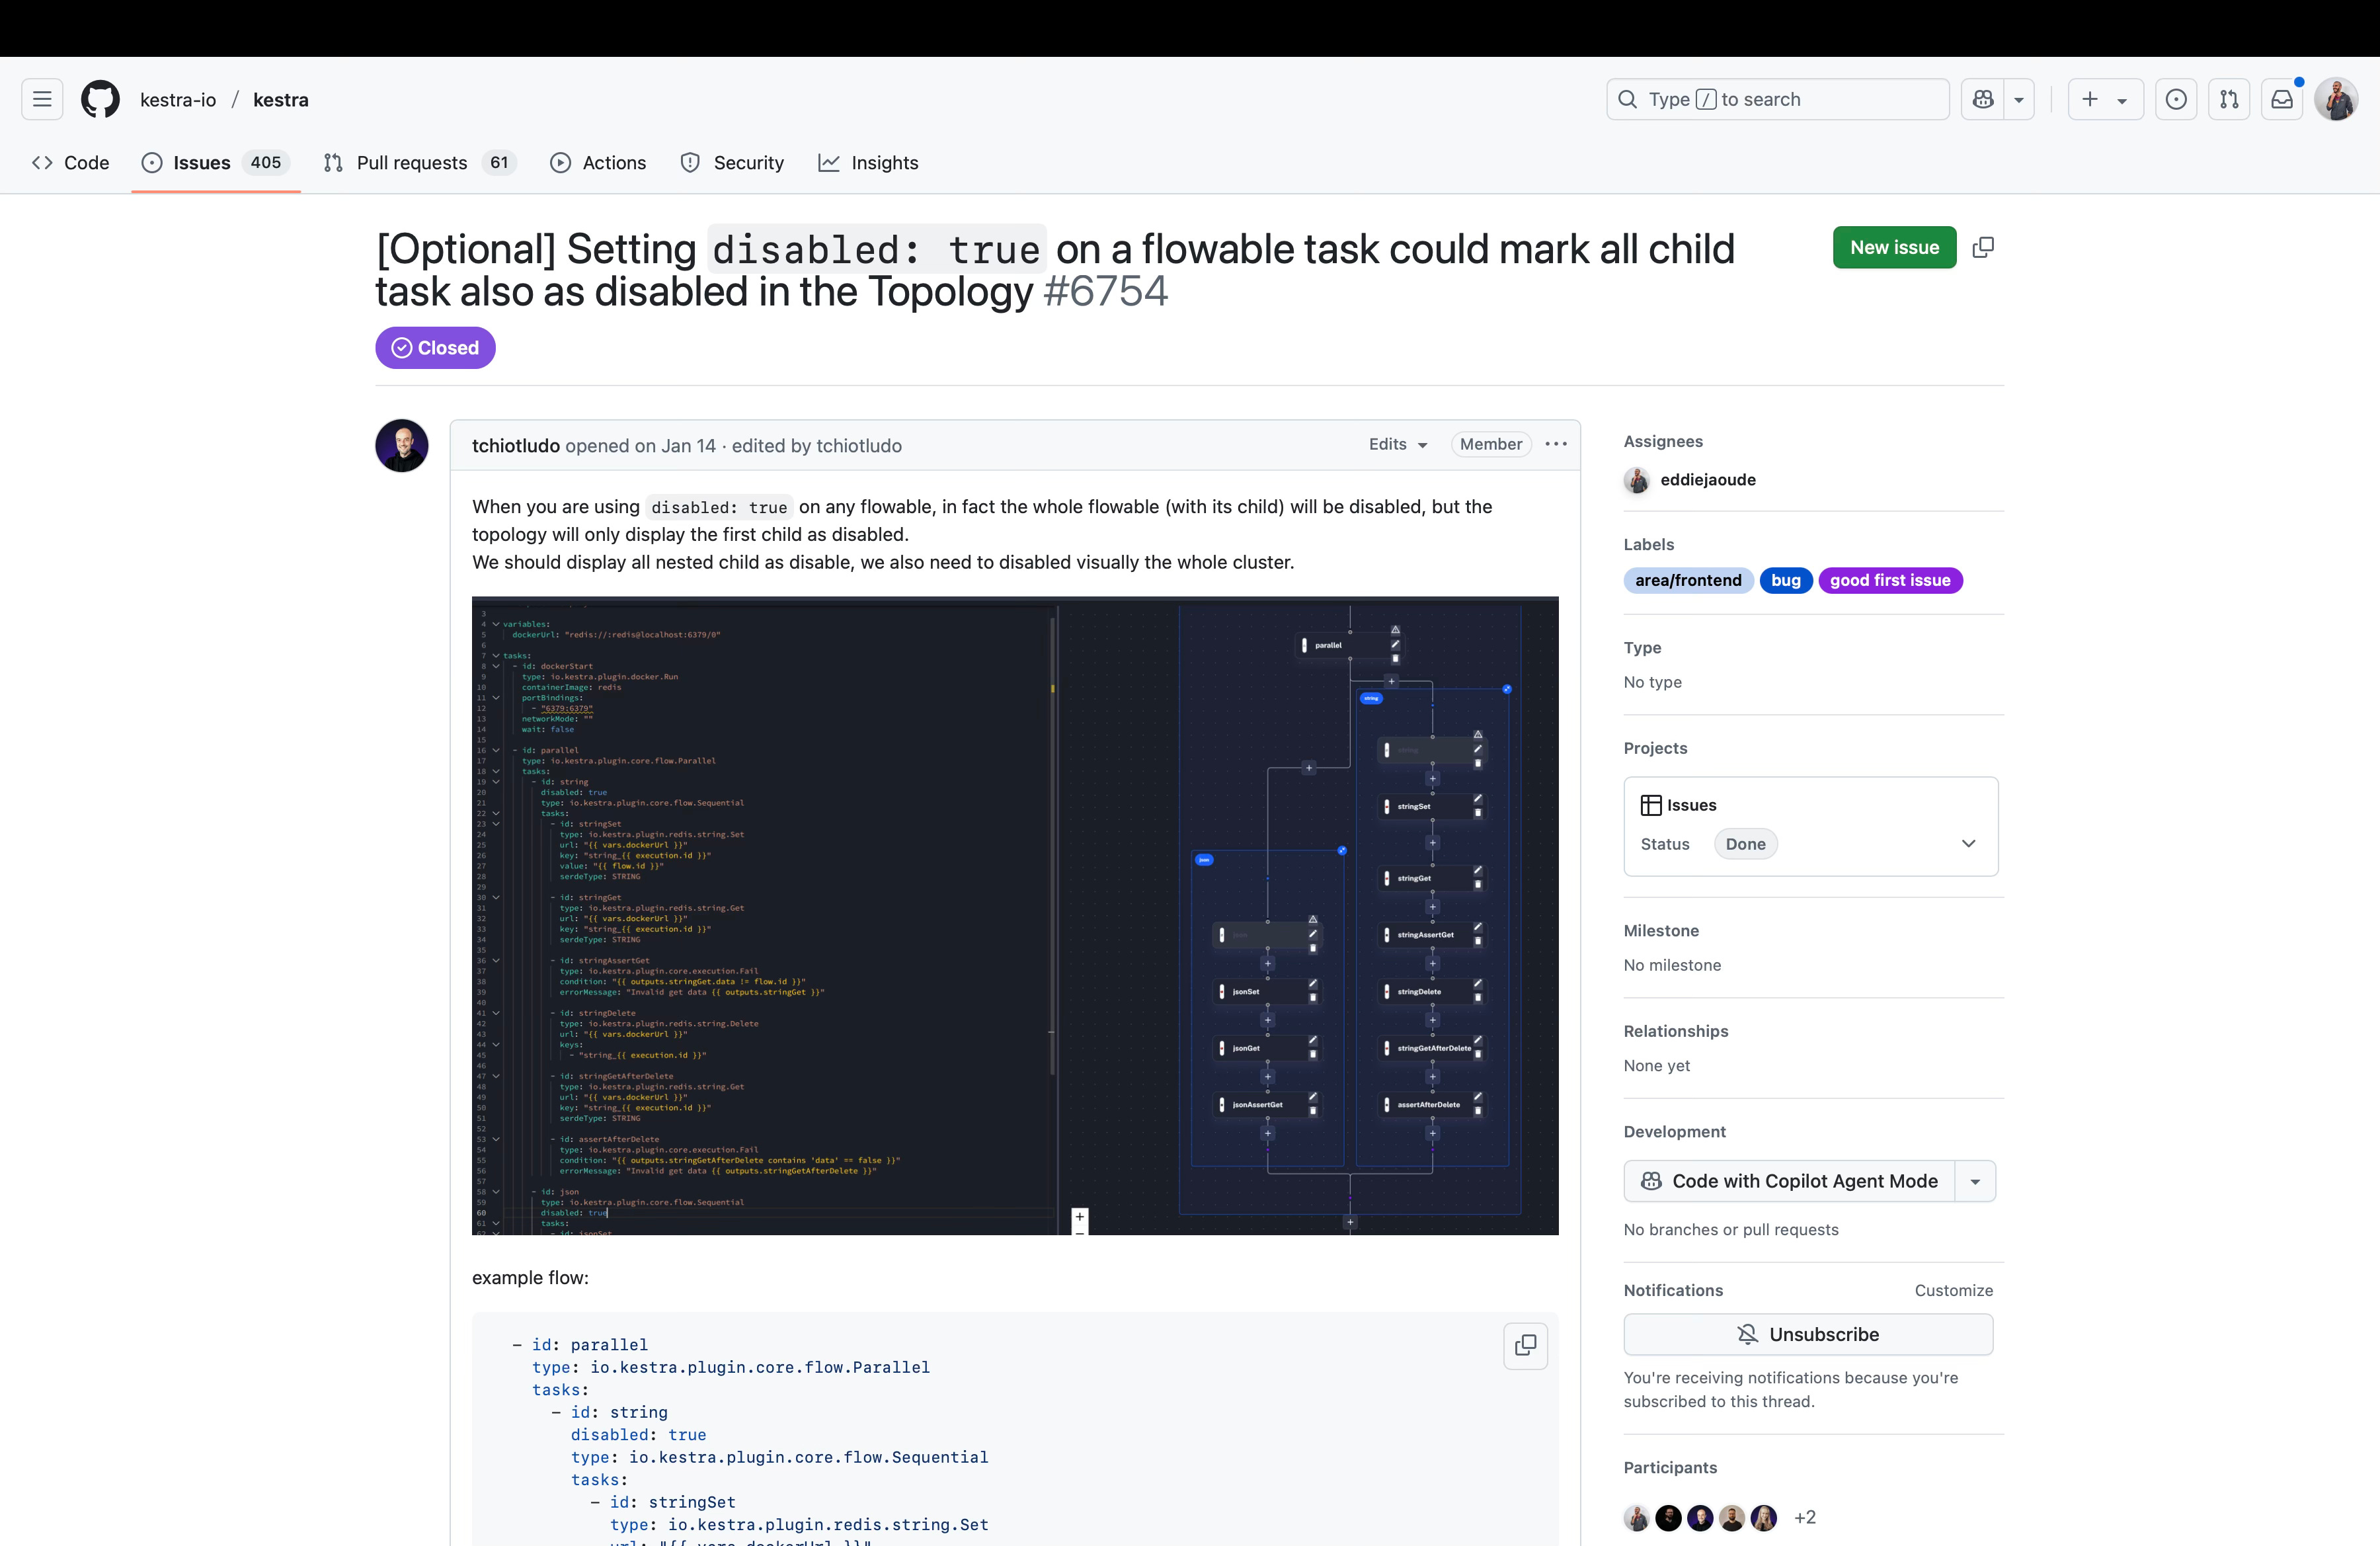
The Open Source GitHub Issue that I will solve is this one: https://github.com/kestra-io/kestra/issues/6754 I came across it as I was searching for a “good first issue” as this is my first contribution to this project.
From the issue title and description when disabling a nested workflow only the first child is disabled in the diagram, but all of the children in the disabled workflow should be shown as disabled.
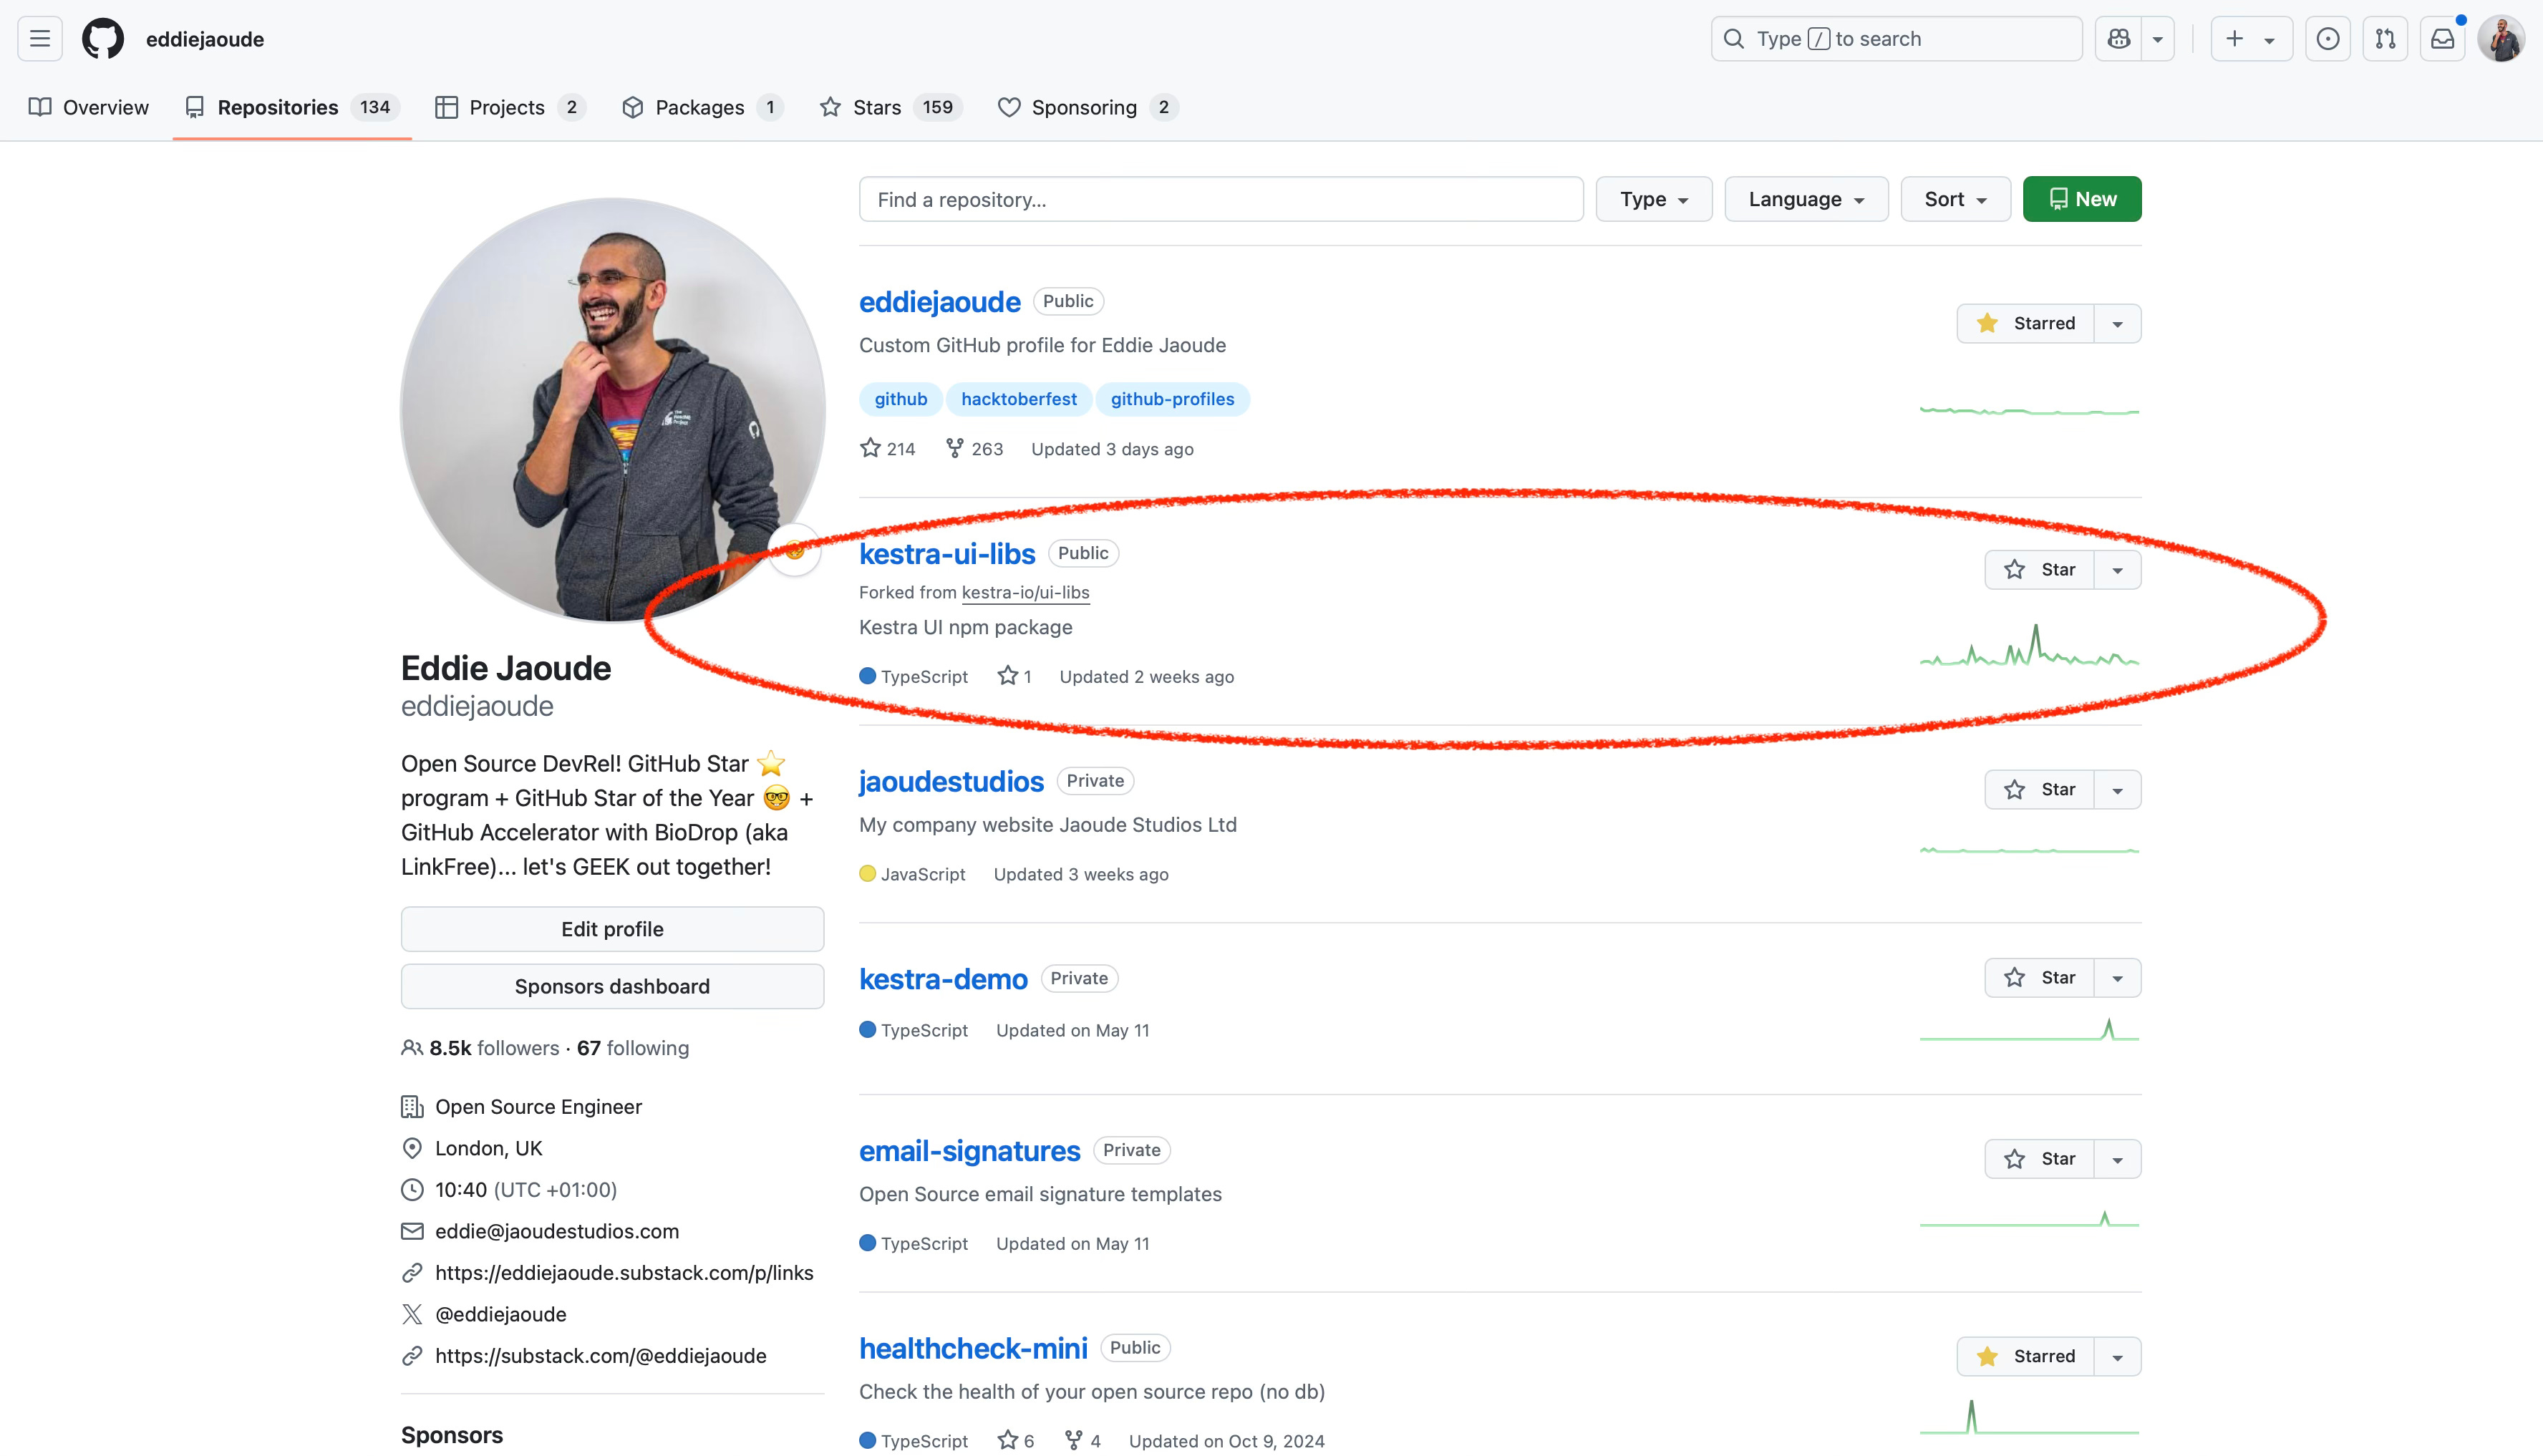
Pre-Pull Request
Before I ask for the issue to be assigned to me, I set up the project locally to get a rough idea of how to tackle the problem. I actually discovered that the bug was not actually in this repo, it was in one of the project’s dependencies https://github.com/kestra-io/ui-libs. So I then proceeded to set up the “ui-libs” project and modified the Kestra repo to use my local version. Once that was done, I was more confident that I could fix the bug as well as see the changes.
Once the issue is assigned to you, get the project running locally if you haven’t done so already. This isn’t always as easy step and can be more difficult than making the code changes. But along this journey you can improve the onboarding documentation for the project - remember your super power - you are new to the project and can look at the documentation. Plus once you have the project running locally you can take on future issues more easily.
As you can see it is not just about changing a few lines of code. There is more to it, which is why I recommend contributing to less projects. That way your investment of setting up the project will benefit you in your next contribution
Once the issued was assigned to me, as the changes I needed to make to fix the bug were on the wrong repo, I created a new issue on the correct repo, detailing what problem and referencing the original Issue.

Here is the Kestra GitHub Issue I created:
https://github.com/kestra-io/ui-libs/issues/561
Pull Request
Setup the projects locally
Yes projects, because we need to setup the dependency project “ui-libs”. These are the steps:
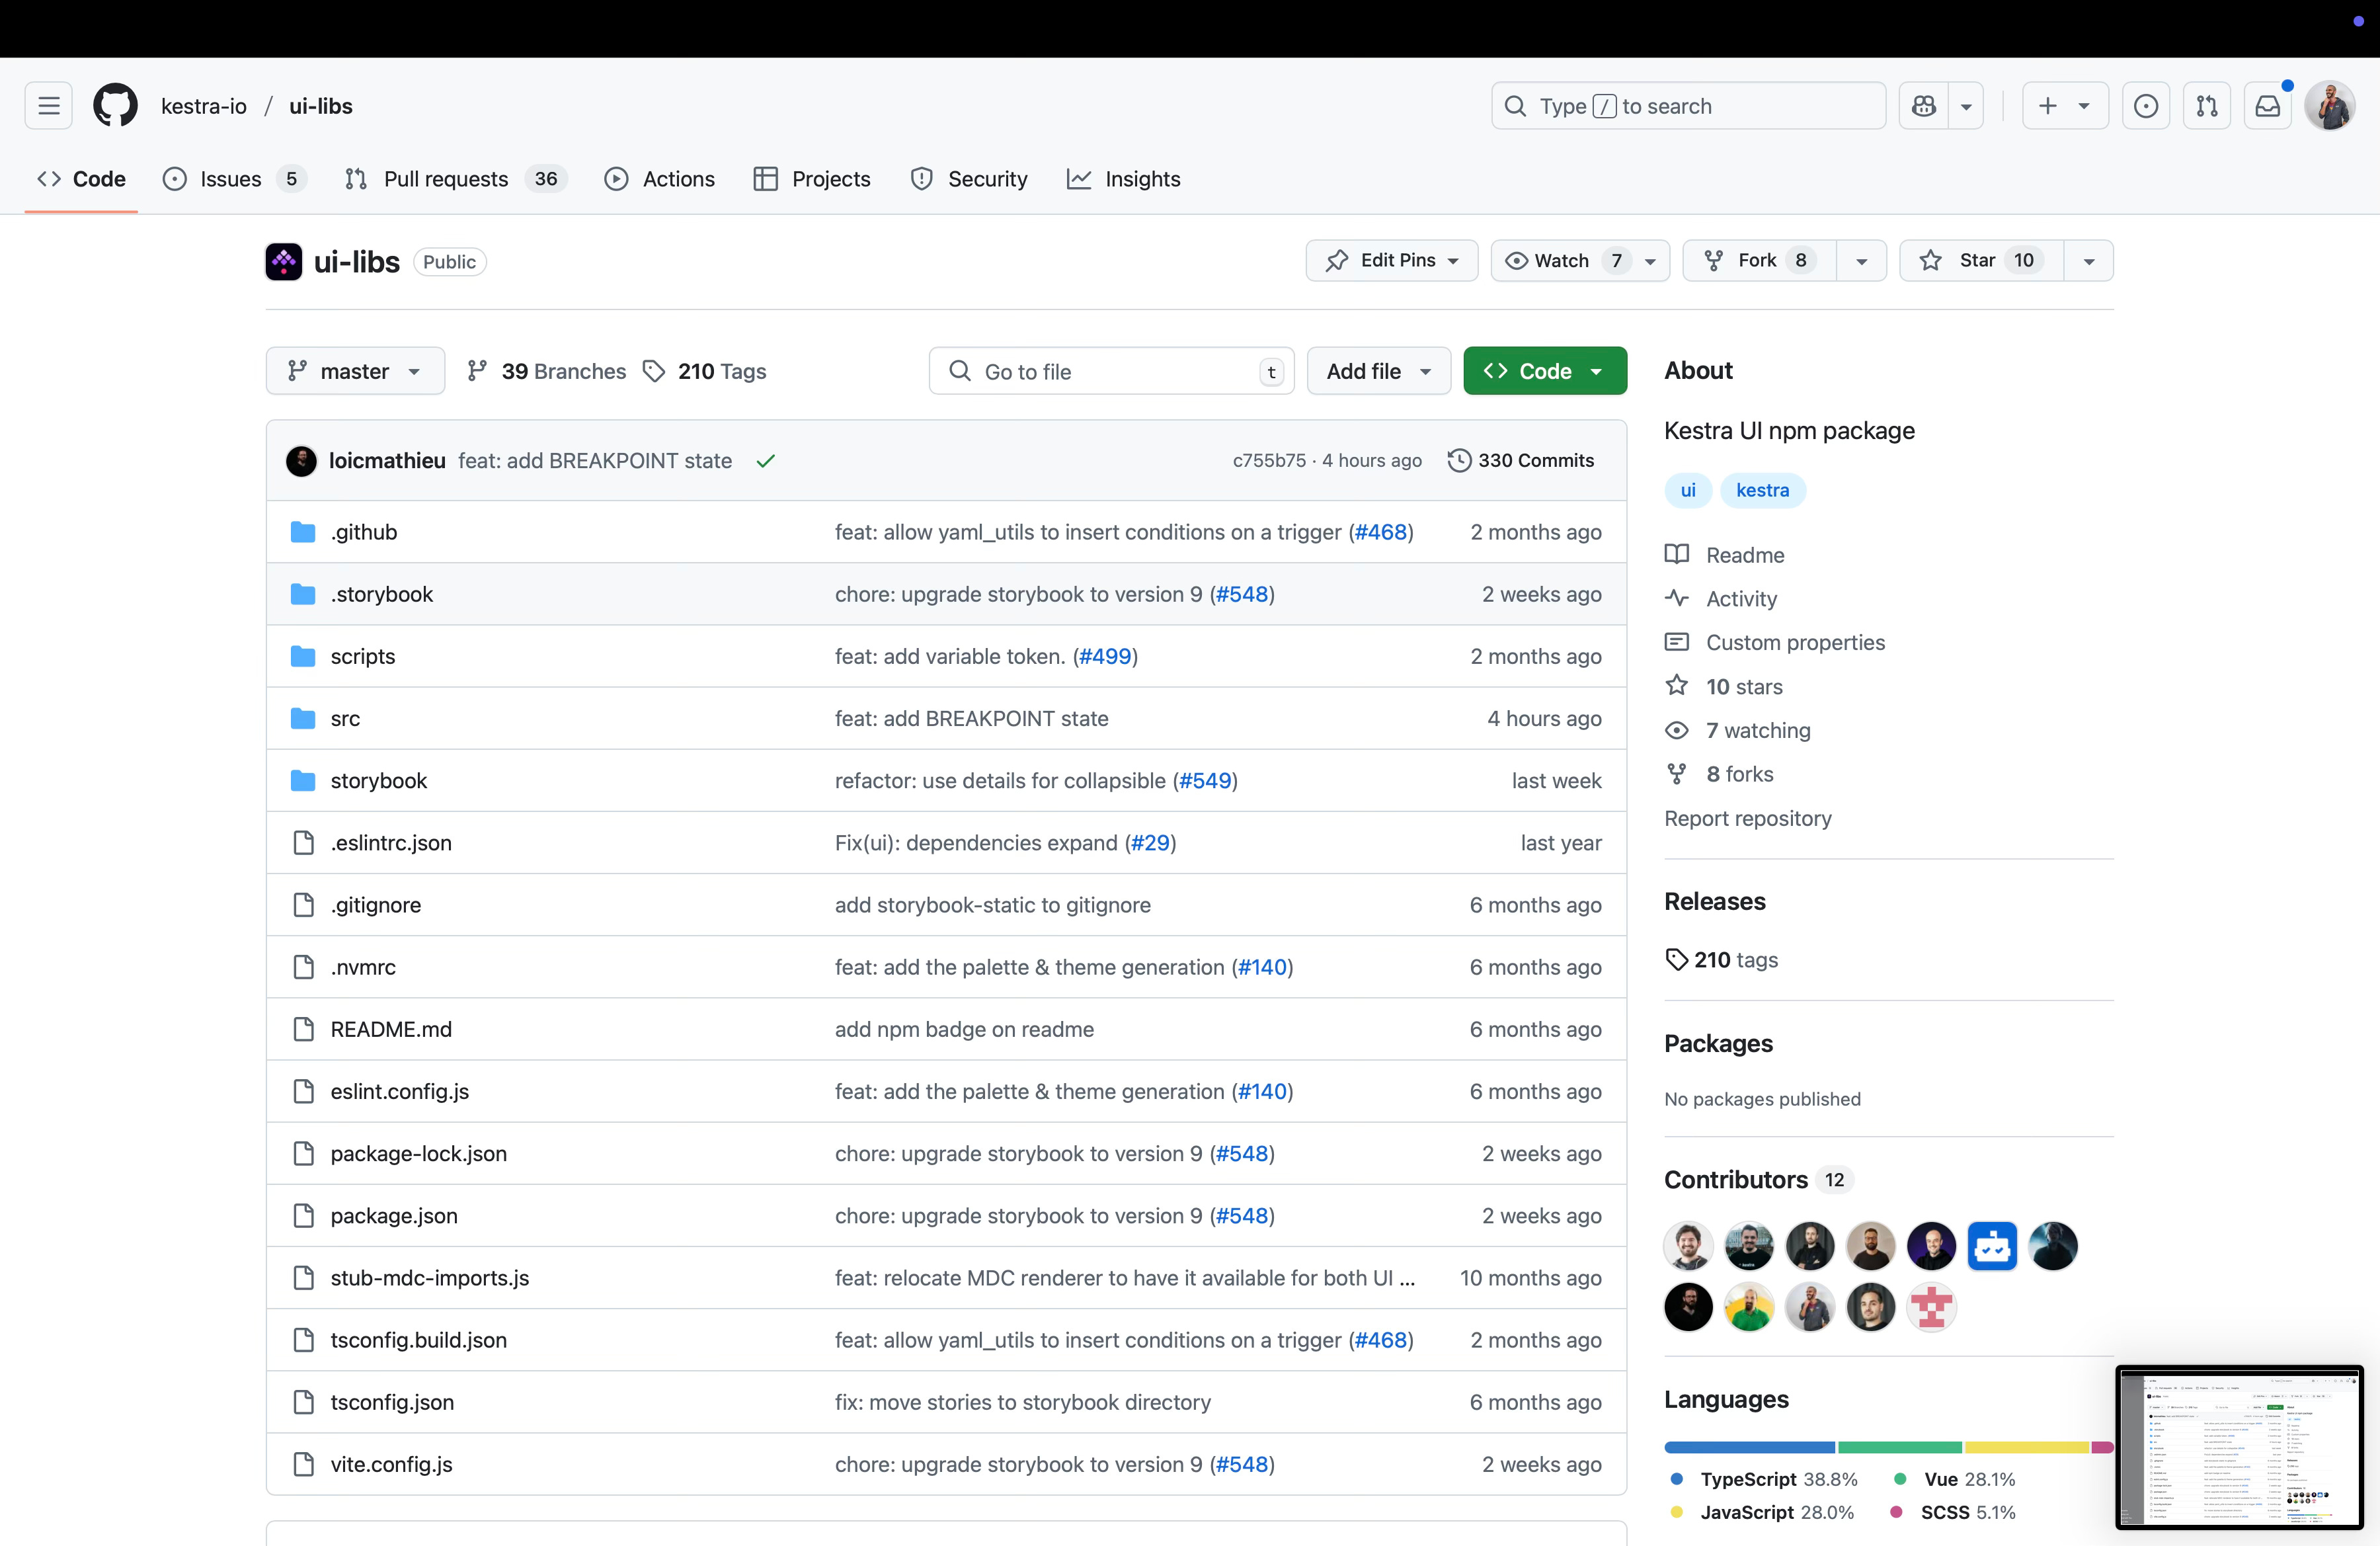
Fork and clone “kestra-io/ui-libs” repo. We need to fork the “ui-libs” repo because we plan to contribute to it.
Clone “kestra-io/kestra” repo. We don’t need to fork the “kestra” repo because we only need this to consume the “ui-libs” local repo to check our changes work correctly.
Update the npm dependency in the “kestra-io/kestra” repo to use our local “ui-libs” project. We will not commit these changes, as this is only for development and testing purposes. After our changes in the “ui-libs” are accepted we can discard the “kestra” repo changes locally.
Kestra has an overall contributing guide you can follow for different types of contributions https://github.com/kestra-io/kestra/blob/develop/.github/CONTRIBUTING.md
Let me take you through the steps needed for setting up the projects for the changes we are going to make:
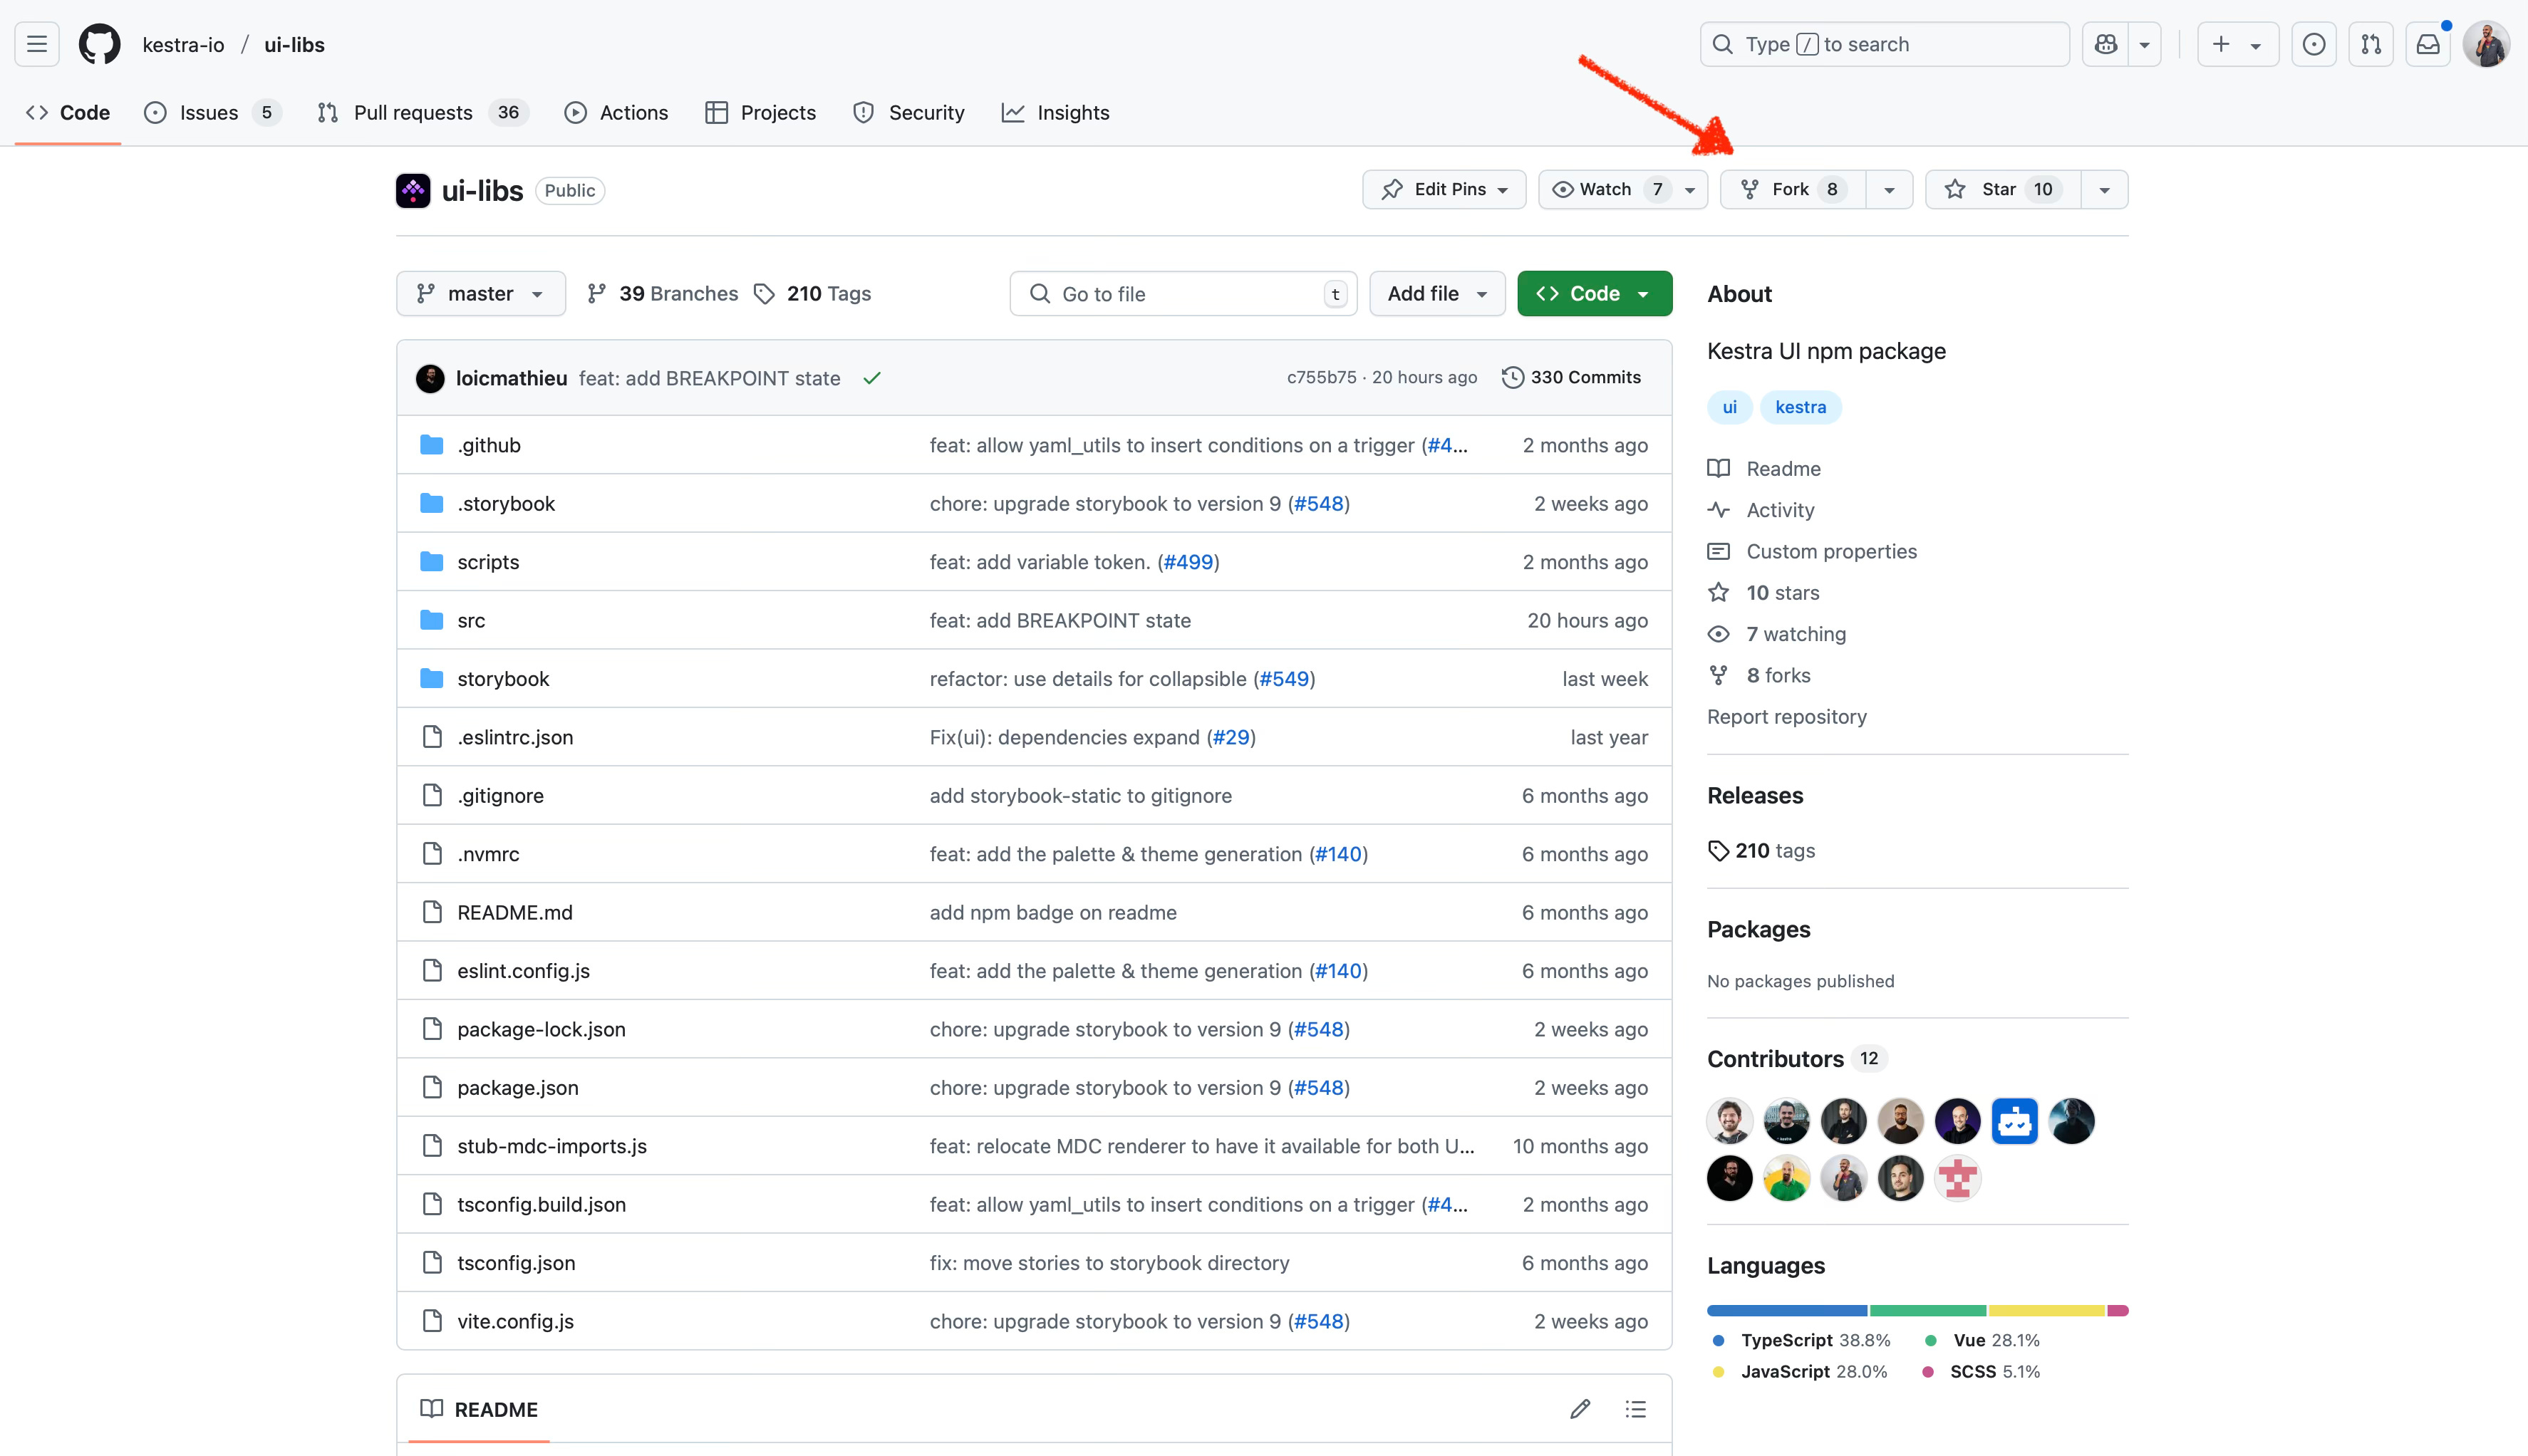
Fork the Kestra GitHub “ui-libs” repo by clicking the fork button at the top right of the repo, you only need to do this once per repo, not every time you wish to contribute to the project. What this will do is create a copy of the repo under your GitHub account so you can make changes.
Now you have a copy of the “ui-libs” repo in your account, you can clone this forked repo.
To clone you can use your GUI or IDE tool. I still prefer to do it on the CLI but that is up to you. If you use the CLI, here is the command, but do not copy the repo path, as you should clone your fork not mine.
git clone git@github.com:eddiejaoude/kestra-ui-libs.gitClone the “kestra” repo, this you can copy as it is not a forked repo, but the upstream (original) repo.
git clone git@github.com:kestra-io/kestra.gitI suggest having these 2 cloned repos as siblings in the folder structure, this will be more clear to manage relative paths and easier to follow along.
I created an empty “kestra” folder (you can name this anything you wish) and cloned both repos into there:

Navigate into each project folder in a new terminal and start the projects.
In terminal 1, navigate to the “ui-libs” repo (I called it “kestra-ui-libs”), then run the npm build command:
cd kestra-ui-libs
npm run build
In terminal 2, navigate to the “kestra” repo, I called it “kestra-io” locally, install the local npm package and then run the project:
cd kestra-io
npm install ../../../kestra-ui-libs
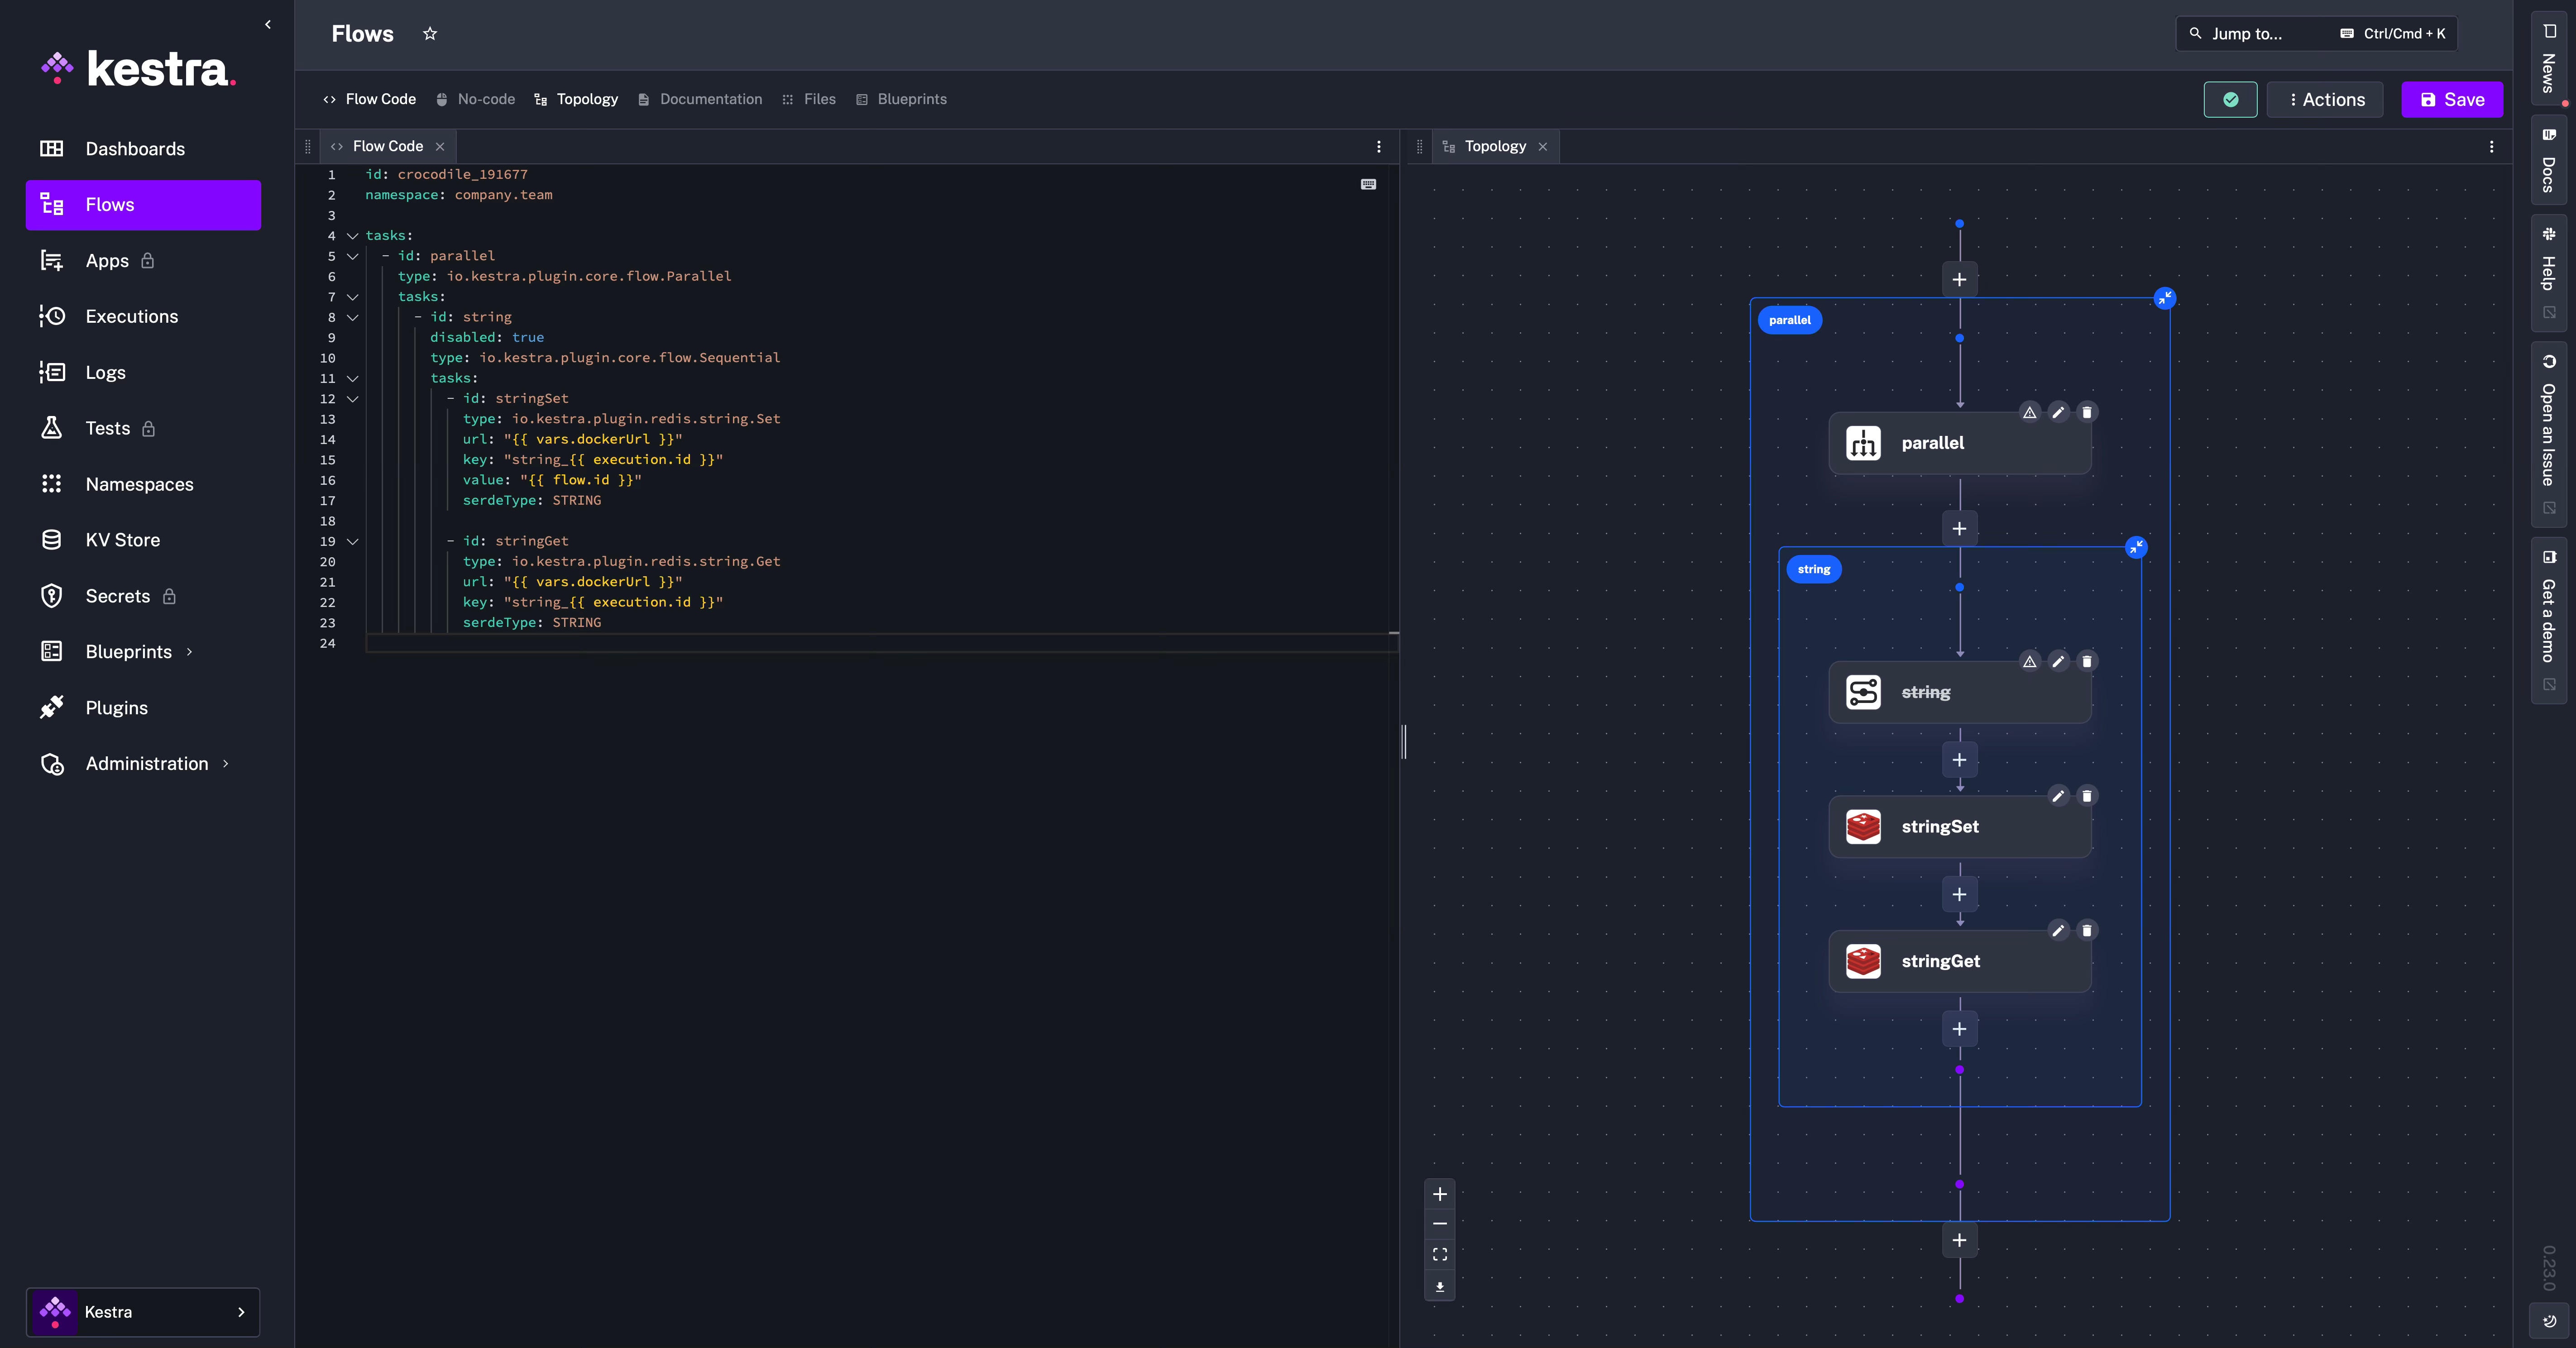
make start-standalone-localReplicate the bug locally
Visit “http://localhost:8080” and create a new Kestra flow. You can use this example YAML to see the bug:
id: example
namespace: company.team

tasks:
  - id: outside
    type: io.kestra.plugin.core.log.Log
    message: Outside message
  - id: nested
    type: io.kestra.plugin.core.flow.Parallel
    disabled: true
    tasks:
      - id: first
        type: io.kestra.plugin.core.log.Log
        message: first child
      - id: second
        type: io.kestra.plugin.core.log.Log
        message: second child

  - id: outside2
    type: io.kestra.plugin.core.log.Log
    message: Outside message
The bug shows the first child disabled but the following children appear to be enabled on the visual diagram called “Topology” shown next to the YAML:
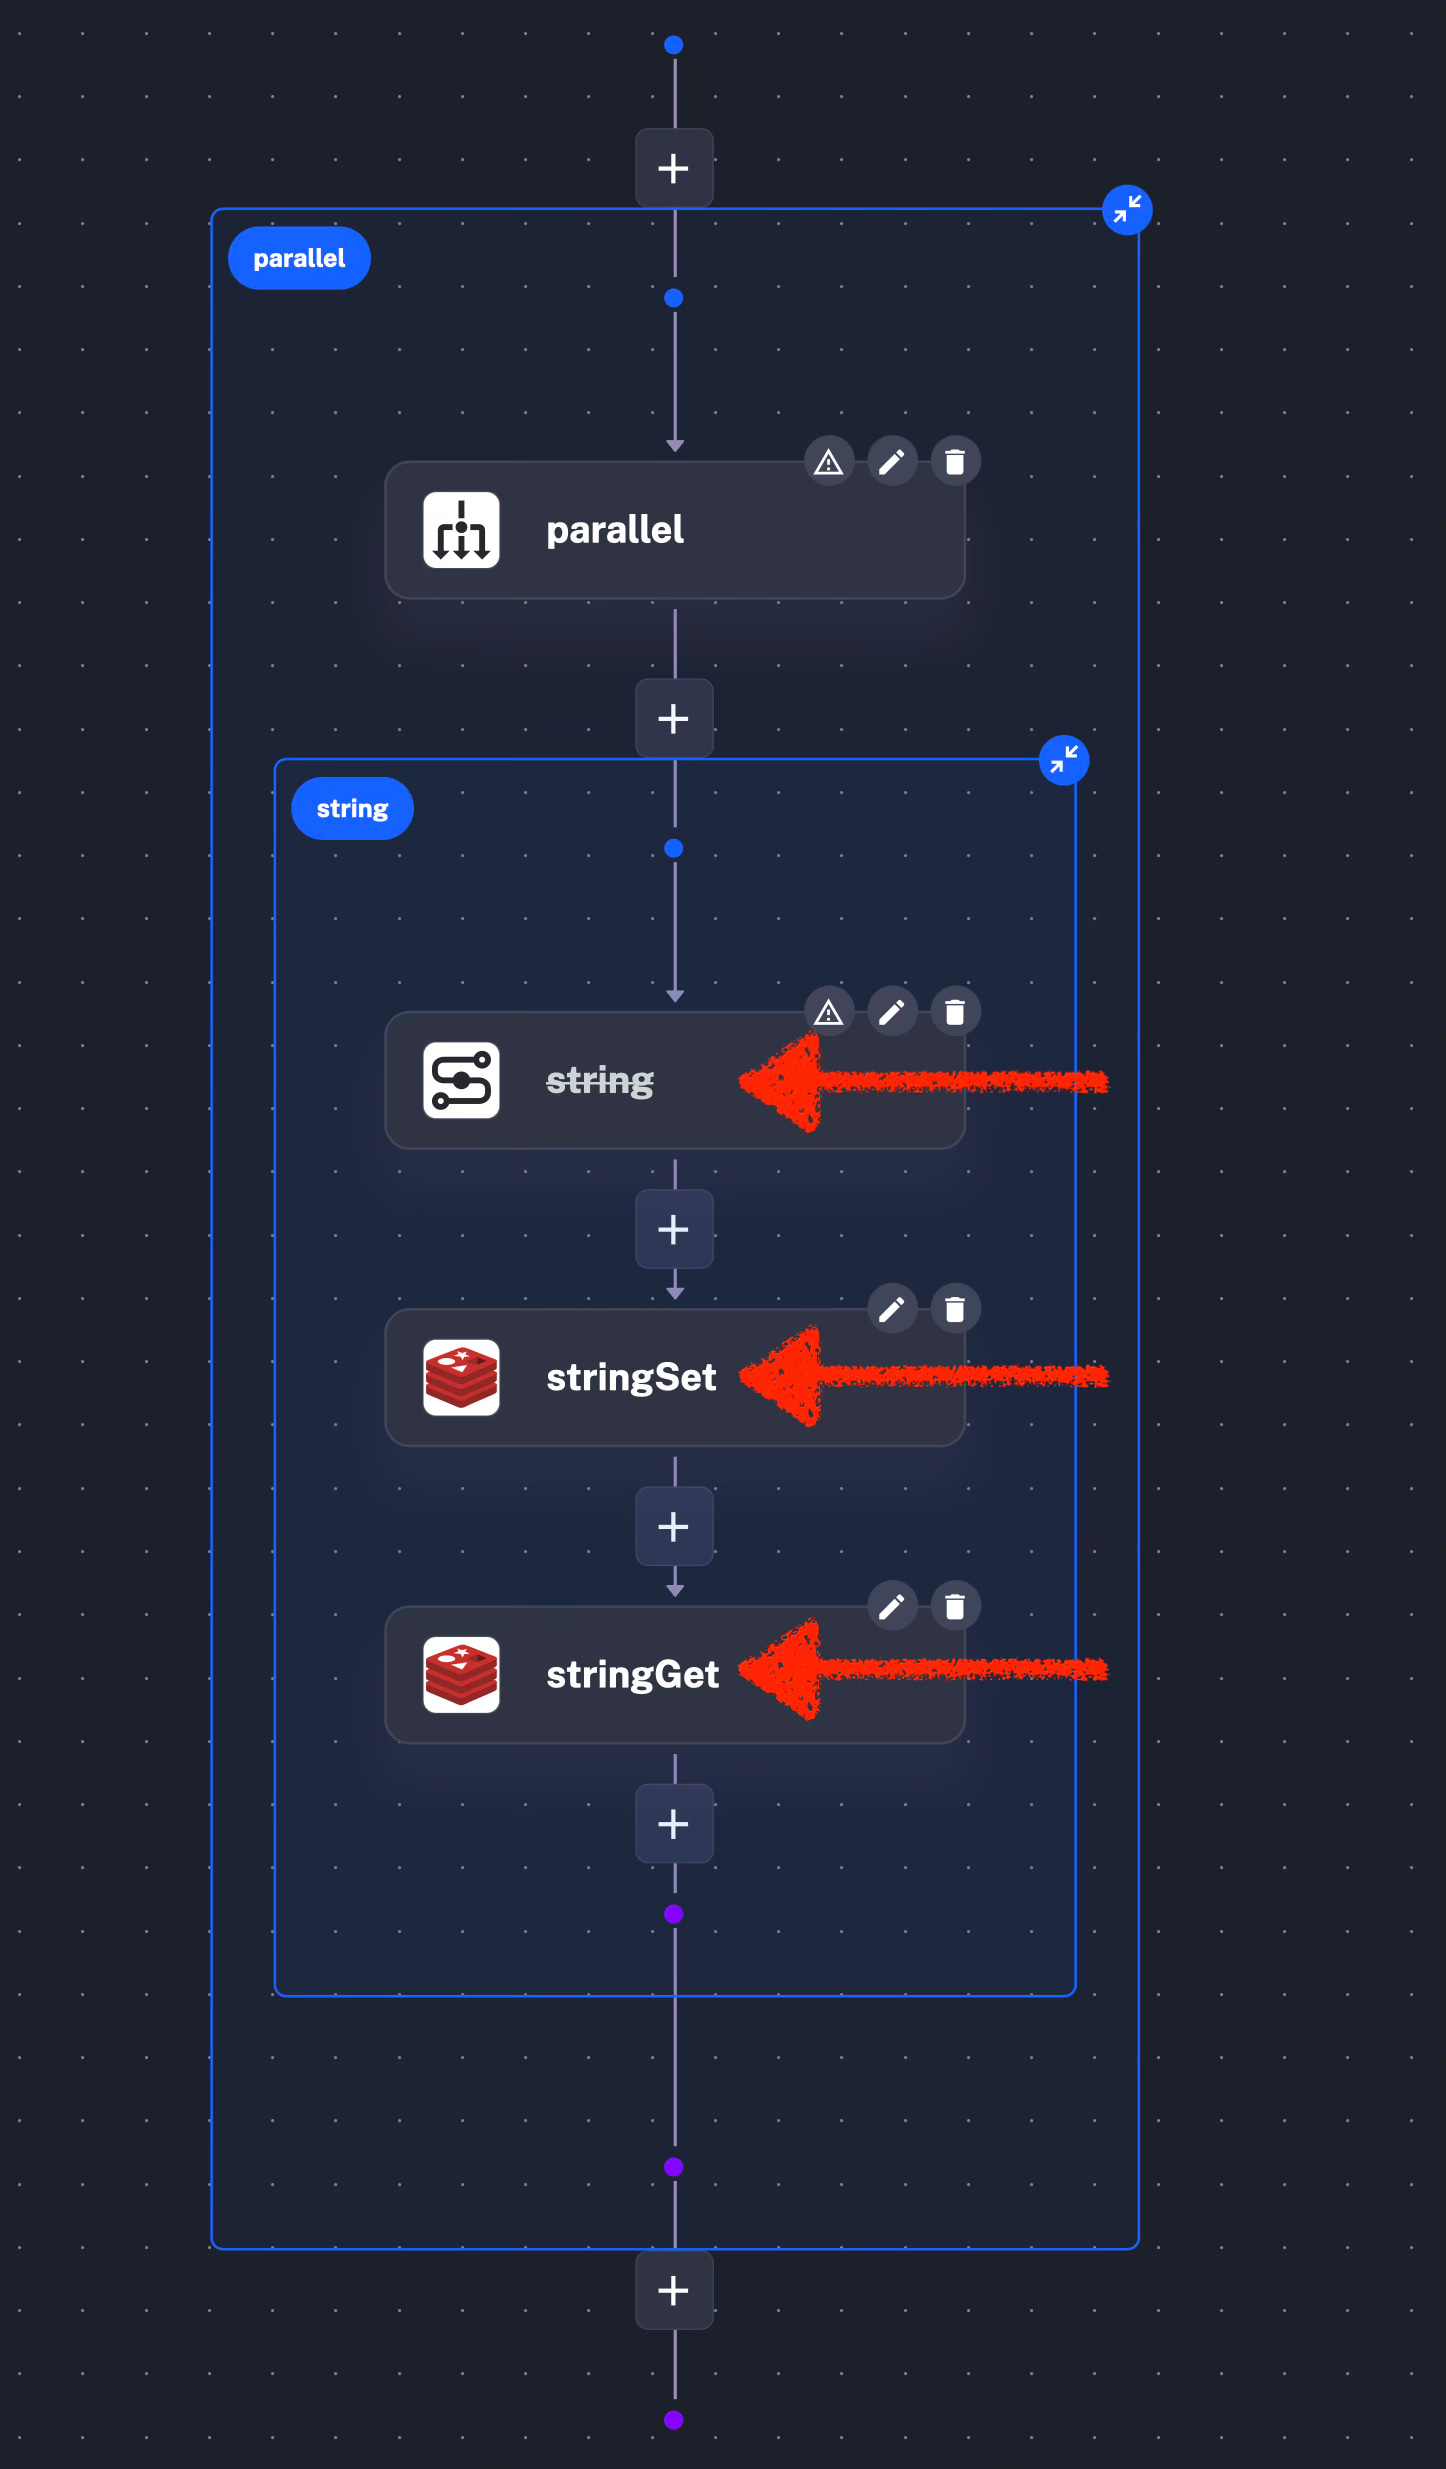
Here is the diagram section zoomed in:
Fix the bug and test locally
I made the following changes to the “ui-libs” repo. This is the git diff:
diff --git a/src/components/nodes/BasicNode.vue b/src/components/nodes/BasicNode.vue
index 48435df..d0a5263 100644
--- a/src/components/nodes/BasicNode.vue
+++ b/src/components/nodes/BasicNode.vue
@@ -183,7 +183,7 @@
                 return {
                     "unused-path": this.data.unused,
                     [`border-${this.borderColor}`]: this.borderColor,
-                    "disabled": this.data.node.task?.disabled,
+                    "disabled": this.data.node.task?.disabled || this.data.parent?.taskNode?.task?.disabled,
                     [this.$attrs.class]: true
                 }
             },
diff --git a/src/utils/VueFlowUtils.ts b/src/utils/VueFlowUtils.ts
index 9d90b7e..afd5536 100644
--- a/src/utils/VueFlowUtils.ts
+++ b/src/utils/VueFlowUtils.ts
@@ -587,6 +587,7 @@ export default {
           draggable: nodeType === "task" ? !isReadOnlyTask : false,
           data: {
             node: node,
+            parent: clusterByNodeUid[node.uid] ? clusterByNodeUid[node.uid] : undefined,
             namespace:
               clusterByNodeUid[node.uid]?.taskNode?.task?.namespace ??
               namespace,
Before making any changes in your fork make sure to create a branch, you can do this in a single git command:
git checkout -b name-of-branchI usually name my branch related to what I am doing, for example “issue-123”.
You do not want to make changes to the default branch, this may work first time but it will cause conflicts with yourself in the future.
Your changes only enter the default branch after they have been merged in by the maintainers on the original (upstream) repo.
More on this later on, keep reading…
If you are following along, you can apply these changes manually to this commit https://github.com/kestra-io/ui-libs/commit/7bb08eef9cec1140174c5379afca3855b8aa772a (but it will not work for the latest changes in the repo). Apply it by saving the code above to a local file, for example “fix-561.patch” and use the git command:
git apply fix-561.patchRun both project commands again and let’s see the result.
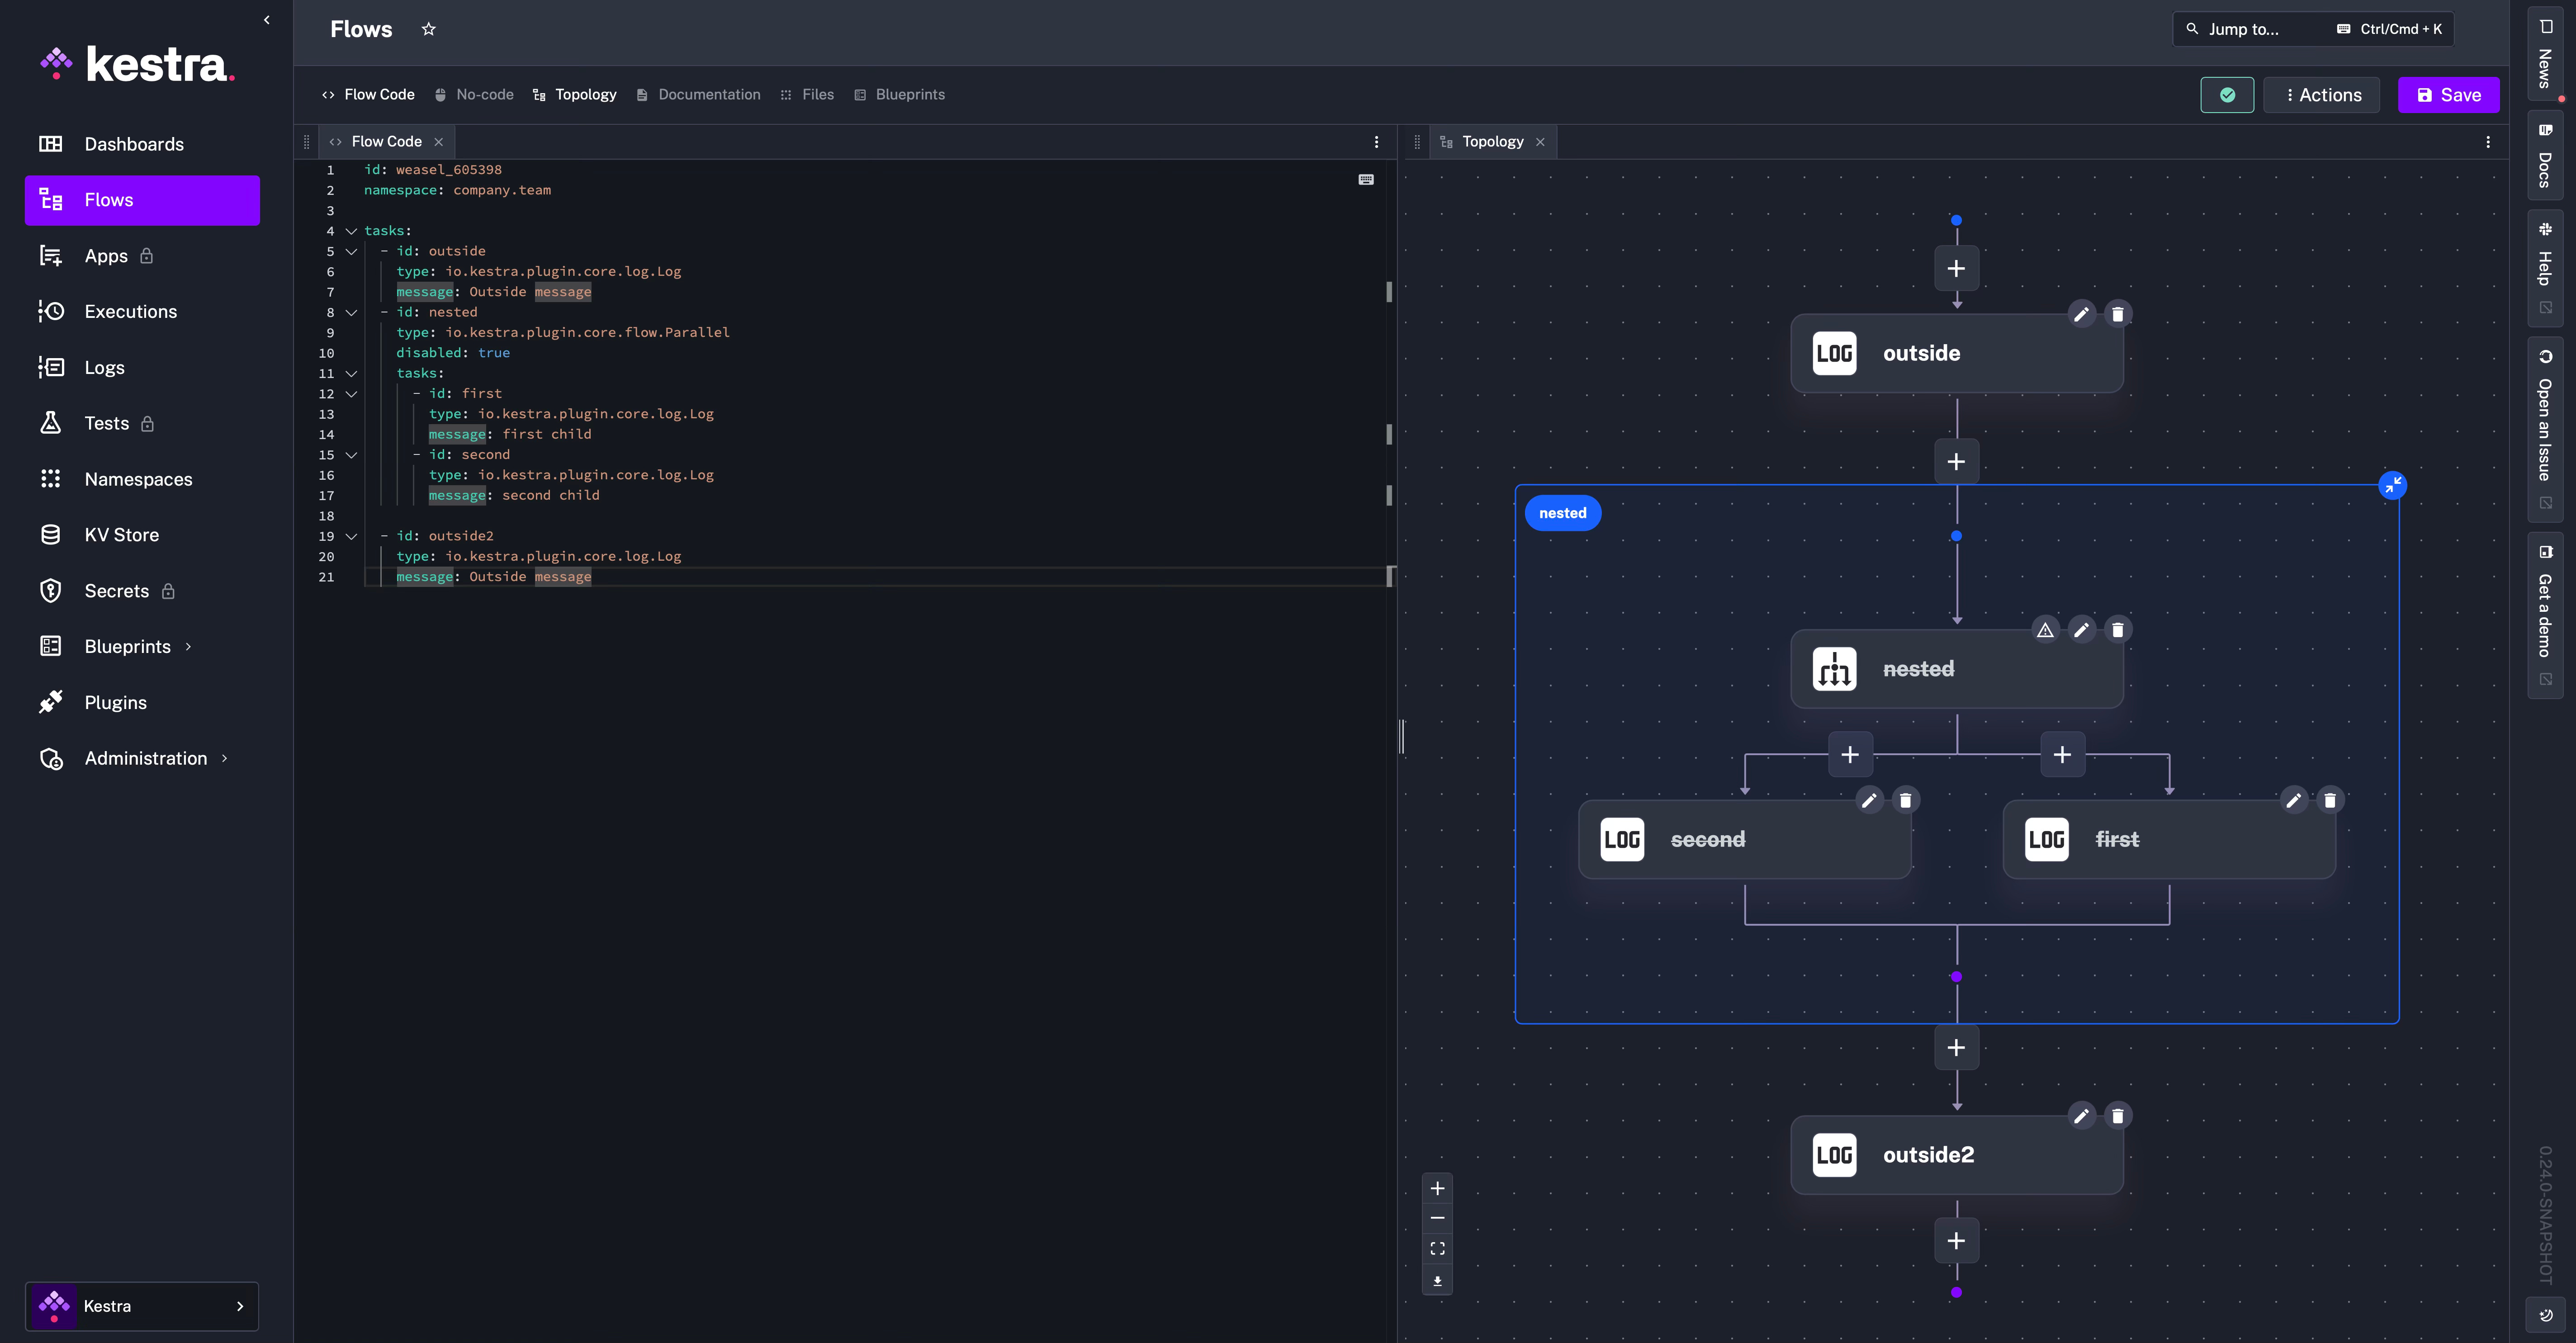
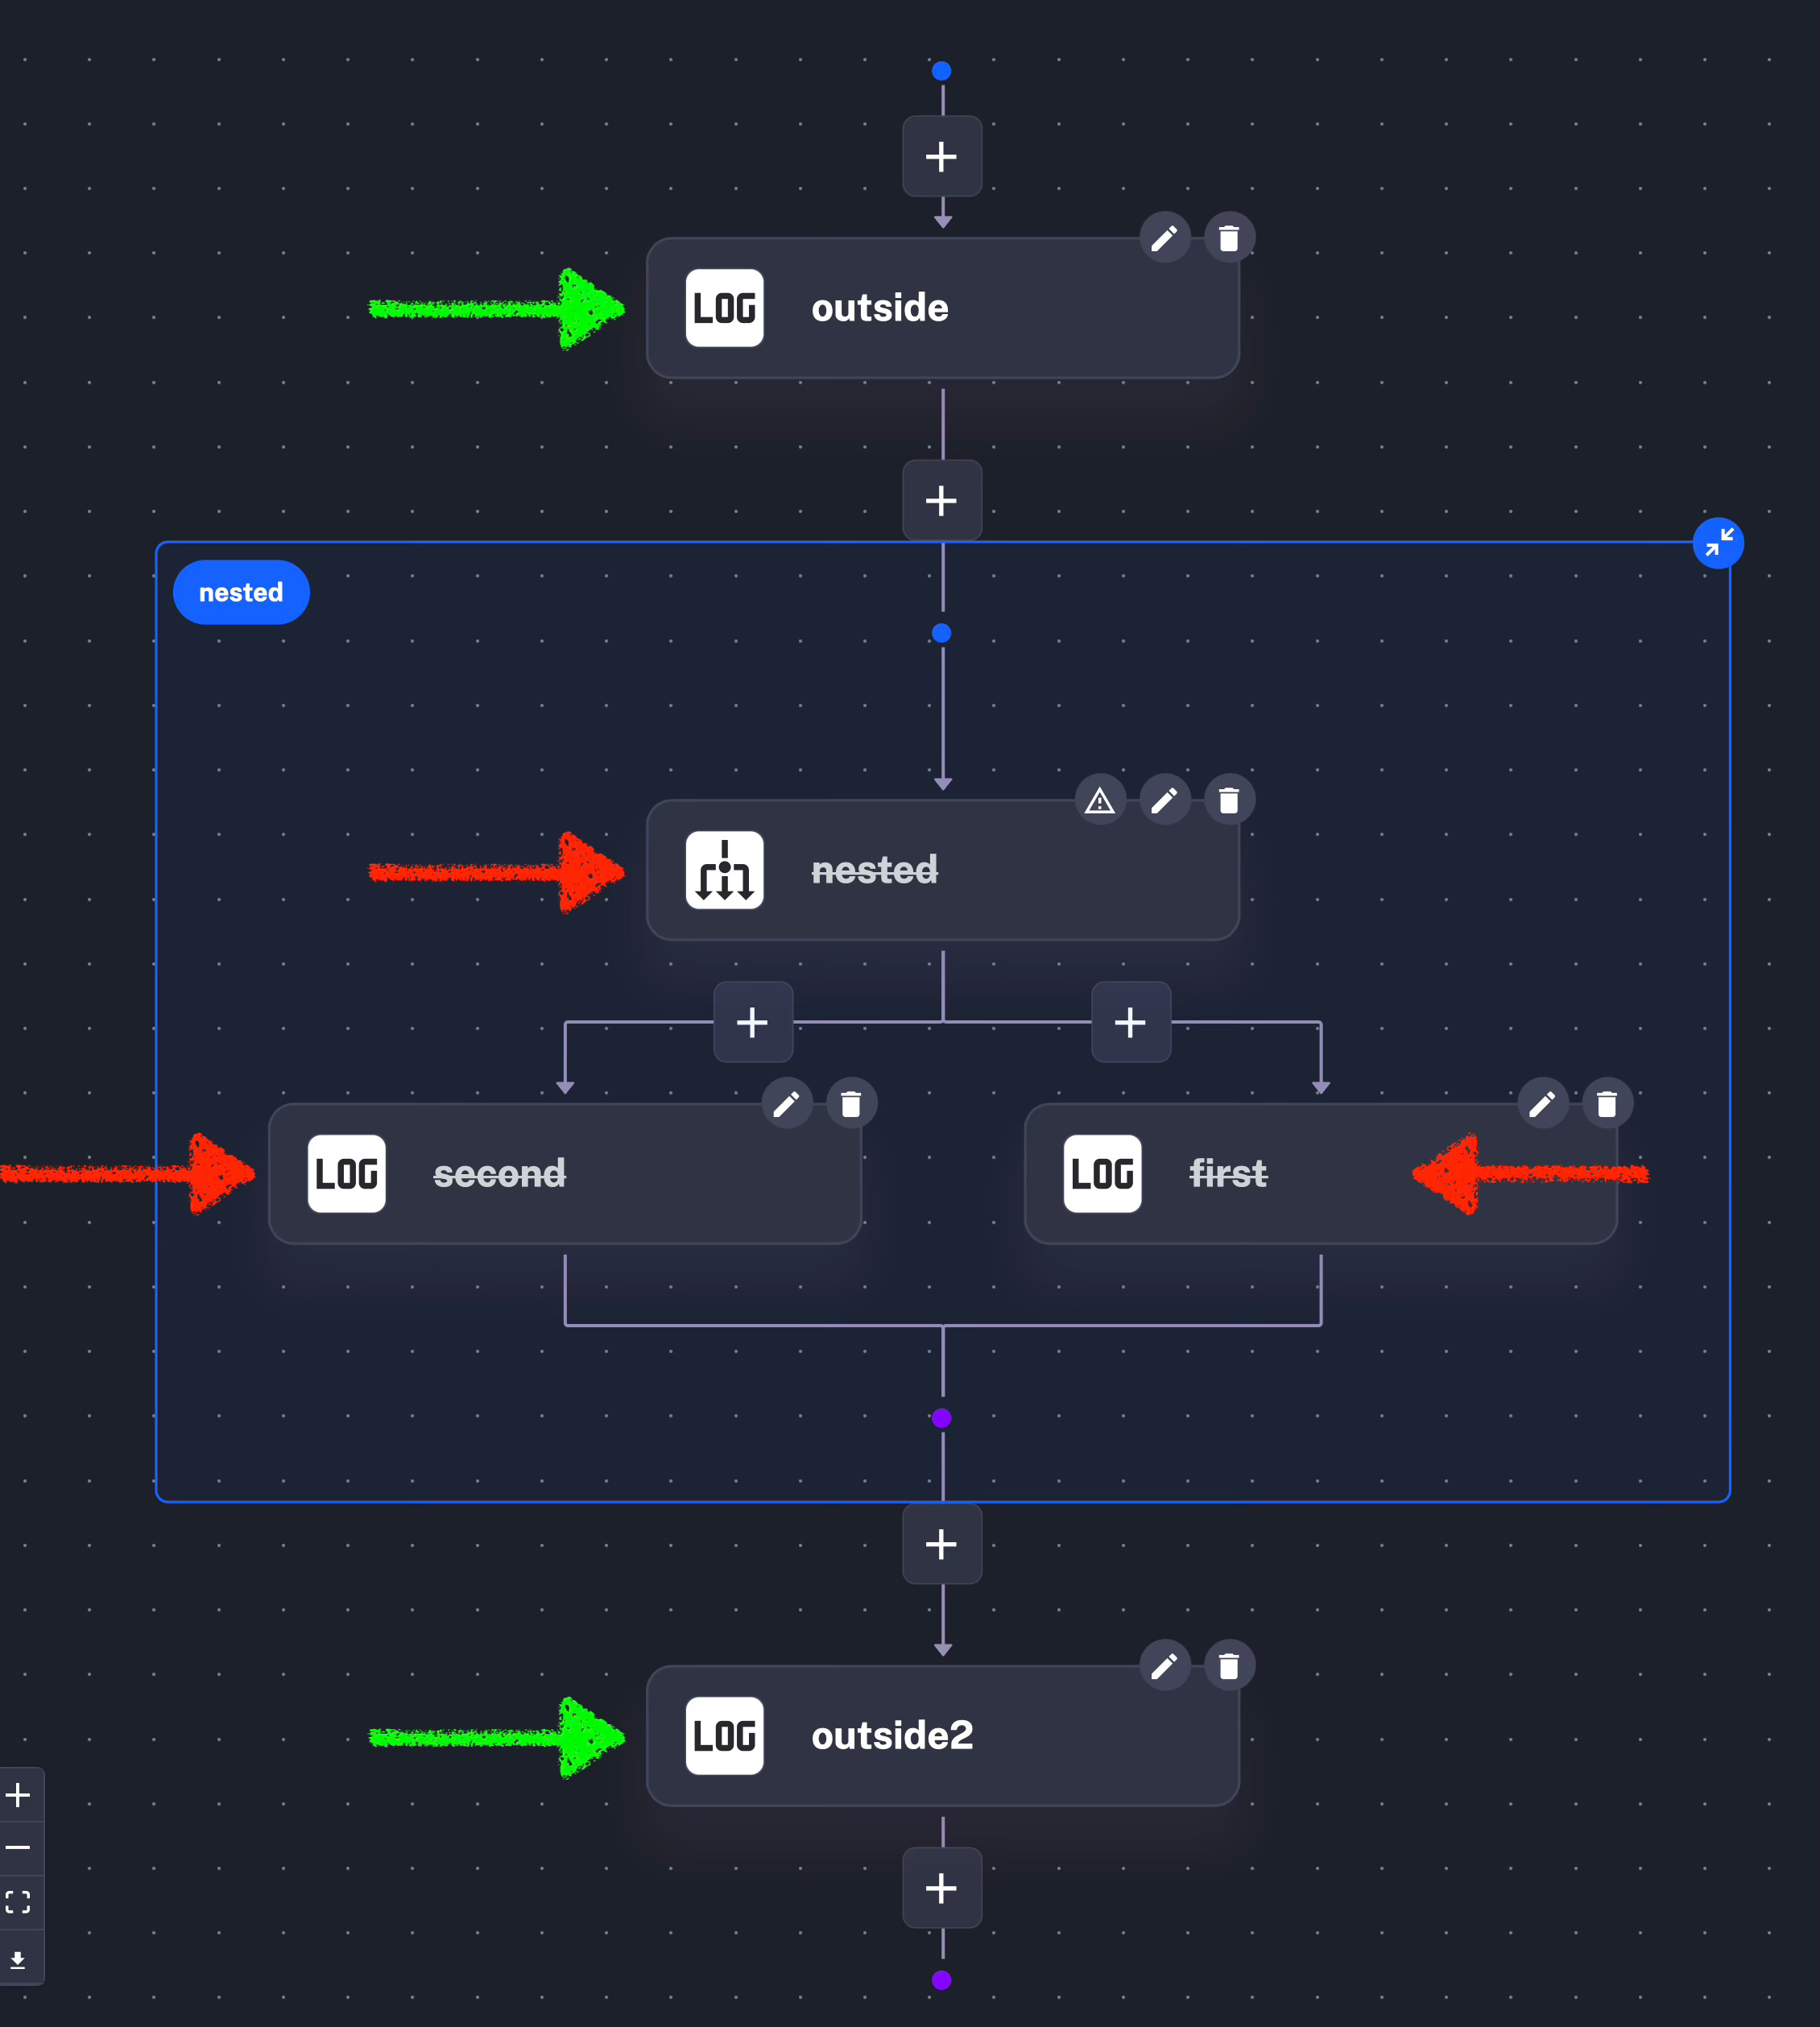
Here is the diagram section zoomed in and I have highlighted the children nodes in red that should be disabled and green for the nodes that should remain enabled:
Creating the GitHub Pull Request
Now I have made my changes and they are tested locally, I can submit a Pull Request to be reviewed by the repo maintainers.
If you need feedback sooner, you can submit a draft Pull Request, this allows you to start the conversation with the maintainers and the project’s community members early.
When creating a Pull Request, the title and description are just as important as the changes you are suggestion. This means the title needs to be clear and concise, plus the description needs to have all the relevant information for anyone to follow why you made the changes.
I also include in the PR a before and after screenshot of the result. I don’t need to include the changes as these are visible on the other tab already. You should also include how to test the changes.
Markdown helps improve the layout of the Pull Request description. No one likes to see a wall of text, so making use of lists and tables for example, will really help keep the reader engaged.
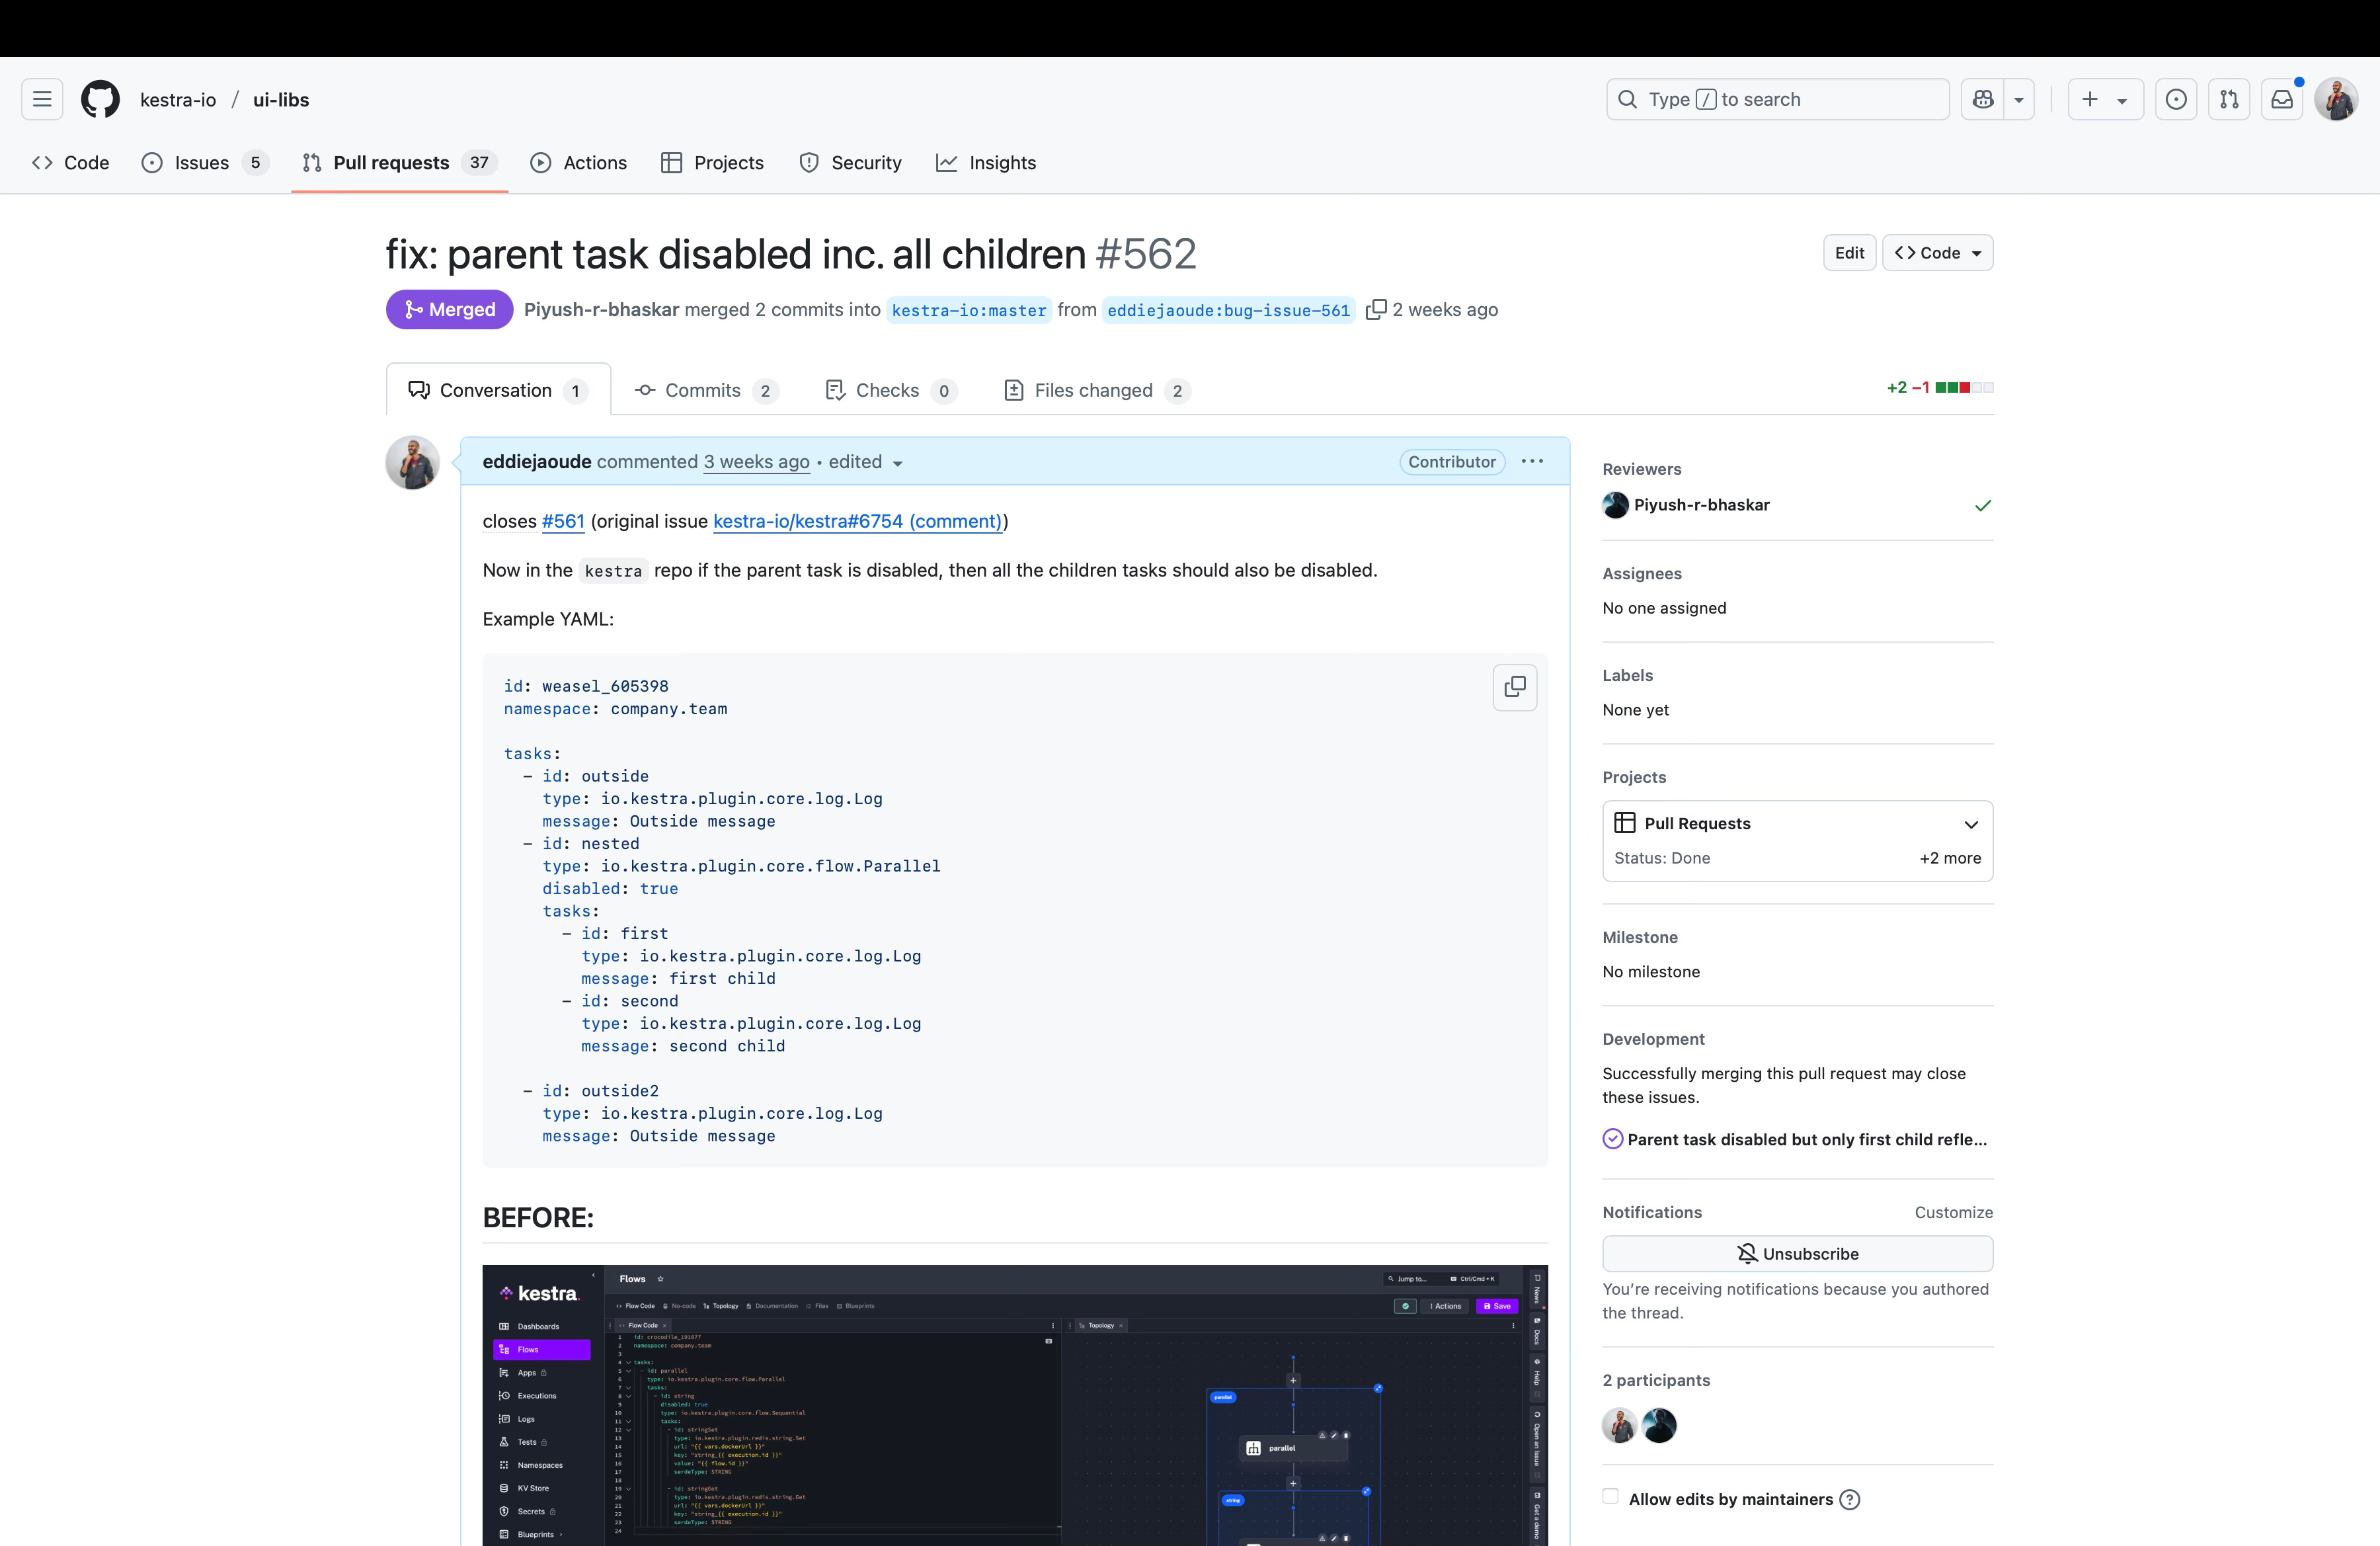
View the GitHub Kestra Pull Request here https://github.com/kestra-io/ui-libs/pull/562
Make sure when you create the pull request, it is “across forks”. You do not want to make a Pull Request on your forked repo, it needs to be on the original (upstream) repo.
Post-Pull Request
Keep an eye on your GitHub notifications, this might be emails if you set it up this way or the way I recommend is using the GitHub inbox for notifications.
Be patient, the team on the projects have their own work to do as well as review GitHub issues and pull requests. Do not chase across platforms 5 minutes after raising a GitHub issue or pull request. If after 1 week you haven’t heard anything, maybe send a polite message in their Slack or Discord, but don’t DM people.
Do not merge your changes in your repo
You are probably thinking, “My changes are in a branch in my repo, how do I get them in the default branch?” Your default branch should be identical to the original (upstream) repo. So your changes will be in the default branch after your Pull Request is merged by the maintainers on the original (upstream) repo. Then there is one more step you need to do to keep your default branch in your fork in sync with the original (upstream) repo.
Add upstream remote to your local git
Your local git repo will have a git remote for “origin” which will be the url of your forked repo. Remotes can have any name you wish and you can have as many git remotes as you want. However, when adding the original (upstream) repo, it is recommended to use the name “upstream” and I highly recommend using the standard naming conventions.
To add a remote, you can check what you already have with the following command:
git remote -v

origin	git@github.com:eddiejaoude/kestra-ui-libs.git (fetch)
origin	git@github.com:eddiejaoude/kestra-ui-libs.git (push)
Now we can add the “upstream” git remote with the command (yours will be identical to this including the url because it is the original repo location):
git remote add upstream git@github.com:kestra-io/ui-libs.gitNow when you list all the remotes you will see the following:
git remote -v

origin	git@github.com:eddiejaoude/kestra-ui-libs.git (fetch)
origin	git@github.com:eddiejaoude/kestra-ui-libs.git (push)
upstream	git@github.com:kestra-io/ui-libs.git (fetch)
upstream	git@github.com:kestra-io/ui-libs.git (push)
Note: your “origin” will be your fork not mine.
The last step is to fetch the changes in the default branch in the upstream repo and then merge it into your default branch of your local git. You can then push this to your fork. This is how your changes and others will end up in your default branch in your forked repo. As this should mirror the upstream repo and you never make changes to it directly, you should never have conflicts in this branch. If you do, then something has gone wrong and you could delete your default branch and fetch it again.
Fetching and merging the upstream
Make sure you change back to the default branch with:
# git checkout <branch-name>
git checkout master
git fetch upstream
git merge upstream/master

# push these commits to your fork on GitHub
git push origin master
Now if you do a git log, the commit history will match the upstream repo.
What next?
Don’t stop there, now you have the project set up locally and have a better understanding of the project, keep going!
Contributing is not just about Pull Requests, it is also about review other Pull Requests and issues. However don’t blindly approve Pull Requests as this is the fastest way to get banned from a project!
Remember it is about adding value not noise. Each time you do something (even if it is leaving a comment) many people get notified. So avoid leaving multiple comments with a single line in each - this is not a DM! (in fact, I wouldn’t even recommend you do this for DMs…)
Conclusion
I hope this post has inspired you to contribute to Open Source.
Most projects in tech involve multiple people, so in addition to improving our tech skills we need to also continually improve our communication skills. Both take practice.
So what are you waiting for? Go and get involved and contribute to Open Source.
Watch the full YouTube video here:
Excellent. Once I am finished my project I’m gonna spend some time contributing to open source and following these guidelines . Cheers Eddie . From Silky aka Paul